A Short Review Concerning the Basic Mechanisms of Surface Modifications due to Machining Operations
Brigitte Clausen*, Rebecca Strunk and Hans-Werner Zoch
Stiftung Institut fur Werkstofftechnik, University of Bremen, Germany
*Corresponding author
Brigitte Clausen, Stiftung Institut fur Werkstofftechnik, Badgasteiner Str. 3, 28359 Bremen, Germany, E-mail: clausen@iwt-bremen.de
Int J Metall Met Phys, IJMMP-2-004, (Volume 2, Issue 1), Research Article
Received: May 04, 2016
Accepted: March 07, 2017
Published: March 09, 2017
Citation: Clausen B, Strunk R, Hans-Werner Z (2017) A Short Review Concerning the Basic Mechanisms of Surface Modifications due to Machining Operations. Int J Metall Met Phys 2:004.
Copyright: © 2017 Clausen B, et al. This is an open-access article distributed under the terms of the Creative Commons Attribution License, which permits unrestricted use, distribution, and reproduction in any medium, provided the original author and source are credited.
Abstract
Machining processes always affect the surface of the machined components, whether this happens on purpose or not. The modification can have positive or negative influences on the functional performance and are usually denoted as Surface Integrity. For instance, residual stresses are known to occur in subsurface layers due to machining operations and may affect the life time of machined parts. But in addition to residual stresses there are also other types of modification that can affect the properties of the manufactured part or the local material reaction to the process in further manufacturing steps. The vision of the collaborative work, described here, is to draw a scientific material based correlation between process-induced internal material loads and the resulting material modifications. Knowing these correlations would allow a mechanism-based and thus process-independent understanding of material modifications by manufacturing operations. Key to implement this approach is the knowledge of identified loads, internal mechanisms, and modifications within the surface layers. This paper focuses on the approach to identify mechanisms of surface modifications due to processing steel materials. This work is part of the collaborative research center "Process Signatures", collaboration between Bremen University and technical University Aachen, Germany.
Keywords
Surface modification, Machined surfaces, Residual stresses
Introduction
Changes in the materials behavior due to machining operations occur due to the interactions between thermal and mechanical loads. The degree of the changes is dependent on the intensity of the influencing parameters but also on the chronological interaction of material loads on the current local microstructure [1-3]. Examples of interaction of thermal and mechanical loads have been discussed in various publications, mostly to understand the mechanisms of distortion [3-10]. However, the investigated temperature and load gradients in heat treatment of steel are merely small compared to machining operations. The influence of higher temperature gradients has been investigated and published for pure thermal loads due to the occurring heating and cooling operations associated with laser and induction heat treatments [11-13].
The idea of developing a more general and process-independent understanding of the correlations between the material loads during a manufacturing process and the resulting material modification by means of Process Signatures was first presented in 2011 [14]. Process Signatures can be described as a collection of specific loads during a process correlated with the changes of material properties (material modification) at different scale levels (the atomic scale, the microstructure scale and the polycrystalline scale) [15].
The collaborative research center on Process Signatures is divided in 15 scientific subprojects, investigating different kinds of material loads and resulting material modifications on the aforementioned scale levels. In the M domain four subprojects focus on the analyses of material modification mechanisms and on modeling and simulation on the different scales, aiming to provide a scientifically based framework for setting up Process Signatures. The objective of the seven subprojects in the F domain is to set up Process Signatures for different manufacturing processes with thermal loads (e.g. electric discharge machining), mechanical loads (e.g. deep rolling), chemical loads (e.g. electro chemical machining) and combinations of these such as conventional grinding and hard turning which are characterized by thermo-mechanical loads. New methods to measure the occurring internal material loads during manufacturing processes are developed in the C domain (four subprojects) of the collaborative research center. Moreover, high resolution measurement techniques such as SEM, TEM and X-ray diffractometry are utilized in the subprojects of the C domain for an experimental characterization of the work piece material modifications. The long-term objective of the collaborative research center is to establish Process Signatures as a new strategy to achieve a knowledge-based solution of the inverse surface integrity problem. Once the correlations between the loading state during the process and the resulting material modifications are established and the loading states themselves are correlated to the machining parameters of the considered manufacturing process, it shall be possible to generate surface integrity states in a knowledge-based way rather than by trial and error. Moreover, it would be possible to already decide in the design phase of the product whether certain processes and/or process chains are appropriate to meet the surface integrity demands. It would even be possible to substitute manufacturing processes by others if the corresponding Process Signatures agree partially regarding the demanded surface integrity of the final part.
It is of crucial importance to identify and quantitatively describe the basic mechanisms leading to the material modification if scientifically based Process Signatures are sought. As a first step the present work proposes an approach to separately analyze the influences of individual thermal and mechanical loading states of the material during a specific machining process. Moreover, the results of a systematic compilation of the most important material modification mechanisms in machining processes are shown.
Approach
To understand the mechanisms of surface modifications due to machining operations, initially each machining operation has been analyzed regarding the individual thermal and mechanical loads affecting the surface layers. For different kinds of loads possible mechanisms and the resulting modifications have been compiled. Further, the possible analyzing methods to measure the modifications on the particular dimensional scales were assorted.
In figure 1, the assumed interactions in the relatively simple example of an induction heat treatment is sketched schematically.
The electrical energy (as a function of time) is interacting with the steel surface. Due to the induced eddy currents a time dependent temperature field is created. The local and temporal temperature gradients are causing changes of the local stress and strain tensors due to locally differing temperature induced strains. The temperatures as well as local stresses and strains affect the microstructure, the dislocation structure, the hardness, and other structural properties. The changes of microstructure can partially be predicted by time-temperature-austenitizing-(TTA) and time-temperature-transformation-(TTT)-diagrams [12]. If the temperatures remain below austenitizing temperature, annealing effects dominate [11,13,16]. Also, the temperature has an effect on the dislocation structure and the inclusion density. Especially in interaction with critical plastic deformations, recrystallization effects are to be anticipated. If stresses exceed the yield strength (as a function of temperature) plastic deformations will occur. Local deformations at elevated temperatures will cause residual stresses at room temperature. Due to these multidimensional interactions a correct prediction is hard to make without a simulative approach. In the collaborative research center a phase field modeling is planned to describe the micro structural changes due to stress, strain and temperature on a microscopic scale [16]. The approaches will be optimized and verified with the input of experimentally determined modifications.
As the most significant material loads in all investigated manufacturing processes primary stresses, shear stresses, strains, hydrostatic stresses and pressures, temperatures, and their temporal and local gradients were identified. As an example for the analytical approach the mechanisms related to the material load "shear stress" are compiled in the second column in table 1. In the last column of table 1 the modifications in the surface layer assigned to the named mechanism are listed.
Table 1. Mechanisms assigned to shear stress and the modification expected in steel.
First of all shear stresses (as all stresses) cause an elastic strain of the lattice (Figure 2). There is no direct modification awaited due to this elastic strain, but there are interactions with other mechanisms which provoke modifications. An elastic strain of the lattice supports transformation processes, the diffusion of alloy elements, and reduces the critical nucleation radius of inclusions. Therewith it affects the phase portions, the element distribution, the vacancy density and the inclusion density.
If the shear stress is high enough to cause the movement of dislocations (Figure 3) plastic deformation occurs. The intrinsic energy of the lattice is rising. In interaction with temperatures exceeding 40% of the melting temperature (measured in Kelvin) critical deformation ratios may cause recrystallization effects. Since these are time depended, short temperature impacts may have no significant effect. Still, the lattice is not in a stable condition and the time-temperature-deformation interactions will have to be investigated closer.
The movement of dislocations (Figure 4) and the formation of new dislocations (Figure 5) due to shear stresses are strengthening the metal due to the four strengthening mechanisms:
• The interaction of dislocations with interstitial and substitutional atoms cause an increase of the yield strength before plastic deformation occurs. Due to diffusion processes at elevated temperatures alloy atoms move to the most distorted regions in the dislocation cores and reduce the distortion energy. A higher strength is needed to ensure a movement of the dislocations. The increase in shear strength can be formulated with the concentration of atoms cA in solid solution (Figure 4, top left). The exponent n varies between 0.5 and 1 in technical alloys.
• The interaction of dislocation with an increasing number of other dislocations is called work hardening. Moving dislocations on different slip planes get entangled with each other and hinder each others movement. The effect can easily be seen in the increasing slope in stress-strain-diagrams. An increase in the dislocation density ρD can be measured by X-ray diffraction or with image analyses of TEM micrographs. The strength increases with the square root of the dislocation density ρD (Figure 4, top right)
• The interaction of dislocations with grain boundaries is mathematically described with the Hall-Petch-effect (Figure 4, bottom left). Dislocation movement stops at grain boundaries since their slip planes end at the boundary. Dislocations therefore pile up on their slip planes at grain boundaries. This is causing locally increasing stresses. However, the locally increased stress may cause dislocations on less optimal located slip planes to move with further increased nominal stress. The grain size can be determined by image analysis of micrographs. The strength increase is described with the reciprocal square root of the grain diameter dG.
• The interaction of moving dislocations with inclusions is depended on the inclusions structure (Figure 4, bottom right). Small coherent inclusions may be cut by dislocations (Kelly-Fine mechanism). Their appearance causes an increase of the stress dependent to the size and number of inclusions. If the size increases an inclusion dependent level the stress to circle the inclusion is lower than to cut it. Non coherent inclusions or dispersions are circled by dislocations (Orowan mechanism). The effect can be measured by an increase (decrease) in hardness.
In cubic face centered lattices (as austenite) plastic deformation often is accomplished by twin formation (Figure 6). The effect can be judged by measuring the twin density.
All these mechanisms result in an increased intrinsic energy in the lattice. A method to quantify the local intrinsic energy has not been developed so far. Indirectly it can be assessed by the stability of the microstructure at elevated temperatures.
Summary and Conclusions
Machining processes are always influencing the surface condition of the machined material. The aim of our work is to understand the influencing factors and their interaction in a way that will allow solving the inverse surface integrity problem in the future. The surface modifications due to machining processes are to be used to optimize the components life time and functional performance. The intelligent combination of different machining operations in an optimized order can achieve this goal.
It will be our task to gain extensive knowledge about the occurring material loads, the mechanism and surface layer modifications. This paper aimed to visualize one branch of a tree of knowledge, where every sprig has to be examined closely. However, the picture of the tree does not suffice for all the expected interactions between the twigs. The stepwise investigation of single interrelationships will support development of the mathematical formulation of the dependencies between the material loads, the mechanisms, the modifications, and their interactions with each other for every machining operation.
Acknowledgements
The authors would like to thank all the project of the collaborative research center "process signature" working together in the working group "mechanisms and materials modification" and support our sub-project with experimental results to substantiate our findings.
Further the authors gratefully acknowledge the financial support of the research work by the German Research Foundation (DFG) within the transregional Collaborative Research Center SFB/TRR 136 "Process Signatures", sub project M02.
Figures
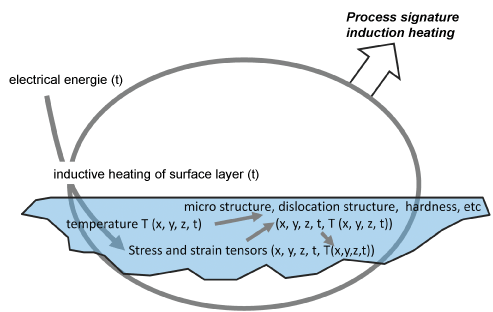
Figure 1: Mechanisms of material modification in induction heat treatment.
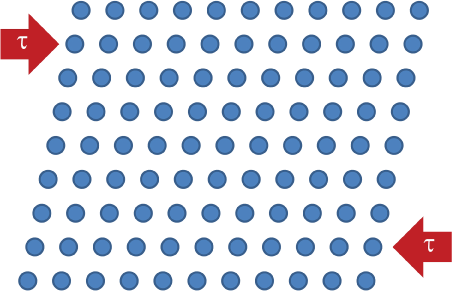
Figure 2: Schematic representation showing the effect of elastic strain.
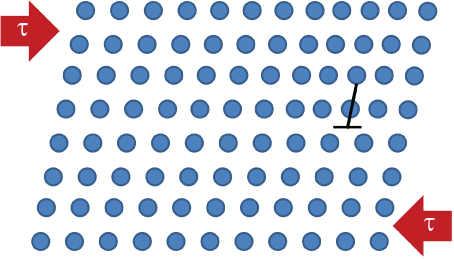
Figure 3: Schematic representation showing the movement of dislocations.
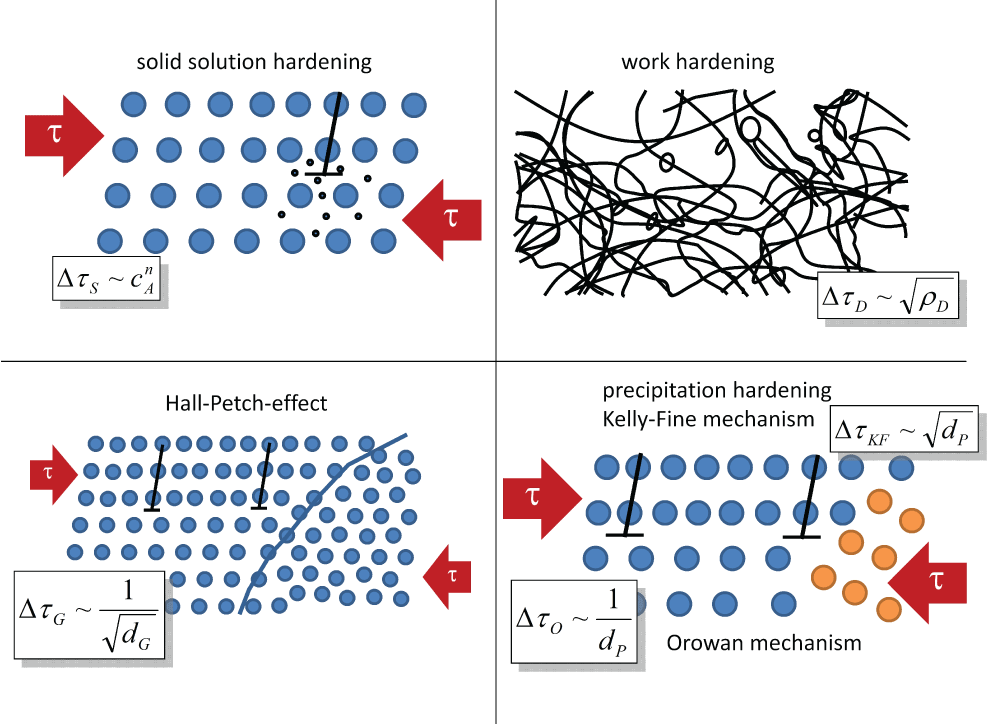
Figure 4: Strengthening mechanisms ascribed to dislocations.
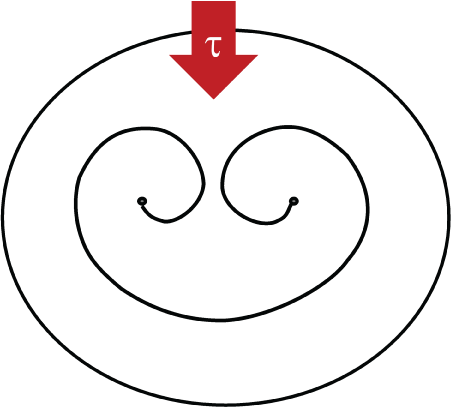
Figure 5: Schematic representation showing the formation of new dislocations.
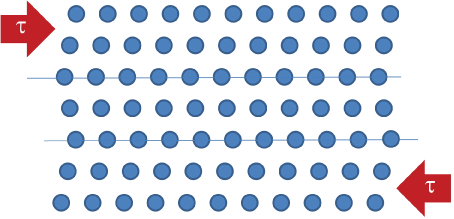
Figure 6: Schematic representation showing the effect of twin formation.
References
-
Field M, Kahles JF (1971) Review of Surface Integrity of Machined Components. Annals of the CIRP 20: 153-163.
-
Jawahir IS, Brinksmeier E, Saoubi RM, Aspinwall AK, Outeiro JC, et al. (2011) Surface integrity in material removal processes: Recent advances. Annals of the CIRP 60: 603-626.
-
Hoffmann F (1987) Mikrostruktur und Schwingfestigkeit von Ck45 nach kombinierter mechanischer und thermochemischer Rands chichtverfestigung.
-
Epp J, Surm H, Kovac J, Hirsch T, Hoffmann F (2011) Interdependence of Distortion and Residual Stress Relaxation of Cold-Rolled Bearing Rings During Heating. Metallurgical and Materials Transactions A 42: 1205-1214.
-
Lippmann S, Weise A, Thieme U (1995) Eigenspannungen nach thermomechanischer Behandlung des Stahles 42CrMo4. Harterei-Technische Mitteilungen 50: 20-26.
-
Macherauch E, Vohringer O (1986) Verformungsverhalten geharteter Stahle. Harterei-Technische Mitteilungen 41: 71-91.
-
Nadolski D, Schulz A, Hoffmann F, Zoch HW, Hanisch S, et al. (2012) Effect of heat treatment and material on the distortion of lateral extruded tripods. HTM Journal of Heat Treatment and Materials 67: 357-365.
-
Pintat T (1991) Scherverhalten unlegierter Stahle bei hohen Verformungsgeschwindigkeiten. Dissertation Universitat Bremen.
-
Steinbacher M, Surm H, Clausen B, Lubben Th, Hoffmann F (2012) Methodical investigation of distortion biasing parameters during case hardening of spur wheels. Materialwissenschaft und Werkstofftechnik 43: 91-98.
-
Surm H, Hermann M, Sattelberger K, Kuper A, Hoffmann F (2010) Identification of distortion controlling factors and interactions during manufacturing of case hardened crown wheels. HTM Journal of Heat Treatment and Materials 65: 85-95.
-
Madler K Grosch J (2001) Einfluss des induktiven Anlassens auf die Biegefestigkeit randschichtgeharteter Gefuge. HTM - Harterei-Technische Mitteilungen 56: 332-340.
-
Orlich J, Rose A, Wiest P (1973) Atlas zur Warmebehandlung der Stahle. MPI fur Eisenforschung und Werkstoffausschuss des VDEh, Stahleisen mbH, Dusseldorf, Germany, 120.
-
Schmidt HD (1978) Untersuchung der Anlassvorgange bei induktiver Schnellerwarmung anhand zweier Werkzeugstahle. TU Berlin.
-
Brinksmeier E, Glabe R, Klocke F, Lucca DA (2011) Process Signatures - an Alternative Approach to Predicting Functional Workpiece Properties. Procedia Engineering 19: 44-52.
-
Brinksmeier E, Klocke F, Lucca DA, Solter J, Meyer D (2014) Process Signatures - a New Approach to Solve the Inverse Surface Integrity Problem in Machining Processes. Procedia CIRP 13: 429-434.
-
Bottger A, Mittemeijer EJ (1993) Anfangsstadien des Anlassens von Fe-C-und Fe-N-Martensit: Umverteilung der Zwischengitteratome wahrend der Alterung. Harterei-Technische Mitteilungen 48: 209-217.
