
aDepartment of Electrical and Electronics Engineering, Federal University of Petroleum Resources, Nigeria
bDepartment of Mechanical Engineering, Federal University of Petroleum Resources, Nigeria
cDepartment of Marine Engineering, Federal University of Petroleum Resources, Nigeria
*Corresponding author
O’tega A Ejofodomi, Department of Electrical and Electronics Engineering, Federal University of Petroleum Resources (FUPRE), P.M.B. 1221, Effurun, Nigeria, E- mail: [email protected]
Int J Robot Eng, IJRE-1-001, (Volume 1, Issue 1), Research Article
Received: August 27, 2015
Accepted: December 02, 2015
Published: December 04, 2015
Citation: Godwin I, Ene DO, Udo I, Awe PE, Barthelomew E, et al. (2015) Pipeline Inspection for Corrosion using a Mobile Robotic System. Int J Robot Eng 1:001
Copyright: © 2015 Godwin I, et al. This is an open-access article distributed under the terms of the Creative Commons Attribution License, which permits unrestricted use, distribution, and reproduction in any medium, provided the original author and source are credited.
Abstract
Pipelines are constructed to transport all kinds of fluids. Accidents have occurred from toxic fluid leaks owing to the cracks and corrosion of pipelines, wreaking havoc on plants, animals and humans. One very effective way of doing this is to perform regular inspection of pipelines. This paper presents the design, development and testing of a pipeline inspection robot. The robot was built using an autonomous mobile robot, ultrasound sensors and a buzzer. The robot is initially placed at the entrance of the pipe before it is switched on. Once powered, the robot begins to advance forward. The distance between the robot and the bottom of the pipe d1, is measured as well as the distance between the robot and the top of the pipe d2. The measured values were used to determine the presence of deposits and corrosion within the pipe. The Inspection robot was tested on a pipeline model constructed from 1.5 m sheet of aluminum and successfully demonstrated the ability to detect deposits and corrosion. Future improvements to the inspection robot include the addition of a camera for visual inspection, integration of wireless capability for easy viewing of acquired data and images, and using a more rugged robot for indoor and outdoor operation.
Keywords
Pipeline inspection, Robotic systems, Corrosion detection
Introduction
Pipelines are constructed to transport all kinds of fluids, some toxic, some highly flammable and others fairly unreactive. In every case, it is important for the transported fluid to be contained within the pipeline, and under ideal situations, have no interaction with the surrounding environment. However, every pipe, depending on the material from which it is fabricated, deteriorates progressively with time, and the pipe becomes prone to cracks and heavy corrosion. Many accidents have occurred from fluid leaks owing to the cracks and corrosion of pipelines [1]. These accidents wreak havoc on plants, animals and humans [2-8]. It is therefore vital to prevent the occurrence of such fluid leaks and save ourselves the disaster.
One very effective way of doing this is to perform regular inspection of pipelines. The information gotten from the inspection is analyzed and used to evaluate the condition of the pipeline. The condition of the pipeline analyzed is used to forecast the areas/points of possible fluid leaks and prescribe maintenance operations for the pipeline. This way the pipe condition is monitored and accidental leaks are reduced to the minimum. Pipe Inspection is an essential activity associated with fitness-for-service (FFS) assessments for surface and buried piping at nuclear plants, oil and gas terminals, refineries, industrial sites, cased pipeline crossings, and distribution pipelines for all sorts.
Intelligent pigs are automated inspection systems which are usually designed such that one inspection tool is looking for a specific type of defect utilizing one technology [9]. Majority of the pigs used operating using either a magnetic flux leakage (MFL) tool or an ultrasonic tool for wall thickness measurements, with the latter being the more common [10]. A pipe inspection robot is a device that is inserted into pipe to check for obstruction, damage, and deterioration, and corrosion. These robots are mostly used for offshore and buried pipes. Nonetheless, they can also be used on surface pipes if the cost is not too high. Ismali et al. provides a thorough review on the various types of pipe inspection robots that have been developed over the last twenty years [11]. These design for these inspection robots vary greatly, ranging from differences in locomotion methods to the principle used in detection corrosion and other pipe abnormalities [12-18].
Pipe inspection robots employ a number of approaches to provide the desired information. The different methods employed depend on the sensors used by the robot and the parameter being measured. Some of the common sensors used are ultrasonic sensors and infra-red sensors. In recent times, video inspection has become popular. For this approach, a camera is installed on the robot. The basic approach for pipe inspection is to take geometric measurements of the pipe under inspection, and often times the inner diameter of the pipe is measured. Motamedi et al. used a robot with a line laser and a CCTV camera to recognize defects of the inner pipeline structure [19].
This paper presents the design, development and testing of a pipeline inspection robot. It is common knowledge that pipelines are proven to be the safest way of transporting fluids, to maintain that reputation regular inspection is required as carefully highlighted above. This fact cannot be overstressed. However, owing to the nature, construction design and purpose of the pipeline, simple external inspection of the pipeline is inadequate. The inner diameter of the pipe is often called into question as this information provides a more accurate analysis and inference from pipe inspection operations. Based on this observation, the pipeline inspection robot was designed to have the ability to move from one point to another within the inner diameter of the pipeline, to possess the capacity detect corrosion in the pipe by detecting geometric changes in the pipe, and be able to give an alarm when corrosion or obstruction is detected. It should be noted that ultrasonic inspection robots used for pipeline inspection typically measure the wall thickness of the pipeline to determine the presence of corrosion. The ultrasonic inspection robot presented in this paper measures instead the inner diameter of the pipeline to determine the presence of corrosion and/or deposits. An advantage to this method is the fact that the robot presented in this paper can also identify regions with dents and geometric distortions as these also compromise the inner diameter of the pipeline.
The design and development of the pipe inspection robot is outlined in the methods section. The results obtained from testing the inspection robot is presented in the discussion and conclusion section.
Materials and Methods
Materials
The pipeline inspection robot has three main physical sections to its design: an autonomous mobile robot, a corrosion detector and an alarm system. The final stage of the design deals with the interfacing and control of these three sections.
Autonomous mobile robot (AMR)
The first requirement of the inspection robot is that it should be capable of motion. To do this, an autonomous mobile robot was designed. An autonomous mobile robot (AMR) is a robot capable of navigating an uncontrolled environment without the need for physical or electro-mechanical guidance devices. This robot also provided the base chassis on which we mounted the sensors and other components (Figure 1).
The items required for the construction of this robot were: 4 wheels, 2 plastic chassis, 4 velocimetry code disks, 4 motors with wires, 8 plastic fasteners, 8 long screws, 6 mounting rods, 8 small screws, 15 nuts a battery connector and a 4 AA battery holder (Figure 2).
The corrosion detector
The corrosion detector unit simply consisted of two (2) ultrasonic sensors (Figure 3) mounted base-to-base to measure the inner diameter of the pipe. An ultrasonic sensor is a proximity sensor. Such a sensor is capable of detecting nearby objects without any physical contact. They send out ultrasound waves and analyze the echo (returning signal) that is received. The time between sending out the signal and receiving the echo is used to estimate the distance to an object (since the speed of sound is known). This gives us our height which translates to pipe diameter. The ultrasonic sensor used in the inspection robot is the HC-SRO4 ultrasonic sensor (Figure 3). It requires a 5 V DC power supply, performs well in 30° angle, and has a resolution of 3 mm. A single ultrasonic sensor measures the distance from its location to the bottom of the pipe (called d1), while the second ultrasonic sensor measures the distance from its location to the top of the pipe (called d2). The distance between the two ultrasonic sensors is also known. By summing the distance between the ultrasonic sensors and the values of d1 and d2, the internal diameter of the pipe can be calculated. Once the internal diameter of the working pipe is known, the measured values of d1 and d2 can be used to determine the presence of corrosion or deposits. For a normal pipe, d1 = 1 cm. If d1 > 1 cm, then this indicates that there is corrosion at the bottom of the pipe. If d1 < 1 cm, this indicates there are deposits at the bottom of the pipe. Similarly, for a normal pipe, d2 = 5 cm (Pipe Diameter). The 5 cm accounts for the distance between the two ultrasonic sensors (top and bottom) as well as the distance between the lower ultrasonic sensor (d1) and the bottom of the pipe. If d2 > 5 cm (Pipe Diameter), this indicates there is corrosion at the top of the pipe. If d2 < 5 cm (Pipe Diameter), this indicates there are deposits at the top of the pipe.
The alarm system
For this, a buzzer (Figure 4) was programmed using Arduino language to go off, producing a ticking sound for 3 seconds when the robot detects corrosion within the pipeline.
Arduino Uno R3
The Arduino board (Figure 5) serves as the brain for the pipe inspection robot. Arduino is a tool for making computers that can sense and control more of the physical world/quantities than a desktop computer. It is an open-source physical computing platform based on a simple microcontroller board and a development environment for writing the software for the board.
It can be used to develop interactive objects, taking inputs from a variety of sensors and controlling a variety of physical outputs such as light, motion, etc., making it the perfect choice for the pipeline inspection robot. The software can be uploaded into the microcontroller board, allowing the robot to operate independent of the computer used to program. This is a plus for long distance inspection. However, it can also be operated directly from the computer using an Arduino board connecting cord (Figure 5). The advantage of this method is that the software can be modified when the robot is in operation. Its major drawback is that it is impractical for long distance inspection, which would be dependent on the length of connecting cord.
Motor shield
A motor shield was utilized to provide sufficient power to the four dc motor of the robot, to allow movement of the robot inside the pipe (Figure 6). The Arduino board was programmed to control the motor shield, sensors, and buzzer.
Methodology
Construction of AMR
The velocimetry code disks were coupled to the 4 Motors with wires (Figure 7a). The 1.5V battery terminal casing was coupled to the top plastic chassis of the AMR (Figure 7b). The motors and code disks were coupled to the plastic chassis of the AMR (Figure 7c). Next, the 4 plastic wheels wee coupled to the mounted motor (Figure 7d). We coupled the top chassis to the base chassis of the AMR using both plastic fasteners and coupling screws. The motor shield was mounted on the Arduino board and placed on top of the AMR. The 4 motors were connected to the motor terminals of the motor shield. Motors were powered using 4 AA batteries (Figure 7e).
Electronics and control
A breadboard was mounted on the AMR to allow for neater connections. Connection to the buzzer was done on the breadboard (Figure 8a). The longer leg of the buzzer was connected to pin 17 of the motor shield, while the shorter leg of the buzzer was connected to the ground channel of the breadboard.
For the attachment of the ultrasonic sensors, it was easiest to place them as far right to the breadboard as possible. The ground pin on the ultrasonic sensor is connected to the ground channel on the breadboard. The echo pin on the ultrasound sensor1 was connected to pin 16 on the motor shield and that of ultrasound sensor 2 to pin 19. The Trig pin on sensor 1 was connected to pin 14 on the motor shield and that of sensor 2 to pin 18. Lastly, the VCC pins of the sensors were connected to the 5 volt channel on the breadboard (Figure 8b).
Control of pipe inspection robot
This robot applies the ultrasonic inspection method. This method approaches pipeline inspection, by comparing measurements. The Robot measures the actual inner-diameter of the pipeline and compares it to a set-value. The set value can be altered to inspect different pipes with diameters ranging from 6-60 inches. It is capable of doing this in such a way that a variation between the measured value and the set value triggers an alarm from the robot. The flow diagram in figure 9 summarizes the steps and decisions taken by the robot at every stage to implement this design concept.
Figure 9. Flow Chart for operation of Pipe Inspection Robot.
The robot is initially placed at the entrance of the pipe before it is switched on. Once powered, the robot begins to advance forward. The distance between the robot and the bottom of the pipe d1, is measured using the first ultrasound sensor. The ultrasonic sensor converts time to distance. For the sensors used in this robot, the conversion was carried out using the following formula:
Distance = (duration/2)/29.1; (1)
Where the speed of sound is 340 m/s or 29 μs/cm and duration is the time taken in microseconds to receive an echo signal after a pulse has been sent out. The ultrasound pulse travels out and back, so to find the distance of the object we take half of the distance travelled.
For a normal pipe d1 should be equal to 1 cm. If d1 is less than 1 cm, it means there are deposits at the bottom of the pipe. If d2 is greater than 1 cm, it means that point in the pipe has undergone corrosion. If either deposit or corrosion is detected by the first ultrasound sensor, the robot stops and sends out an alarm for three seconds before continuing on its route. If d1 is equal to 1 cm, then the pipe is healthy. In this case, the robot does nothing, but simply continues on its way.
Next, in a similar manner, the distance between the robot and the top of the pipe d2, is measured using the second ultrasound sensor. For a normal pipe d2 should be equal to 25 cm. If d2 is less than 25 cm, it means there are deposits at the top of the pipe. If d2 is greater than 25 cm, it means that point in the pipe has undergone corrosion. If either deposit or corrosion is detected by the second ultrasound sensor, the robot stops and sends out an alarm for three seconds before continuing on its route. If d2 is equal to 25 cm, then the pipe is healthy. In this case, the robot does nothing, but simply continues on its way.
The entire process is repeated while the robot moves through the entire length of the pipe, alerting the inspection team to regions in the pipe that contain deposits or have undergone corrosion. Once the robot reaches the end of the pipe, it exits the pipe and comes to a stop. The current pipeline inspection robot developed in this paper is capable of providing corrosion inspection for straight pipelines with 6-60 inches in diameter. Future improvements to this initial design will include the addition of a forward-facing ultrasonic sensor to determine changes in the inner shape of the pipelines. With this new ultrasound sensor, the robot will be able to detect when there is a curve or a T-junction in the pipeline and its movement can be altered accordingly.
Discussion and Conclusion
The pipe inspection robot was tested using a pipeline model made from 1.5 m sheet of metal (Figure 10). The pipeline model was made of aluminum sheet wrapped into a cylinder and bounded with metal strips or solidity. The inner diameter of the pipeline model was 30 cm. certain sections of the pipeline model were tampered with to introduce dents and geometric distortions within the interior pipelines. These regions were used to simulate the effect of corrosion or the presence of deposits within the pipeline. The presence of corrosion will result in an increase in the inner diameter of the pipeline, while the presence of deposits in the pipeline will result in a reduction in the inner diameter of the pipeline. It is important to note that the current algorithm employed by the inspection robot view dents and geometric distortions the same as corrosions and deposit and will alert the inspection team whenever it encounters dents, geometric distortions, corrosions or deposits within the pipeline.
Figure 10 (a,b). Pipeline model used for testing the Pipeline Inspection Model.
On careful inspection of the model surface, the purposefully induced dents and geometric distortions can be visually observed. A visually observable dent is more than enough proof of corrosion or presence of deposit in an actual pipeline, hence, the designed robot is expected to be capable of detecting these distortions on the pipeline model if the design is accurate.
First, we connected the inspection robot to a laptop using an Arduino connecting cord to provide a visual display of the sensor measurement as the robot inspects along the pipeline. Since the AMR is not suited for rugged terrains, the pipeline inspection robot was inserted into the pipeline model, and placed at the start of the pipe. Next, we connected the 9V battery to the battery connector, and observed the robot as it initialized motion, measuring the inner diameter of the pipe in two unequal fractions as it runs along the length of the pipeline.
The sections of the pipeline model considered to be normal had an inner diameter of 30 cm. The robot moved along these normal sections at an approximate speed of 200 mm/s and did not stop or give off an alarm. This indicates that the robot is capable of identifying sections in a pipeline that conform to the standard diameter. When the robot reached the sections of the pipeline model in which dents and geometric distortions had been introduced, the robot stopped, gave off the buzzing alarm, and smoothly resumed motion in a straight line. When the geometric distortion introduced into the pipeline model resulted in an inner diameter greater than 30 cm, the robot identified that region as a section in which corrosion was present. When the geometric distortion resulted in a diameter less than 30 cm, the robot identified that region as a section in which deposits were present. Again, it is important to note that the robot will flag regions that possess dents, geometric distortions, corrosion or deposits.
Figure 11a and figure 11b respectively show the robot very close to the pipe entrance, and when the pipe length is almost completely inspected. The measurements from the inspection were displayed on the computer screen for instantaneous monitoring. Figure 11a shows the robot stopping in a section of the pipeline in which geometric distortions have narrowed the inner diameter of the pipeline. Here, a message indicating the presence of deposits is displayed on the computer screen, while an audible alarm is issued by the buzzer. Figure 11b shows the robot stopping in the section of the pipeline in which geometric distortions have increased the inner diameter of the pipeline. At this location, a message indicating the presence of corrosion is displayed on the computer screen, while an audible alarm is issued by the buzzer.
Figure 11. Pipeline Inspection Robot inspecting the pipeline model (a) Robot at entrance of pipe (b) Robot near the end of pipe.
In the course of designing the pipeline inspection robot, several challenges were encountered. A few of them, which may affect the robot’s efficiency, are outlined below:
• Speed: It was a challenge finding the perfect speed for the robot. If the robot went too fast, it raced past distortions, and when it was too slow, it stopped and refused to initialize motion after 3 seconds because it was still detecting the corrosion at that point.
• Absence of Switch: The absence of a switch meant that whenever the robot was powered it went straight to operation. This was a problem when it came to conserving power and retrieving the robot after inspecting a pipe length.
• Insufficient Space: The chassis was too small for most of the installations that the robot required. And it made the robot look aesthetically clumsy.
• Low Buzzer Volume: The buzzer volume is too low, it is impossible to hear the buzz in a noisy environment.
The pipeline inspection robot clearly demonstrated the capacity to detect deposits and corrosion within a pipeline. The algorithm implemented can be readily adjusted to inspect pipes with different parameters. There are however, several improvements that can be made to improve the efficiency of the robot. A switch should be included to help conserve power and ensure safer operation of the robot. A more rugged AMR can be used for subsequent designs. This will improve the adaptability of the robot, making it suitable for both outdoor and indoor operations. Other inspection methods (sensors), such as video inspection can be included, to increase the scope of inspection done at any point in time. An alarm unit with better volume characteristics should be used for subsequent designs. Finally, the robot should be equipped with wireless capability so that acquired data and images can be readily transferred to a computer for easy viewing by the inspection team.
Figures
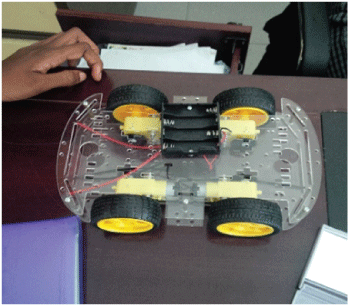
Figure 1: The autonomous mobile robot for the pipe inspection robot.
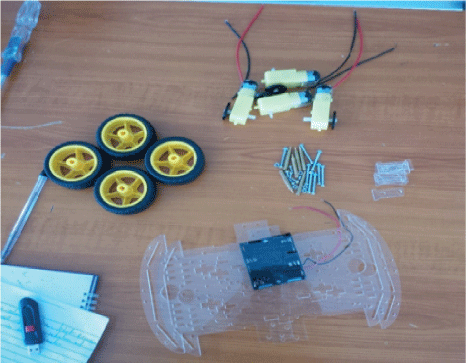
Figure 2: Some components of the Autonomous mobile Robot.
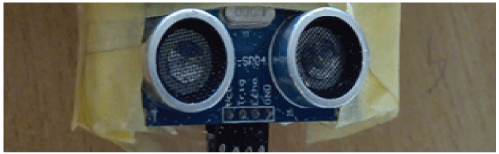
Figure 3: Ultrasound Sensor.
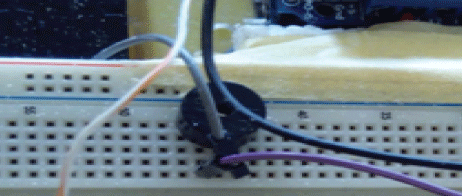
Figure 4: Buzzer for robot alarm system.
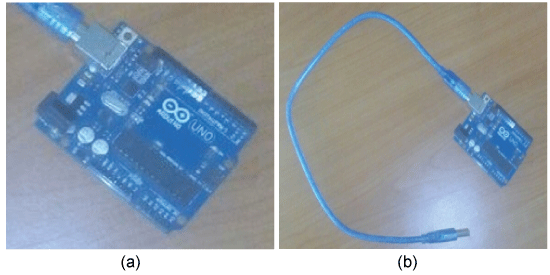
Figure 5 (a,b): Arduino board with USB cable attached.

Figure 6: Arduino board and the Motor shield on the plastic chassis.
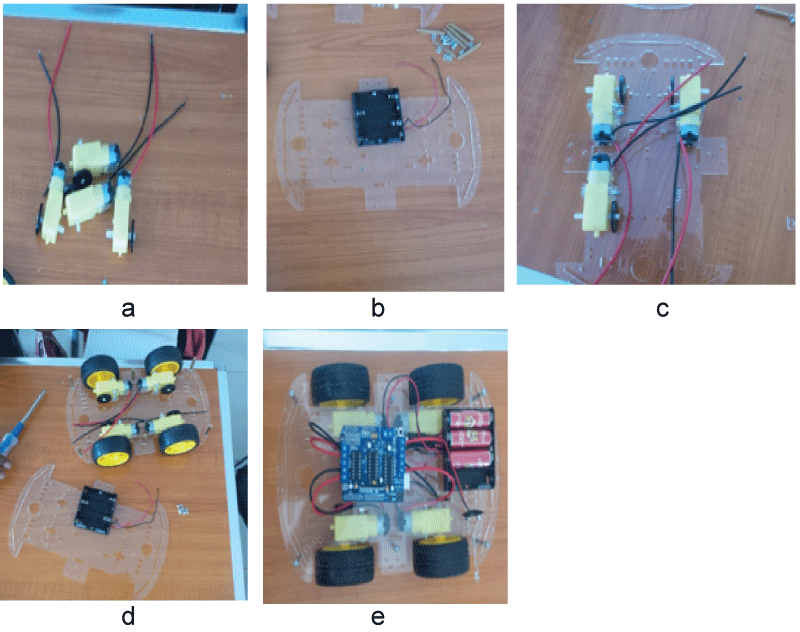
Figure 7 (a-e): Construction of AMR.
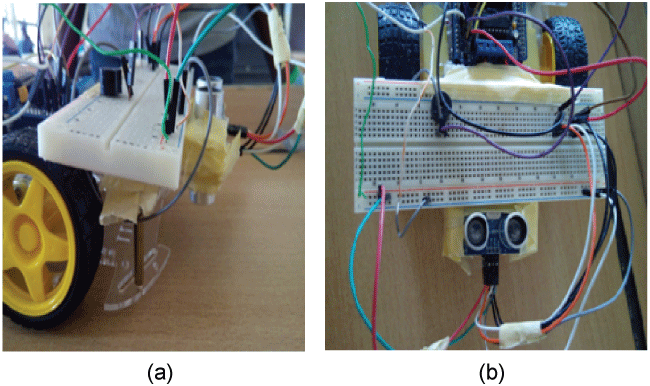
Figure 8 (a,b): Buzzer and Ultrasound sensor connections to AMR.
References
- www.shell.com.ng
- EA Akpofure, ML Efere, P Ayawei (2000) The Adverse Effects of Crude Oil Spills in the Niger Delta. Urhobo Historical Society.
- PC Nwilo, OT Badejo (2007) Impacts and Management of Oil Spill Pollution along the Nigerian Coastal Areas. Administering Marine Spaces: International Issues.
- Jernelöv A (2010) The threats from oil spills: now, then, and in the future. Ambio 39: 353-366.
- Chindah AC, Braide AS (2000 ) The Impact of Oil Spills on the Ecology and Economy of the Niger Delta. Proceedings of the workshop on Sustainable Remediation Development Technology held at the Institute of Pollution Studies, River State University of Science and Technology, Port-Harcourt, Rivers.
- EE Nkwocha, OP Duru (2010) Micro-Analytic Study on the Effect of Pollution on Local Plant Species and Food Crop. Advances in Bioresearch: 189-198.
- Ordinioha B, Brisibe S (2013) The human health implications of crude oil spills in the Niger delta, Nigeria: An interpretation of published studies. Niger Med J 54: 10-16.
- OE Agbalagba, RK Meindinyo (2010) Radiological impact of oil spilled environment: A case study of the Eriemu well 13 and 19 oil spillage in Ughelli region of delta state, Nigeria. Indian J. Sci. Technology 3: 1001-1005.
- Barbian, OA (2004) Handbook Automated Ultrasonic Testing Systems, IIW Handbook (ISBN3-87155-953-9), DVS Verlag, DGZfP, Berlin.
- Ismali IN, Anuar A, Sahari KSM, Baharuddin MZ, Fairuz M (2012) Development of in-pipe Inspection Robot: A review. IEEE Conference on Sustainable Utilization and Development in Engineering and Technology 310-315.
- H Willems, B Jaskolla, T Sickinger, OA Barbian, F Niese (2010) Advanced Possibilities for Corrosion Inspection of Gas Pipelines using EMAT technology. European Conference on Non-destructive Testing ECNDT.
- Bretl T, Rock S, Latombe J, Kennedy B, Aghazarian H (2004) Free climbing with a multi-use robot. Experimental Robotics 21: 449-458.
- Choi HR, Ryew SM (2002) Robotic system with active steering capability for internal inspection of urban gas pipelines. Mechatronics 26: 713-736.
-
Horodinca M, Doroftei I, Mignon E, Preumont A, (2002) A simple architecture for in-pipe inspection robots. International Colloquium on Mobile and Autonomous Systems, Magdeburg, Germany.
- Ryew SM, Baik SH, Ryu SW, Jung KM, Roh SG, et al. (2000) In-pipe inspection robot system with active steering mechanism. Intelligent Robots and Systems. IEEE/RSJ International Conference 2000 3: 1652-1657.
- Tache F, Fischer W, Moser R, Mondada F, Siegwart R (2007) Adapted magnetic wheel unit for compact robots inspecting complex shaped pipe structures. Proc. of the 2007 IEEE/ASME International Conference on Advanced Intelligent Mechatronics (AIM’2007) 1-6.
- Tatar O, Mandru D, Ardelean I (2007) Development of mobile minirobots for in-pipe inspection tasks. Mechanika Journal 6: 60-64.
- Md Raziq Asyraf Md Zin, Khairul Salleh Mohamed Sahari, Juniza Md Saad, Adzly Anuar, Abd Talip Zulkarnain (2012) Development of a Low Cost Small Sized In-Pipe Robot. International Symposium on Robotics and Intelligent Sensors 2012. Procedia Engineering 41: 1469-1475.
-
Motamedi M, Faramarzi F, Duran O (2012) New concept for corrosion inspection of urban pipeline networks by digital image processing. 38th Annual Conference on IEEE Industrial Electronics Society, IECON 2012, 1551-1556.