International Journal of Metallurgy and Metal Physics
(ISSN: 2631-5076)
Volume 3, Issue 1
Research Article
DOI: 10.35840/2631-5076/9212
Numerical Analysis Conducted During the Study on the Impact of Tool-Chip Contact Time on the Shear Angle in Orthogonal Machining
Naga SC Velamakuri1*, Oliver J Myers1 and John E Wyatt2
Table of Content
Figures
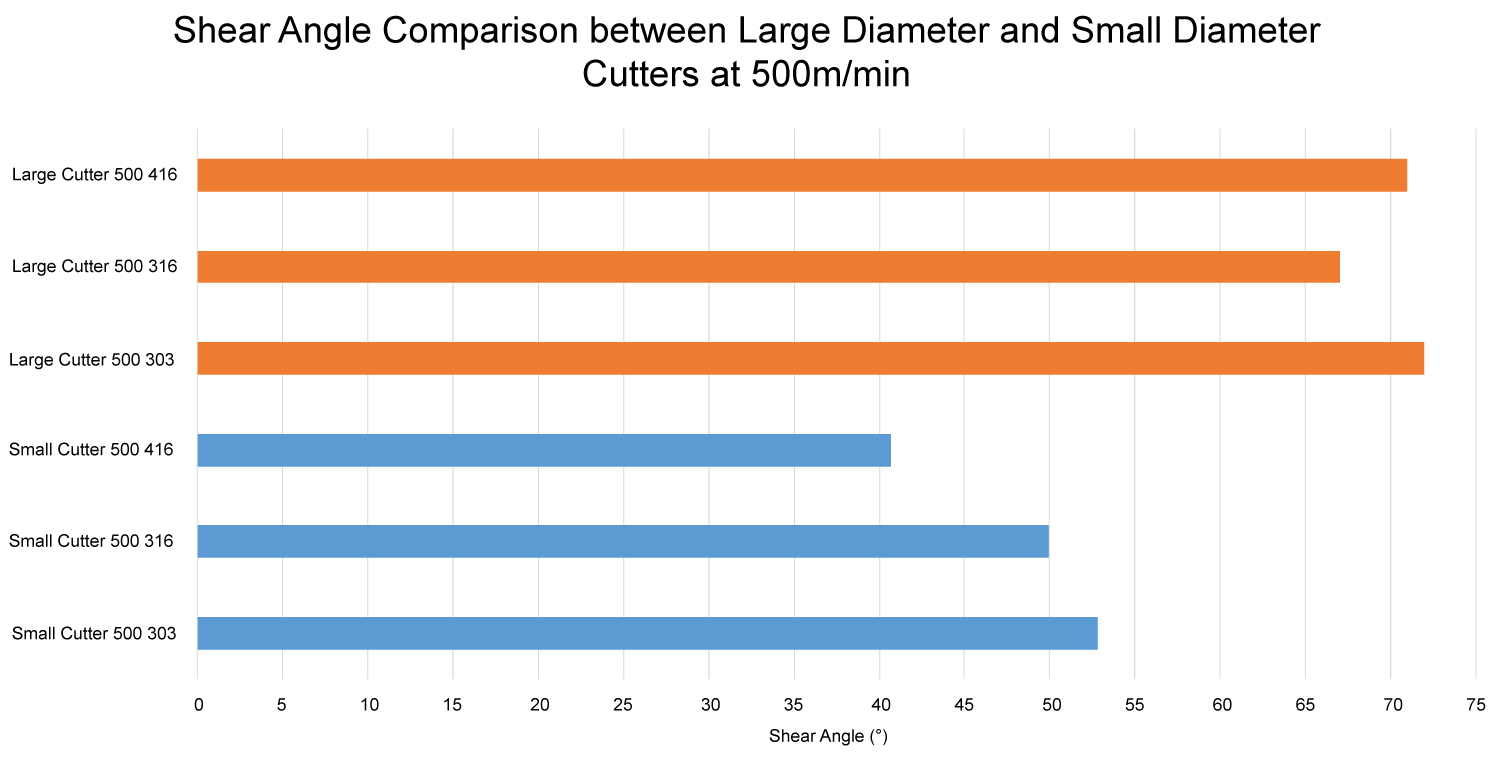
Figure 1: Shear angle comparison between...
Shear angle comparison between large diameter and small diameter cutters at 500 m/min.
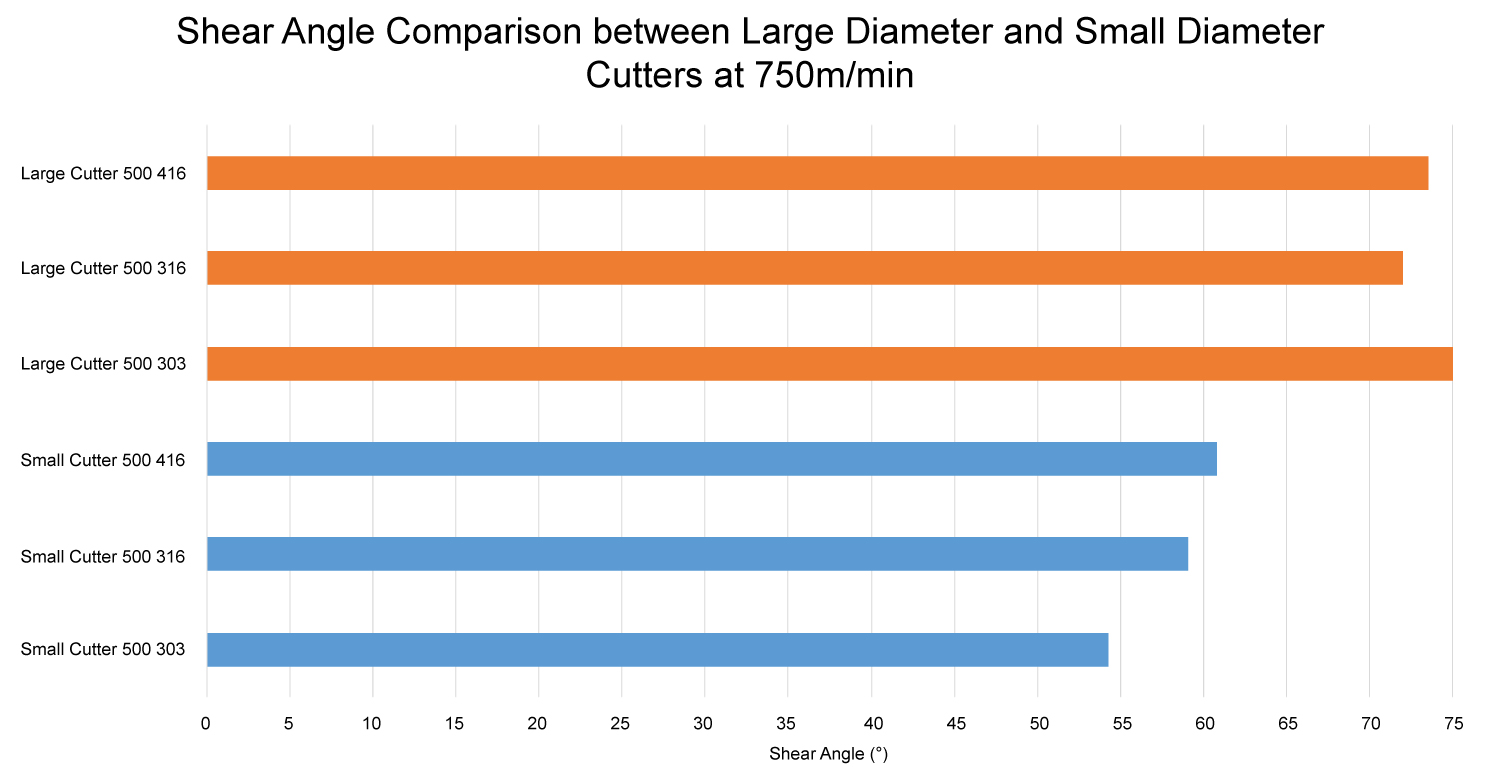
Figure 2: Shear angle comparison between...
Shear angle comparison between large diameter and small diameter cutters at 750 m/min.
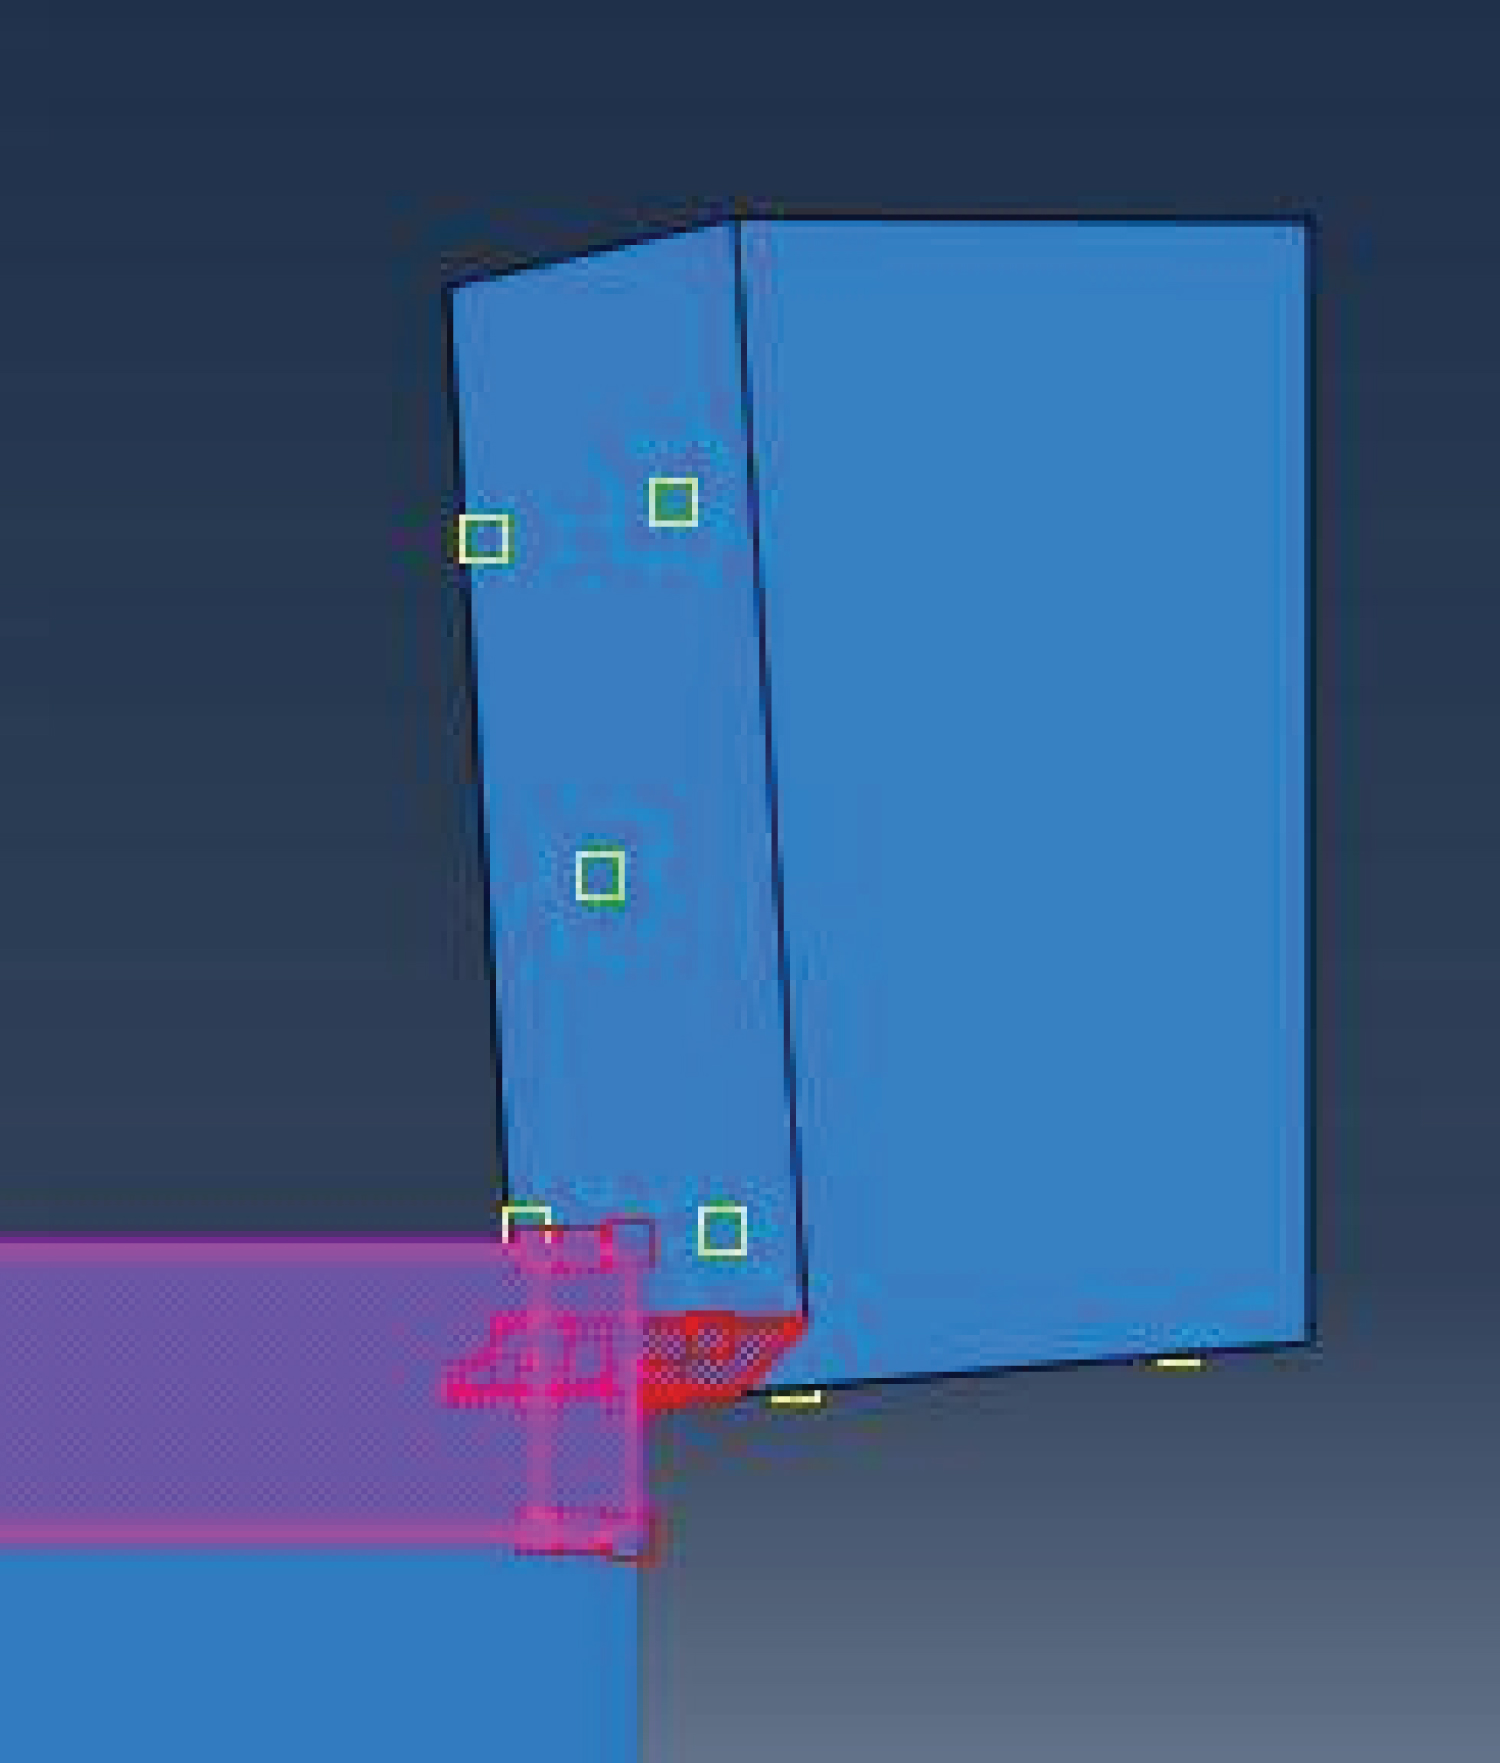
Figure 3: Normal behavior interaction...
Normal behavior interaction property defined-Sticking region.
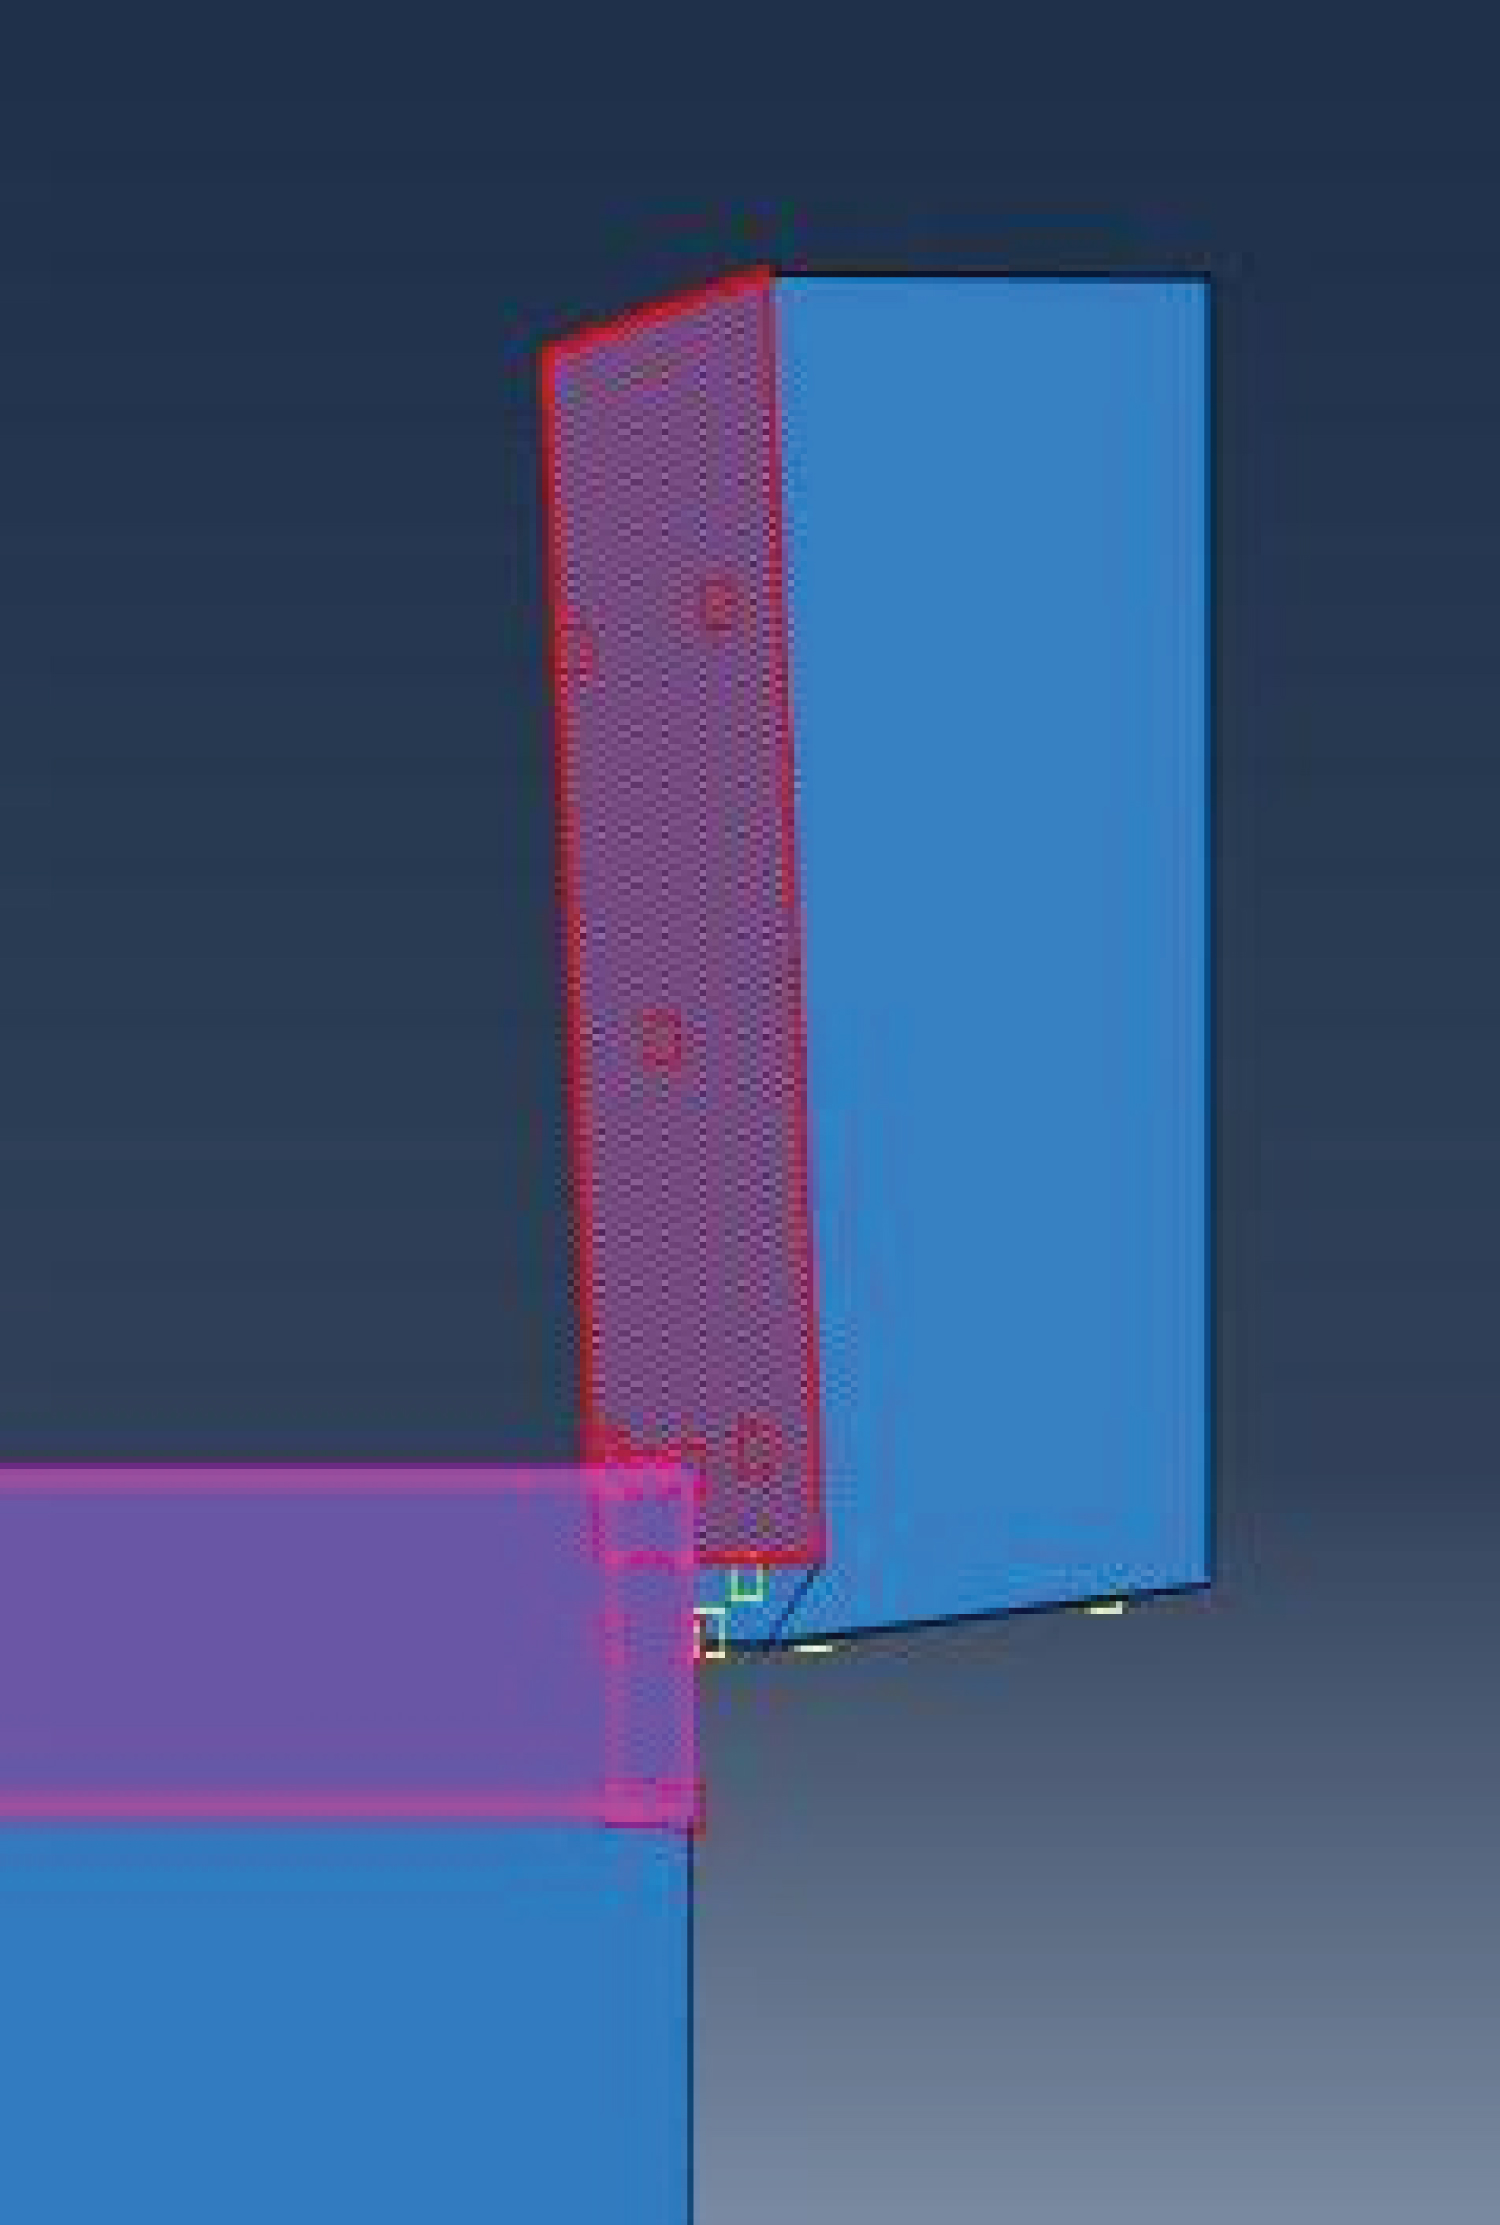
Figure 4: Tangent behavior interaction...
Tangent behavior interaction property defined-Sliding region.
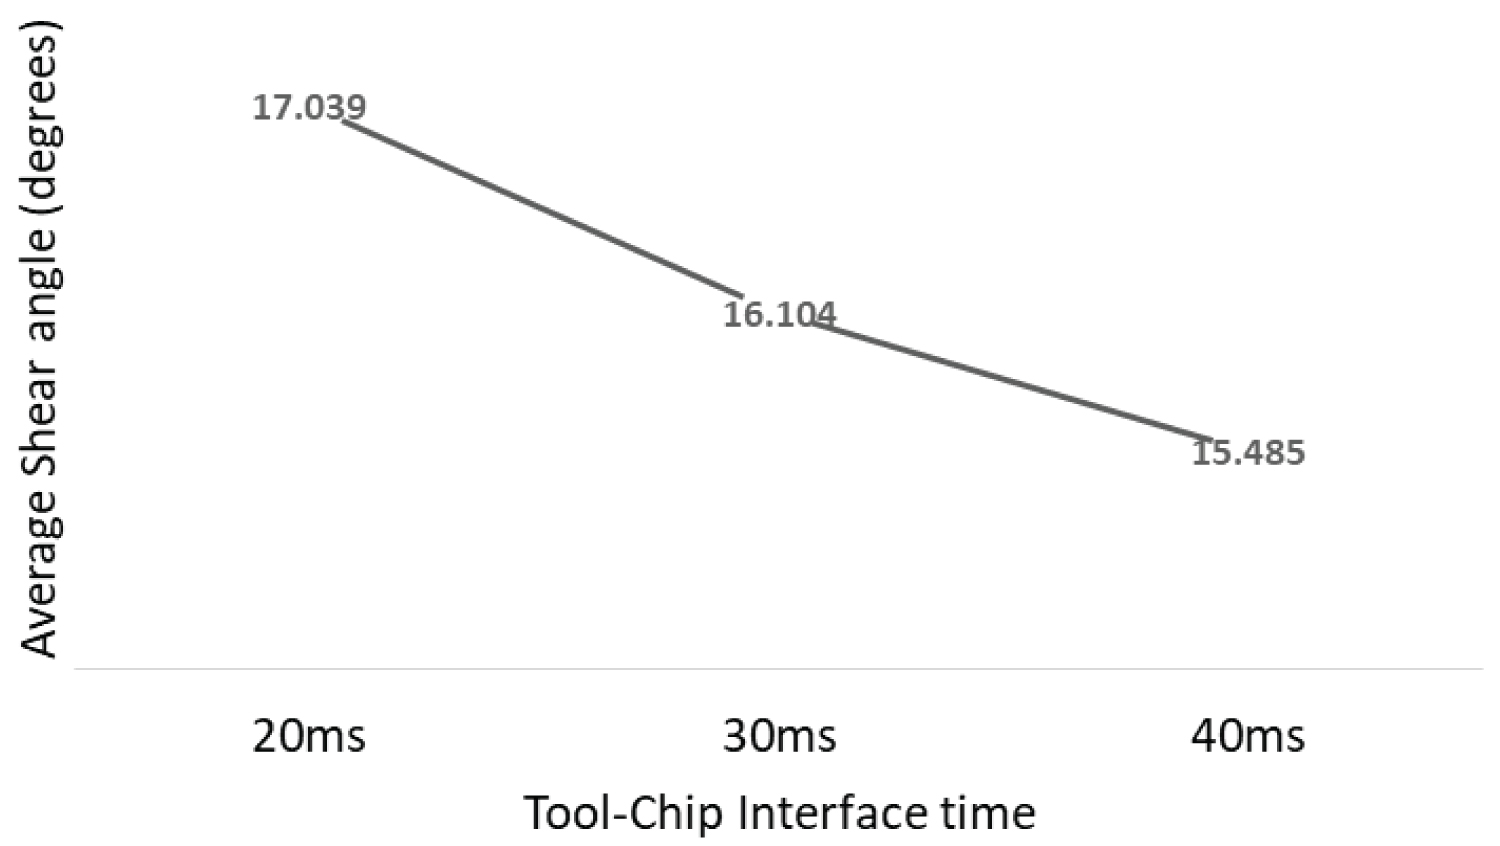
Figure 9: Impact of tool-chip interface...
Impact of tool-chip interface time on shear angle - Al2024.
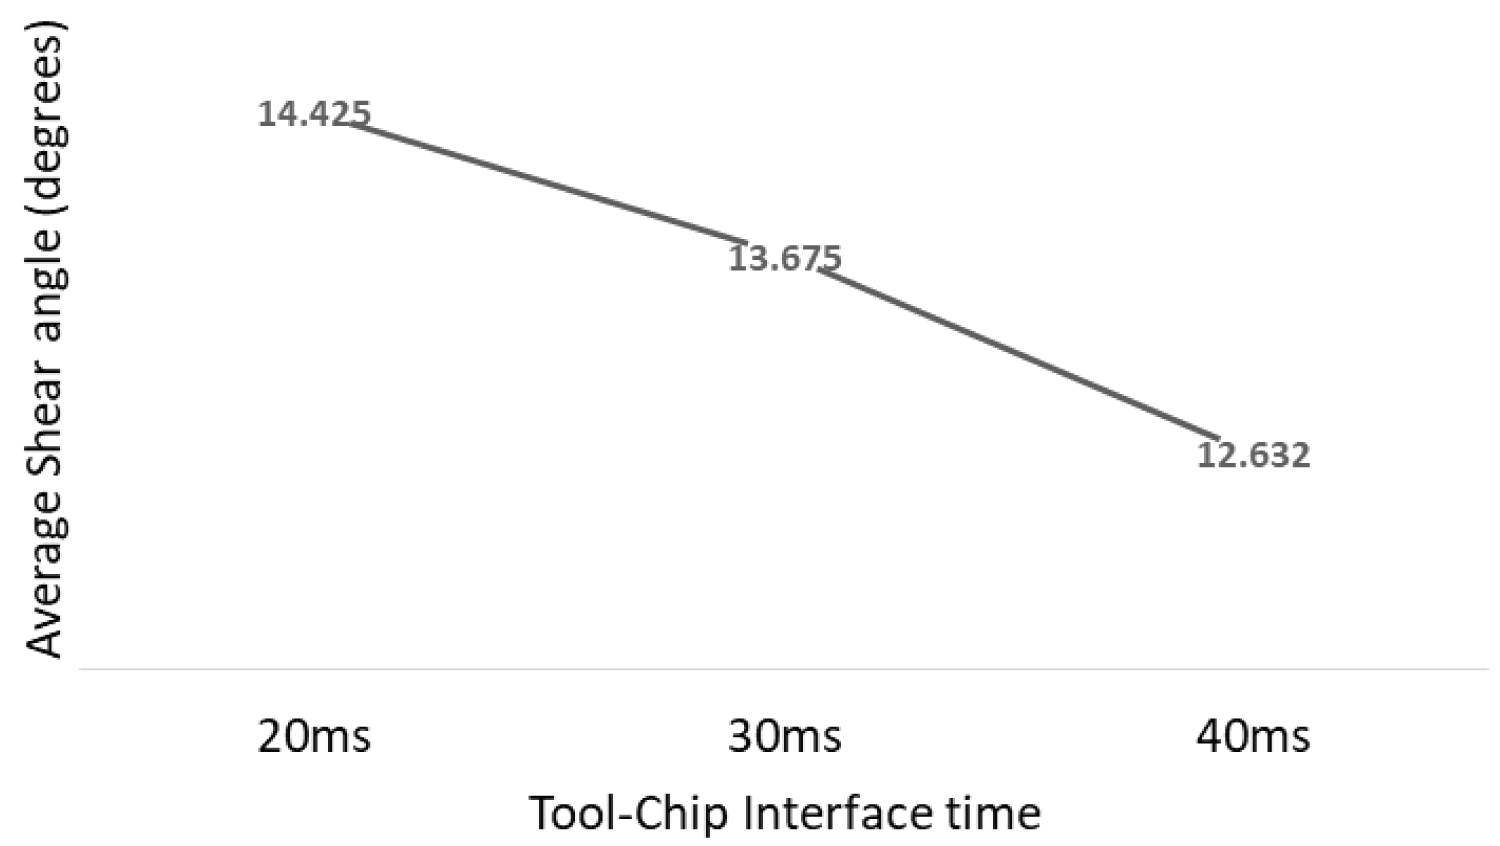
Figure 10: Impact of tool-chip interface time...
Impact of tool-chip interface time on shear angle - Al7075.
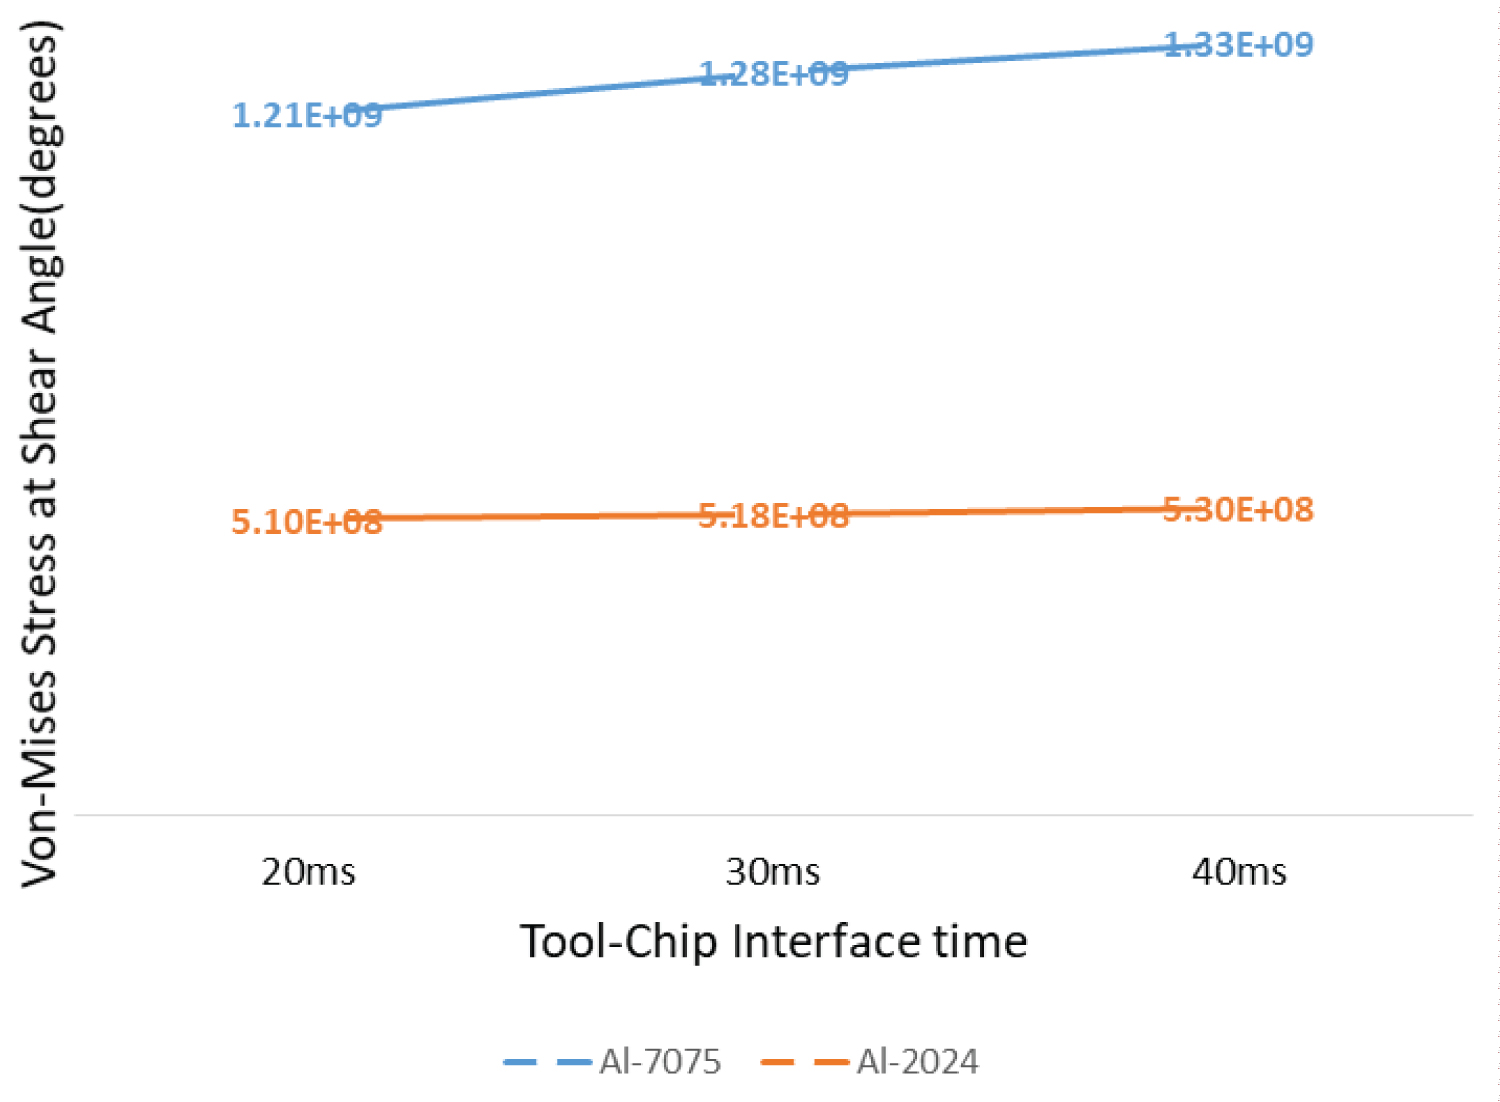
Figure 14: Impact of material on the stress values...
Impact of material on the stress values at tool-chip interface.
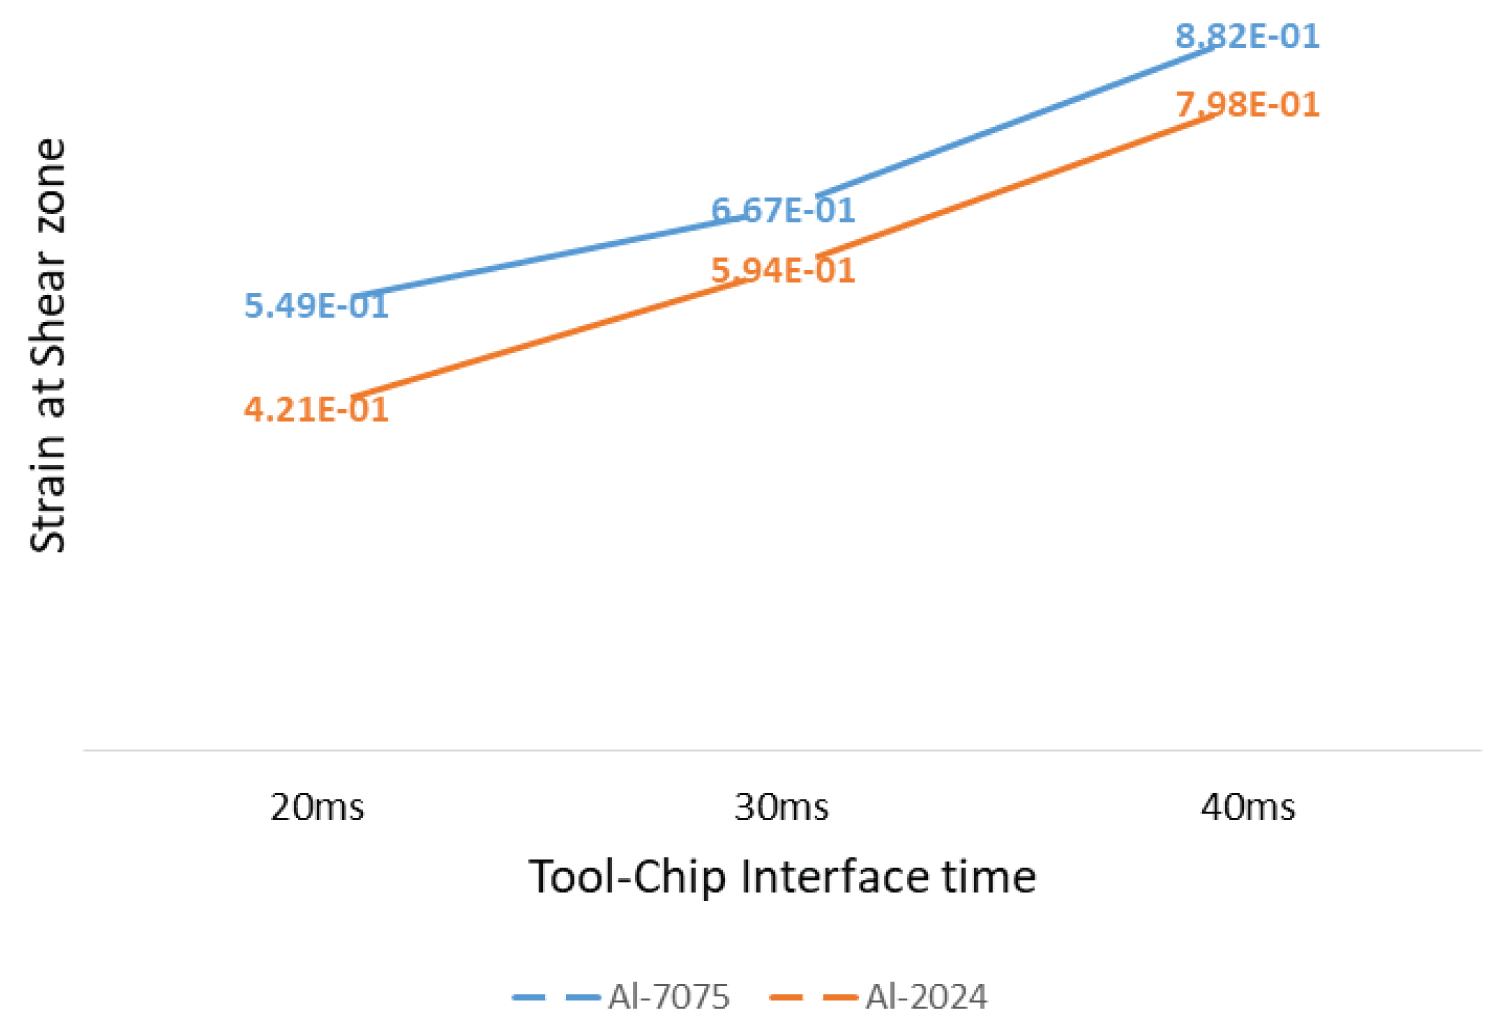
Figure 15: Impact of material on the strain values...
Impact of material on the strain values at tool-chip interface.
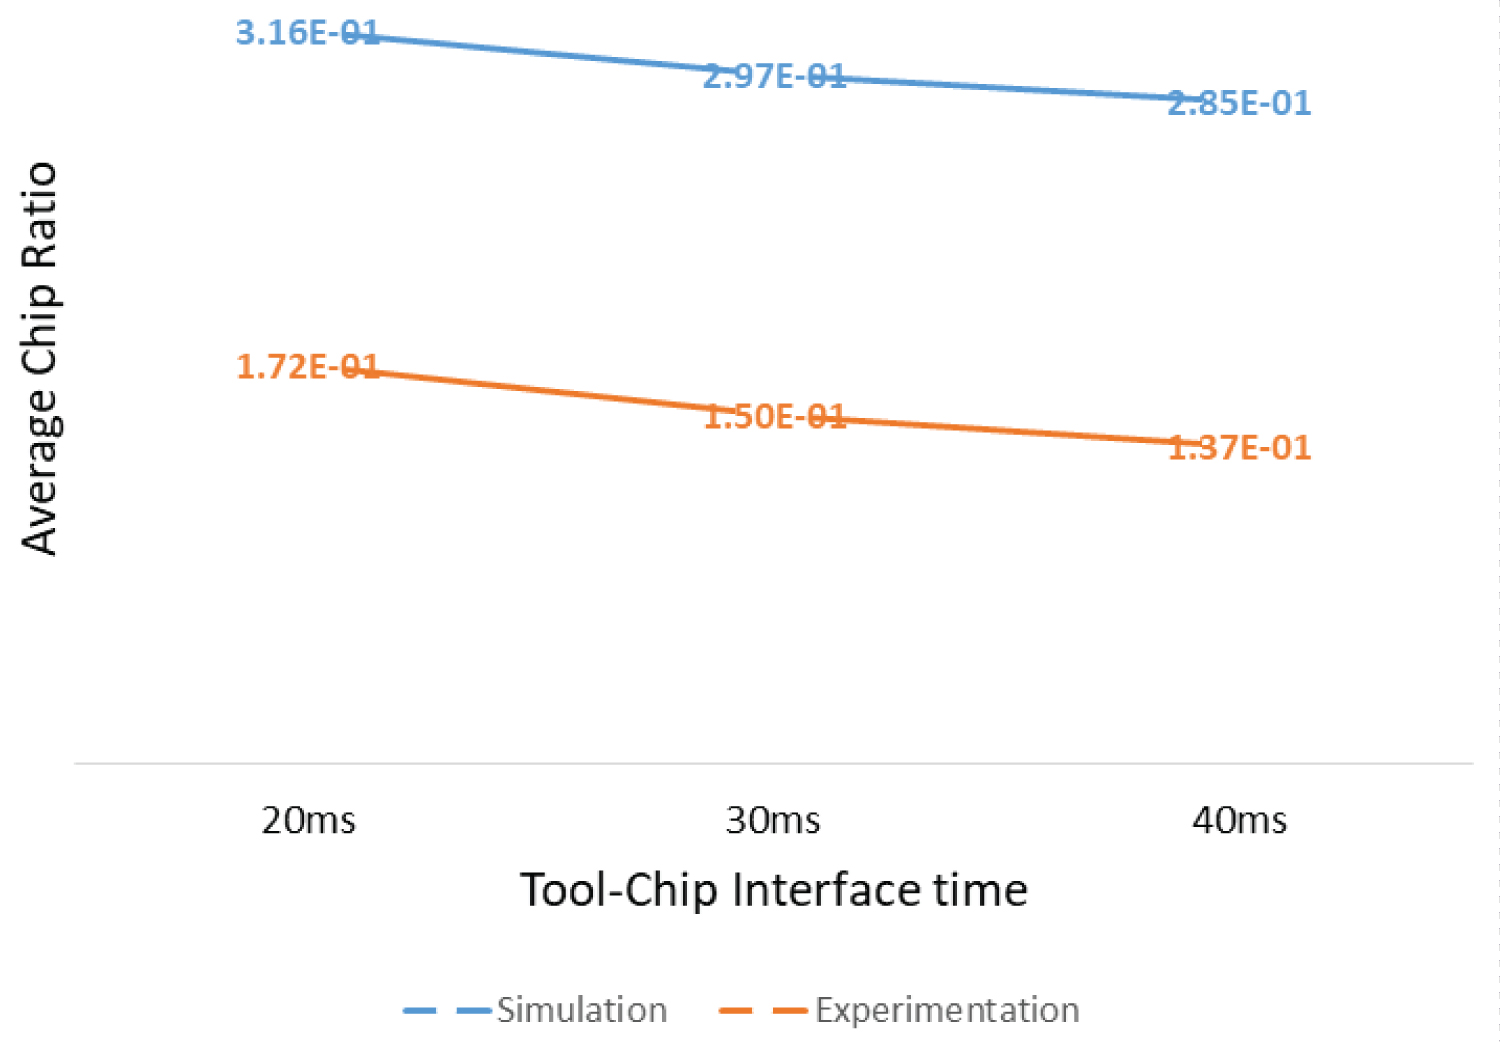
Figure 16: Comparison of experimental and simulation...
Comparison of experimental and simulation results for Al-2024 Chip ratio.
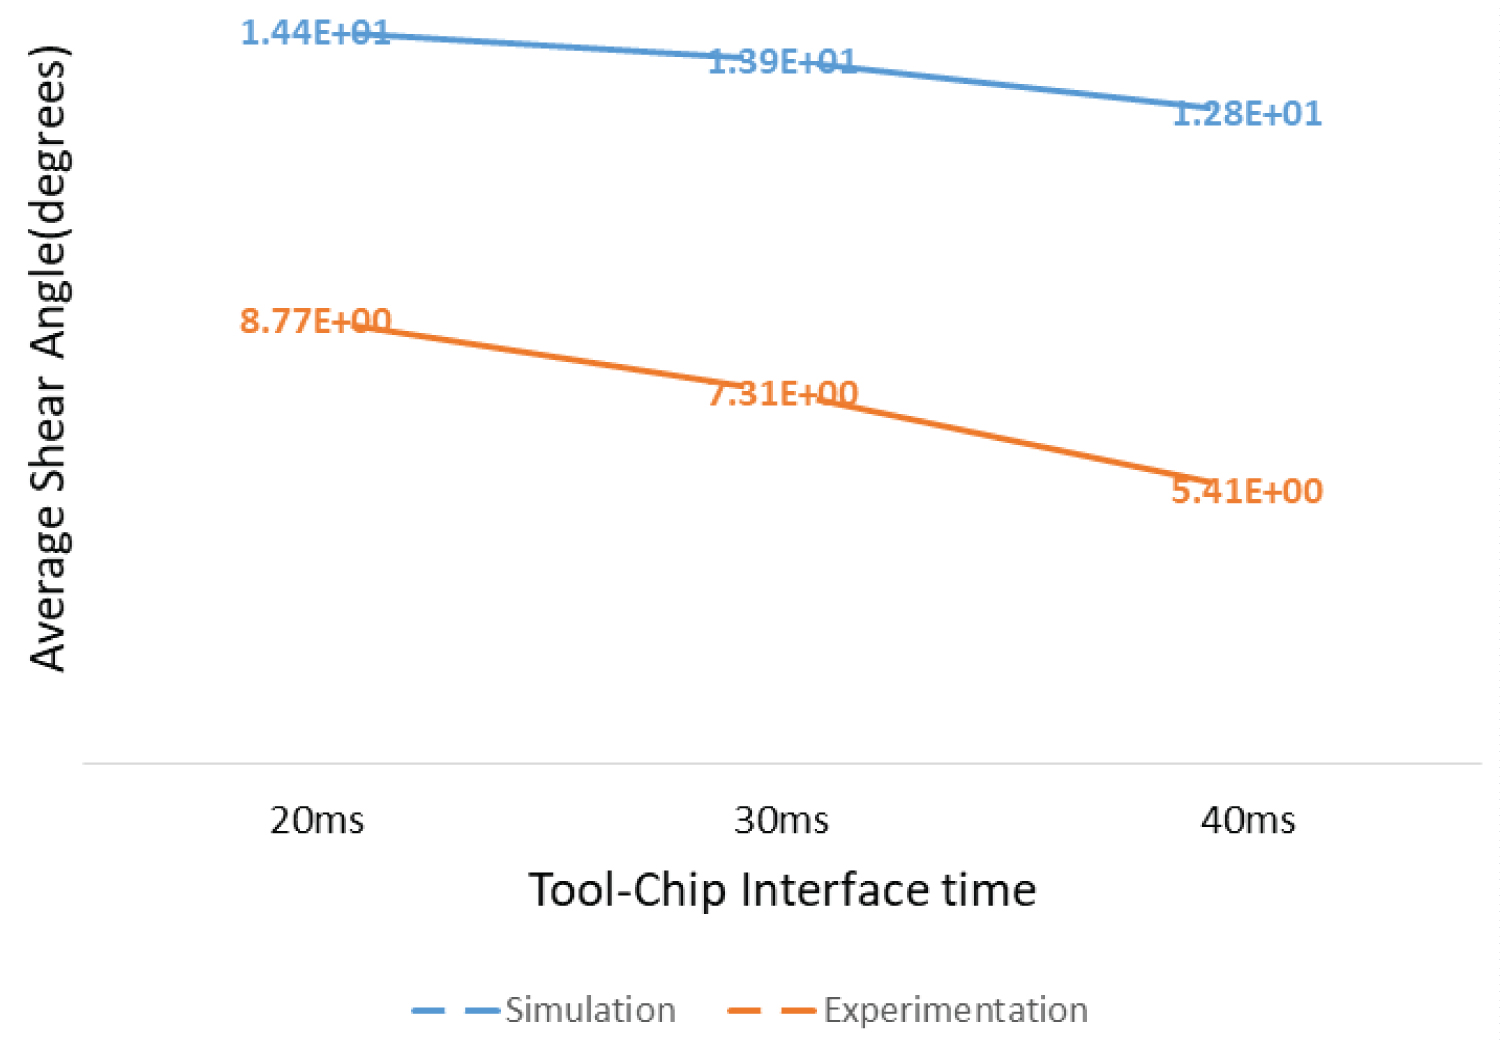
Figure 17: Comparison of experimental and simulation...
Comparison of experimental and simulation results for Al-7075.
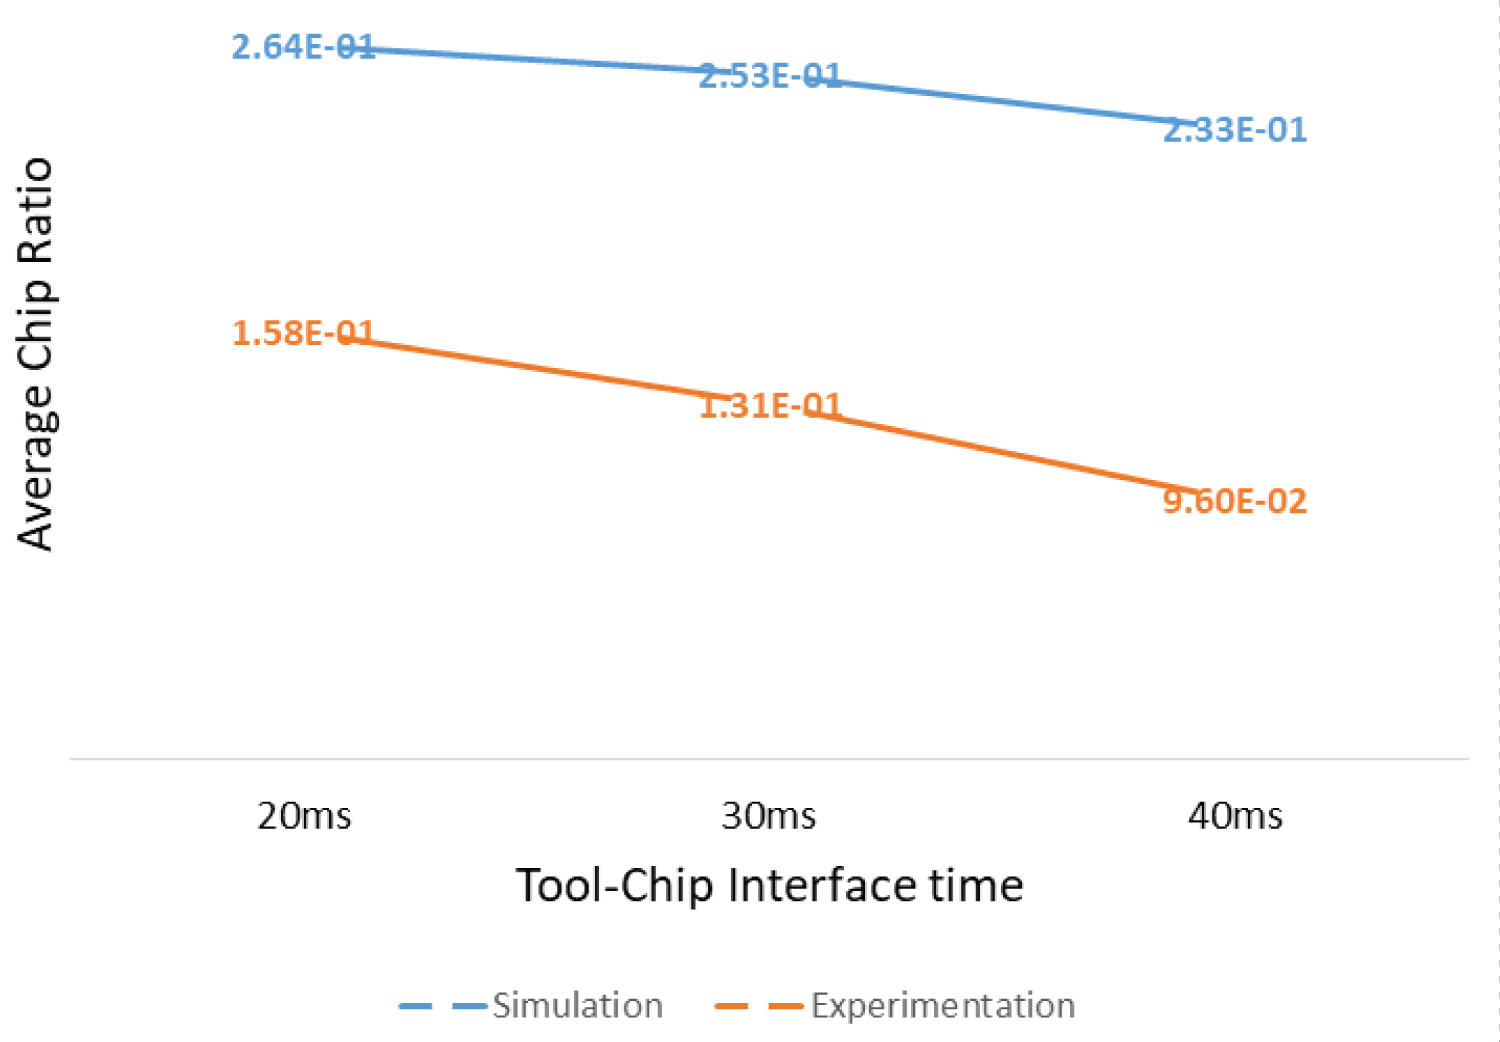
Figure 18: Comparison of experimental and simulation results...
Comparison of experimental and simulation results for Al-7075 Chip ratio.
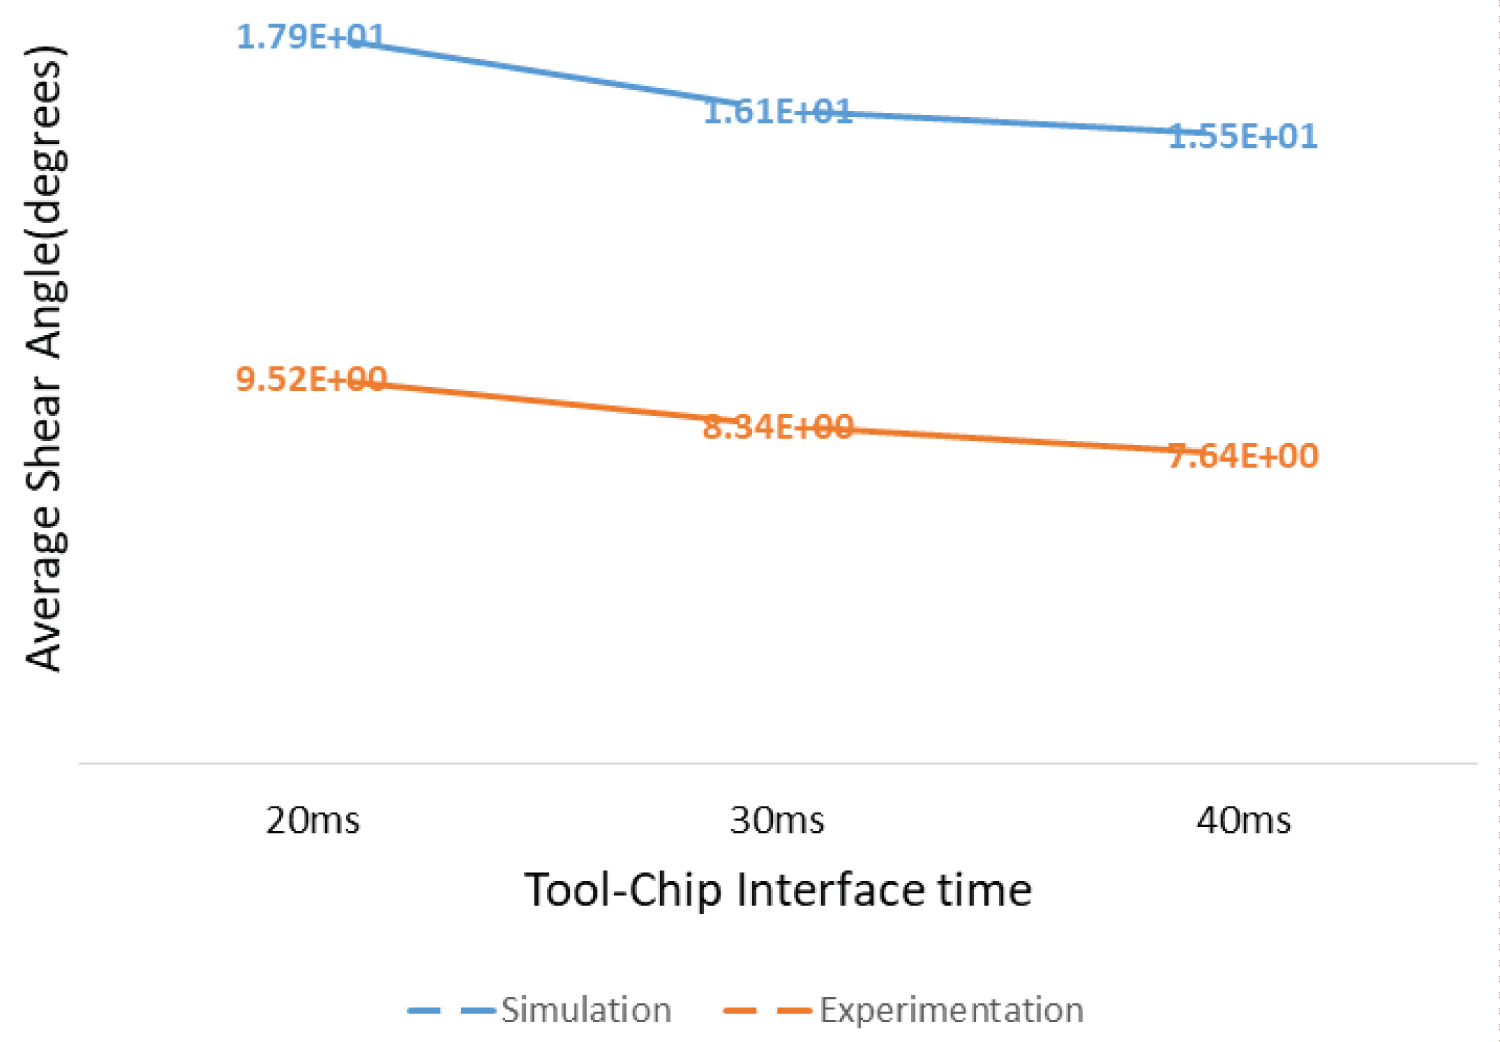
Figure 19: Comparison of experimental...
Comparison of experimental and simulation results for Al-2024.
Tables
Table 1: Details of the Geometry used.
Table 4: Experimental results for Al-2024.
Table 5: Experimental results for Al-7075.
Table 6: Results from simulations of Al-2024 with different interface times.
Table 7: Results from simulations of Al-7075 with different interface times.
Table 8: Comparison of experimental and simulation results for Al-2024 Shear Angle (deg).
Table 9: Comparison of experimental and simulation results for Al-2024 Chip ratio.
Table 10: Comparison of experimental and simulation results for Al-7075 Shear Angle (deg).
Table 11: Comparison of experimental and simulation results for Al-7075 Chip ratio.
References
- C Kilicaslan (2009) Modelling and Simulation of Metal Cutting by Finite Element Method. Strain 86.
- P Sartkulvanich, F Koppka, T Altan (2004) Determination of flow stress for metal cutting simulation-progress report. Journal of Materials Processing Technology 146: 61-71.
- M Shatla, C Kerk, T Altan (2001) Process modeling in machining. Part II: Validation and applications of the determined flow stress data. International Journal of Machine Tools and Manufacture 41: 1659-1680.
- P Oxley (1961) Mechanics of metal cutting. International Journal of Machine Tool Design and Research 1: 89-97.
- A Shrot, M Baker (2011) How to identify Johnson-cook parameters from machining simulations. AIP Conference Proceedings 1353: 29-34.
- David Christian, Bowes (2013) Numerical Modelling of Ti6Al4V Machining: A Combined FEA and Unified Mechanics of Cutting Approach.
- ME Merchant (1944) Basic mechanics of metal cutting process. Journal of Applied Mechanics 11: 168-175.
- G Varga (2012) Examination of Shear Angle in Metal Cutting. Journal of Production Processes and Systems 5: 71-78.
- M Movahhedy, MS Gadala, Y Altintas (2000) Simulation of the orthogonal metal cutting process using an arbitrary Lagrangian-Eulerian finite-element method. Journal of Materials Processing Technology 103: 267-275.
- NS Velamakuri, OJ Myers, JE Wyatt (2017) Understanding the Impact of Tool-Chip Engagement Time on the Shear Angle in Orthogonal Metal Cutting. International Journal of New Technologies in Science and Engineering 4: 31-46.
- R Ramanujam, K Venkatesan, V Saxena, P Joseph (2014) Modeling and Optimization of Cutting Parameters in Dry Turning of Inconel 718 Using Coated Carbide Inserts. Procedia Materials Science 5: 2550-2559.
- Priyadarshini, SK Pal, AK Samantaray (2011) A Finite Element Study of Chip Formation Process in Orthogonal Machining. International Journal of Manufacturing, Materials and Mechanical Engineering 1: 19-45.
- IASM Aerospace Specification Metals.
- A Installation, L Guide, Abaqus 613.
- KM Chen (2010) Analysis of the metal cutting process using the shear plane model. Master Thesis.
- JJ Lorentzon, Niklas Jarvstrat Modelling chip formation of alloy 718. Journal of Materials Processing Technology 209: 4645-4653.
- SVA Laakso, E Niemi (2016) Modified Johnson-Cook flow stress model with thermal softening damping for finite element modeling of cutting. Proceedings of the Institution of Mechanical Engineers, Part B: Journal of Engineering Manufacture 230: 241-253.
- D Umbrello, RM' Saoubi, JC Outeiro (2007) The influence of Johnson-Cook material constants on finite element simulation of machining of AISI 316L steel. International Journal of Machine Tools and Manufacture 47: 462-470.
- SPFC Jaspers, JH Dautzenberg (2002) Material behaviour in metal cutting: Strains, strain rates and temperatures in chip formation. Journal of Materials Processing Technology 121: 123-135.
- GH Majzoobi, F Rahimi Dehgolan (2011) Determination of the constants of damage models. Procedia Engineering 10: 764-773.
- X Wang, J Shi (2013) Validation of Johnson-Cook plasticity and damage model using impact experiment. International Journal of Impact Engineering 60: 67-75.
- M Daoud, W Jomaa, JF Chatelain, A Bouzid, V Songmene (2014) Identification of material constitutive law constants using machining tests: A response surface methodology based approach. High Performance and Optimum Design of Structures and Materials 137: 25-36.
- DM Veljic, MM Perovic, AS Sedmak, MP Rakin, MV Tri-funovic, et al. (2012) A coupled thermo-mechanical model of friction stir welding. Thermal Science 16: 527-534.
- C Fuat Kara, Kubilay Aslantas (2016) Prediction of cutting temperature in orthogonal machining of AISI 316L using artificial neural network. Applied Soft Computing 38: 64-74.
- H Wu, S Zhang (2015) Effects of cutting conditions on milling process of Ti6Al4V. The International Journal of Advanced Manufacturing Technology 77: 2235-2240.
- L Filice, F Micari, S Rizzuti, D Umbrello (2007) A critical analysis on the friction modelling in orthogonal machining. International Journal of Machine Tools and Manufacture 47: 709-714.
- Kubilay Aslantas, Irfan Ucun (2011) Numerical simulation of orthogonal machining process using multilayer and single-layer coated tools. International Journal of Advanced Manufacturing Technology 899-910.
- S Bose, T Samanta, A Chakraborty (2014) Stress Analysis Criteria of High Speed Steel Single Point Turning Tool. Computing. Communication & Manufacturing 300-306.
- G Su, Z Liu (2010) An experimental study on influences of material brittleness on 575 chip morphology. International Journal of Advanced Manufacturing Technology 51: 87-92.
- MC Shaw (2004) Metal Cutting Principles. (2nd edn), Oxford University Press.
- T Ozel, Y Karpat (2007) Identification of Constitutive Material Model Parameters for High-Strain Rate Metal Cutting Conditions Using Evolutionary Computational Algorithms. Materials and Manufacturing Processes 22: 659-667.
- DI Lalwani, NK Mehta, PK Jain (2009) Extension of Oxley's predictive machining theory for Johnson and Cook flow stress model. Journal of Materials Processing Technology 209: 5305-5312.
- AO Tay, MG Stevenson, GDV Davis (1974) Using the finite element method to determine temperature distributions in orthogonal machining. Proceedings of the Institution of Mechanical Engineers 188: 627-638.
Author Details
Naga SC Velamakuri1*, Oliver J Myers1 and John E Wyatt2
1Department of Mechanical Engineering, Clemson University, USA
2Department of Instructional Systems and Workforce Development, Mississippi State University, USA
Corresponding author
Naga SC Velamakuri, Department of Mechanical Engineering, Clemson University, USA.
Accepted: March 24, 2018 | Published Online: March 26, 2018
Citation: Velamakuri NSC, Myers OJ, Wyatt JE (2018) Numerical Analysis Conducted During the Study on the Impact of Tool-Chip Contact Time on the Shear Angle in Orthogonal Machining. Int J Metall Met Phys 3:012.
Copyright: © 2018 Velamakuri NSC, et al. This is an open-access article distributed under the terms of the Creative Commons Attribution License, which permits unrestricted use, distribution, and reproduction in any medium, provided the original author and source are credited.
Abstract
Machining is a production technique for achieving desired shapes from pre-formed blocks of metal with surface quality and dimensional accuracies. Despite the development of high performance FE codes; the machining simulation is a complex task due to geometric complexities, high cutting speeds and strain rates that need high simulation times. In this paper, by using the experimental and numerical techniques an in-depth investigation has been carried out to understand the impact of tool-chip contact time on the shear angle in an orthogonal machining. This is in contradiction to the existing belief of shear angle dependence on cutting velocity. Experimental data has been recorded using Al-2024 and Al-7075 as the materials under consideration and the conditions in the simulations for the material constitutive laws will be discussed. The results will be validated with the conducted experimentation results and the observed differences with reasons, possible solutions and future work are discussed.
Keywords
Orthogonal machining, Shear angle, Tool-chip contact time, Johnson-Cook model, Thermal and contact modeling, Mesh distortion
Introduction
Finite Element Modeling (FEM) is the most reliable computational tool used in the simulation of metal cutting processes. The main advantage of using FEM lies in the capability to predict various outputs and characteristics of a metal cutting process such as forces, stresses, temperatures etc. that are difficult to measure in real time thus saving the cost of experimentation [1]. In order to achieve accurate metal cutting simulation, material constants must be obtained at high strain rates (up to 106 = s), temperatures (up to 1000 ℃) and strains (up to 4). The modeling of an accurate ow stress model is highly important for the FEM of a machining process. The most widely used ow stress formulations in metal cutting simulations are Oxley, Johnson-Cook and Zerilli-Armstrong material constitutive models. These material constitutive models are built from the existing methods for determining the flow stress models which include the static tests (tensile, compression), dynamic tests (split-Hopkinson bar technique), inverse method (machining test) and a combination between these methods. The use of various methods for determining the material constants for the numerical modeling of a machining process create discrepancies in the accuracies of the flow stress modeling [2].
To reduce the discrepancies and make a more interactive data set, Shatla proposed a hybrid method to determine the material constants of the constitutive equation [3]. The basic idea about this method is to minimize the error between the measured cutting forces and those predicted analytically using computer code OXCUT based on Oxley's machining theory [4]. Another approach based on FEM in conjunction with orthogonal machining tests has been also proposed in the literature. The material constants of the constitutive law were interactively tuned until a good match between the cutting force obtained by FEM and the measured one is obtained. Apart from being time consuming, the parameter used by these methods is the cutting force to identify material constants. Since there is a compound effect of strain rate and temperature, it is observed that the cutting force was less sensitive to errors in the material constants.
The discrepancies observed have been overcome by using the inverse method that has been developed based on machining tests for the characterization [5]. In this method, the measured cutting forces and chip thickness were used to calculate analytically the flow stresses, strains, strain rates and temperatures in the primary shear zones. Then, the material constants were obtained using a nonlinear regression solution. The main advantage of this approach is that extreme conditions are achieved directly with machining tests which is not possible with any of the other methods. But most of the research in metal cutting considers Oxley's machining theory to begin with and proceed with defining experimental constants and this might be one of the reasons for the discrepancies observed in the metal cutting numerical models.
In this research, the experimental recordings have been taken into consideration for the material constants to de ne the material behavior in the elastic zone. Since, the research is still in the initial phase and the lack of thermal conditions recording equipment, the constants from literature have been considered by matching the working set-up and conditions. This is one of the prime considerations for expanding the future work to reduce the discrepancies caused by not using thermal constants from experimental data. The main motive of the experimental work in this research is to probe more into the difference from the existing the general opinion of researchers on the shear angle direct proportionality with cutting speed. During the initial experimental work of this research it was noticed this opinion is not always true. The two different machining strategies in high speed machining of stainless steel were employed and it has been observed that the shear angle was not dependent on the cutting speed but on tool-chip interface time as shown in Figure 1 and Figure 2. The data analysis of the recorded experimental results has been extensively done for a clear comprehension of the factors involved in the variation of the shear angle and the considerations to be taken account for the finite element modeling of the machining process.
Finite Element Method
In the experiments conducted for this research, we have collected the chip data and calculated the shear angles with the formulae available in the literature. Thus, by understanding the chip morphology we can determine the optimal cutting conditions. Generally, application of finite element modeling to cutting process involves Eulerian, Lagrangian or Arbitrary Lagrangian Eulerian (ALE) formulations. In Eulerian approach, as the mesh is fixed in space, the numerical difficulties associated with the distortion of elements are eliminated. In Lagrangian approach, the reference frame is set by fixing the grid to the material of interest such that as the material deforms the grid also deforms. Lagrangian formulation is easy to implement and is computationally efficient. Difficulties are seen in this approach when elements get highly distorted during the deformation of the material in front of the tool tip [1,6].
Eulerian and Lagrangian approaches have their own advantages and disadvantages in contrast and with this in view, a more general approach, Arbitrary Lagrangian Eulerian (ALE) approach was introduced which combines the best part of both these formulations to one. ALE reduces to a Lagrangian form on free boundaries while maintains an Eulerian form at locations where significant deformations occur, as found during the deformation of material in front of the tool tip; thus, avoiding the need of remeshing. This is seen as the primary advantage of ALE and the use of this method has been done for the distortion control in the Finite Element Modeling of the process [7-9].
Details of the geometry
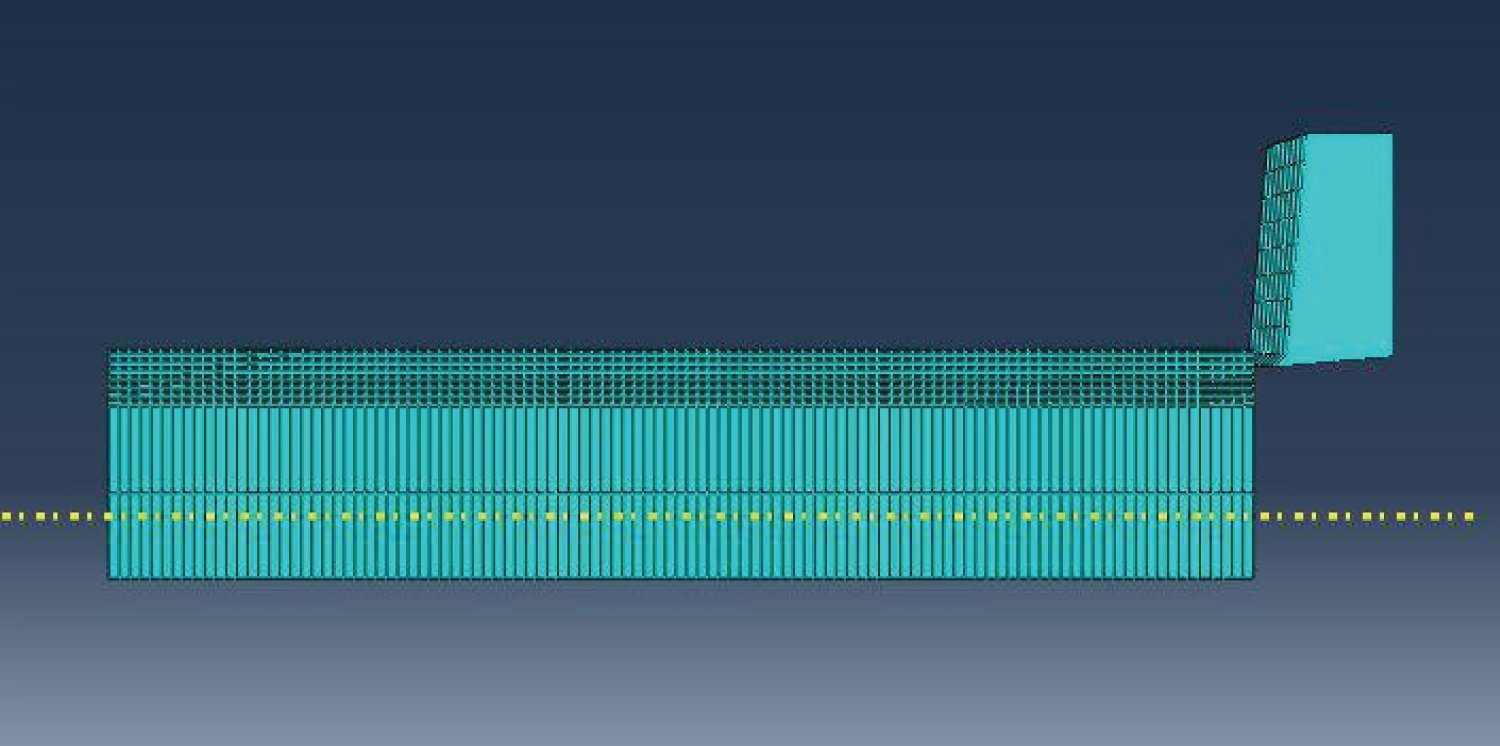
The workpiece geometry has been designed as a rectangular block with the depth of cut and in regard to the tool the rake angle and clearance geometries are done as per the experimentation done [10,11]. Due to the limitations in the software, the dimensions and the parameters have been scaled down to accommodate for analysis. The cutting speed has been maintained constant and only the rpm is varying in the experiments. Due to the constant cutting speed and only varying rpm, for ease of analysis the workpiece is considered to be rectangular and the rpm is converted to linear speed to machine the rectangular surface, which has been referred from existing literature [12]. Care has been taken to scale in proportion, not to affect the results and the speed of simulations. The details of the geometry used for the simulation of the experimental set-up are as shown in the Table 1.
The simulation needs the workpiece and tool to be set at a particular geometric configuration and constrained at certain kinematic spatial constraints.
Details of the modeling
The finite element model consists of a cutting tool and a workpiece. The extension of plane strain condition has been done for the 3D FEM simulations. The cutting width is very large than the undeformed chip thickness. The basic assumptions of 2D FEM are extended regarding the tool geometry. The material properties are defined in the Table 2.
Material Behavior
The FEA simulation uses the Johnson-Cook model for dealing with the elastic-plastic behavior of the material to accommodate the deviatoric and hydrostatic effects seen in metals. The Classic Metal Plasticity Model was selected for the current research because it accommodates plastic ow associated with isotropic yield, using perfect plasticity or isotropic hardening behavior and can be used when the rate-dependent effects are important. It has an advantage of being able to be coupled with the progressive damage and failure models to specify the damage initiation and evolution laws. This gives an opportunity to specify the progressive degradation of the material stiffness and the removal of damaged elements from the mesh generated. Materials show an increase in their yield strength as the strain rates increase [14-16]. This effect is important in many metals when the strain rates range between 0.1 to 1 per second and becomes significant when the range is between 10 and 100 per second. In machining, we see the strain-rates are of the magnitudes 104 per second which give the need to consider strain-rate effects in this model.
Johnson-Cook plasticity model
The traditional Johnson-Cook (JC) plasticity model is widely used in the metal cutting Finite Element (FE) analysis. From the industrial perspective, one important advantage of the JC model, compared to many others, is its availability as built in constitutive model in the commercial software packages. It is assumed in a JC model, that the flow stress is a unique function of the total strain, plastic strain rate, and temperature and their effects on the ow stress can be described in a multiplicative fashion as shown in Equation 1 [1,14,17,18].
The flow stress is the stress that must be applied to cause a material to deform at a constant strain rate in its plastic range. Because most materials work hardens under these conditions the flow stress is a function of the degree of plastic strain, the general case with most of the metals is to have a deformation rate in the direction normal to the yield surface. This is a particular type of isotropic hardening model that take all the above stated factors into consideration for the simulation modeling. It generally is of the form
The constants in the equation 1 represent:
A = Yield stress corresponding to a 0.2 offset point. (When a yield point is not easily defined based on the shape of the stress-strain curve an offset yield point is arbitrarily defined. The value for this is commonly set at 0.1 or 0.2)
B and n = Represent the strain hardening effects
C = Strain rate effect
m = Temperature softening
= The equivalent plastic strain
is the dimensionless plastic strain rate for
The first part of the J-C equation is the strain dependent component, while the second part is a strain rate modifier which introduces strain rate hardening. The third part is a temperature dependent component which accounts for thermal softening of the material at elevated temperatures. The strength of the material is thus a function of strain, strain rate, and temperature. The model assumes that the strength is isotropic and independent of mean stress. The values of A, B, C, n, and m are determined form an empirical t of ow stress data as a function of strain, strain rate, and temperature. In this thesis, the experimental data could not be used to generate the values of the material constants used for modeling. The use of material constants from literature has been done and care has been taken to select the constants from a similar experimental set-up and working conditions as in the current experimentation. Apart from the plasticity model for deformation, because of the high strain rates involved we need to consider the damage criterion for metals which defines the failure method which needs to be considered for its simulation.
Johnson-Cook dynamic failure model
Material failure refers to the seizure of load-carrying capacity of any material those results from progressive degradation of the material stiffness. Chip separation always has been a matter of controversy among the research community and that is reflected in the numerical simulations where no clear direction is given as to which is the best approach. The specification of a failure mechanism consists of four distinct parts:
1) Definition of the effective (or undamaged) material response
2) Damage initiation criterion
3) Damage evolution law
4) Mesh dependency and choice of material removal
The Johnson-Cook dynamic failure model is based on element integration points and the value of equivalent plastic strain at these points. The damage parameter (E) is used for judging the failure in the materials [19-21].
Here, = Increment of the equivalent plastic strain during an integration cycle
= Equivalent strain to fracture under current conditions
The failure in these models is assumed to occur when the value of the damage parameter equals or exceeds 1.
In general, the deformation in machining is due to ductile fracture. If the shear fracture comes to play along with the ductile fracture it might lead to segmental chip formation which is an unseen effect in this research. We only discuss ductile fracture in this research. This kind of failure can be accounted to the nucleation, growth and coalescence of the voids in the material structure. This model proceeds with an assumption that the equivalent plastic strain at the onset of damage is a function of stress triaxiality and strain rate.
The general form of the Johnson-Cook damage criteria is of the form: [4,7]
Where,
η = -p/q is termed as stress triaxiality 170
p = Pressure stress
q = Mises equivalent stress
= Equivalent plastic strain rate
In this research we use Johnson-Cook damage criterion which is a special case of the ductile damage criterion.
Where,
D1 - D5 - Failure parameters measured at or below the transition temperature
p/q - Non-dimensional pressure-deviatoric stress ratio
T - Non-dimensional temperature
- Non-dimensional plastic strain rate
- Reference strain rate
The damage model is used in conjunction with the Johnson-Cook plasticity model. Care is taken to keep the melting and the transition temperatures constant with the values of specified in the plasticity definition. The non-dimensional temperature is defined the same way as in the Johnson-Cook plasticity model the constants used as shown in Table 3.
Thermal model
In a fully coupled thermal-mechanical analysis, the procedure enables to solve simultaneously for stress and temperature fields. The heat transfer equations are integrated using an explicit forward-difference rule and mechanical response by explicit central-difference rule [6,12,23].
For high rate deformation problems, it can be assumed that an arbitrary percentage of the plastic work referred to as the inelastic heat fraction done during deformation. The conductive heat transfer between the contact surfaces is assumed to be defined by the Equation 4 [14,24].
Here, q is the heat flux per unit area crossing the interface from point A on one surface to point B on the other, A and B are the temperatures of the points on the surfaces, and k is the gap conductance. In the FEA software, k may be defined as a function of factors like temperature, distance, pressure. The default is to make k a function of the clearance d which is the method used in this study. When k is a function of gap clearance, d, the tabular data starts at zero clearance and defines k as d increases. If gap conductance is not also defined as a function of contact pressure, k will remain constant at the zero-clearance value for all pressures.
Contact and friction model
The contact modeling for the present work uses a modified Coulomb friction model to de ne the contact between the cutting tool and the workpiece. Wu and Zhang [25] in their work utilized the model which states that the contact between the chip and the rake surface region can be divided into two regions namely:
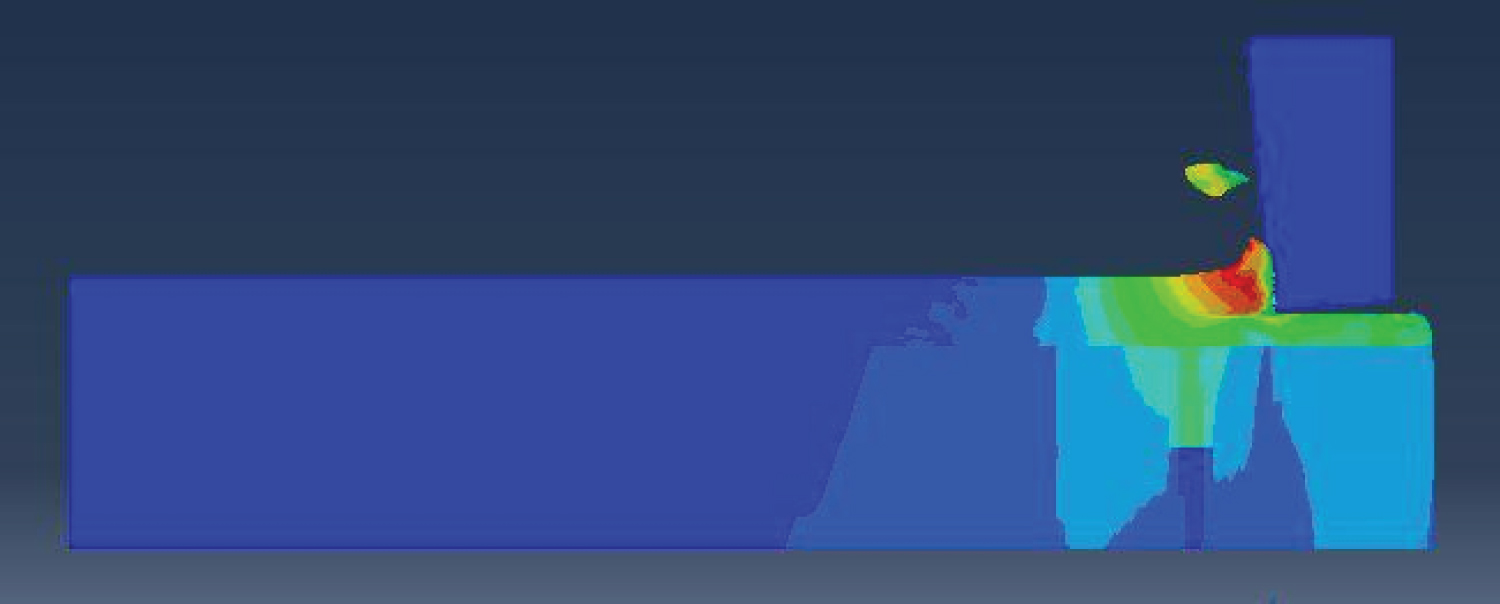
1) Sticking region (shown in Figure 3)
2) Sliding region (shown in Figure 4)
Where τcriti can be defined as
Here is defined as the uniaxial yield stress of the work material. The formulation indicates that the friction is sliding when the friction stress is below τcriti, and it becomes sticking when the friction stress is equal to or larger than the τcriti regardless of the contact normal stress. Sticking and sliding friction conditions along the tool/chip interface are dependent on the direct stress magnitude. Sticking will occur at high contact pressure and when the contact pressure is low, as is the case away from the tool cutting edge, sliding friction will dominate.
There are many variations on the value of friction coefficient which are used in literature. Koenig, et al. suggest a constant friction coefficient of = 0.3, while others use a variable friction coefficient calculated from orthogonal cutting tests according to the Equation 8 [1,2,12].
Where,
Fp - Force component along the direction of cutting velocity
Fq - Force component perpendicular to the direction of cutting velocity
The important parameters taken a note of during the thermal analysis of orthogonal machining are:
1. The condition for which = 0.5 is in the sticking zone and = 0.3 is in the sliding one ensures the best prediction of results in metal cutting analysis [26].
2. In elastic heat fraction (0.9, this is typically used in the simulation of high-speed manufacturing processes involving large amounts of inelastic strain, Where the heating of the material caused by its deformation significantly influences temperature-dependent material properties [6,12]).
3. Frictional energy conversion factor (All dissipated frictional energy is converted into heat and distributed equally between the two surfaces. f = 0.5) [6,14].
4. Fraction of the thermal energy conducted into the chip (0.35-1 for carbide cutting) [12].
5. Fraction of heat generated due to plastic deformation remaining in the chip (0.9-1) [6,14].
We define all the above-mentioned properties in the material definition and the interaction properties to allow the thermal effects play a role in the simulation results. Both the frictional forces and the friction-generated heat are included in the kinematic contact algorithm through the tangential behavior and gap heat generation modules of the software. The heat that goes into a chip evaluated during a software simulation combining the effects of both the heat fractions can be only 0.7-0.8 of the total.
Mesh dependency and choice of material removal
The main concern while using the constitutive models is the presence of mesh dependency.
Characteristic Length (L) helps in determining the value of equivalent plastic strain at failure and cannot be used as a material parameter for specification of the damage evolution law. For this reason, the damage evolution is defined in terms of equivalent plastic displacement (upl). Using the characteristic length, we have the energy dissipated expressed in terms of per unit area and not per unit volume and the softening part is expressed as stress-displacement relation.
The energy dissipation is treated as an additional parameter to compute the displacement, at which full damage occurs, ensures the correct amount energy release and alleviates the mesh dependency [14].
Linear form
The evolution of the damage variable with the relative plastic displacement can be specified in tabular, linear or exponential form. In this research, we use a simple linear evolution of the damage variable with effective plastic displacement. The linear evolution of damage variable with effective plastic displacement is as shown below. The effective plastic displacement uplf, at the point of failure (full degradation) can be specified. Then, the damage variable increases according to Equation 9 [14].
This definition ensures that when the effective plastic displacement reaches the failure displacement value , the material stiffness will be fully de-graded [14,22,27].
The linear damage evolution law defines a truly linear stress-strain softening response only if the effective response of the material is perfectly plastic (constant yield stress) after damage initiation.
The damage evolution law can be specified in terms of equivalent plastic displacement, upl, or in terms of fracture energy dissipation, Gf. Both of these options take into account the characteristic length of the element to alleviate mesh dependency of the results. Keeping a watch on all these considerations, an 8-node linear brick, reduced integration and hourglass control elements (C38DR) have been considered for the tool and workpiece. The workpiece has been meshed with 23560 elements and the tool with 386 elements as the tool was coarsely meshed. This was the meshing pattern followed for the simulations run without temperature effect in the material constitutive modeling. With the inclusion of temperature effects on the material constitutive models we have used elements (C38DRT) with the 8-node thermally coupled brick, trilinear displacement and temperature, reduced integration and hourglass control with the same number of elements to record the impact of thermal effects on the material behavior. The mechanical-thermal model has increased number of elements to 51600 on the workpiece and the number of elements on the tool remain constant as seen in Figure 5. The results of these settings from the numerical modeling will be discussed in the following chapters.
Solution Procedure
To solve highly non-linear problems with large deformations and change of contact, as in the case of machining we use the explicit dynamic method. The advantage of using explicit dynamic procedure is its ability of an explicit integration scheme for time which helps in calculation of the state of the system at a later time from the current time.
The approach for simulations is a combination of both Eulerian and Lagrangian analysis. The ALE approach is incorporated to allow ow boundary technique without altering elements and connectivity of the mesh. This approach avoids severe element distortion and entanglement of the cutting without need for any remeshing criterion.
When explicit dynamic ALE formulation is used the conservation, equations are combined with the advective terms to account for independent mesh motion as well as material motion. The mapping of solution variables from old mesh to new mesh can be achieved by using advection. The solution for a time step advances step-wise when ALE approach is used. In this model, the ALE formulation is defined to remesh at frequency of once in 5 steps and 3 times to remesh every time remeshing occurs.
In the Lagrangian step the incremental motion of the material where the displacements are computed using the explicit integration rule and then all the internal variables are updated.
In the Eulerian or advection step where a mesh motion is performed to relocate the nodes such that the element distortion becomes minimum and the grid nodes can be moved according to any one or combination of the three algorithms namely, volumetric, Laplacian and equipotential smoothing. The element and the material variables are then transferred from the old mesh to the new mesh in each advection step. The results using these simulation settings, discussion on the possible reasons for the differences observed, conclusions and future work will be discussed in the following chapters.
Results and Conclusion
Experimental results
The results of finite element simulations are discussed. Firstly, the experiments results are presented which verify the initial hypothesis that claim the change of shear angle with tool-chip interface time. The simulation considerations mainly include the mechanical and thermal parameters of cutting as strain, strain rate, stress and temperature which have been explained in the previous chapters. The results from experiments are in Table 4 and Table 5.
Simulation results
From the above section, we proceed with the following conclusions:
1. The tool is considered with an edge geometry.
2. The tool is considered to be rigid as the experiments were run with different tools to eliminate the effect of tool wear.
3. The JC model constants have a strong impact on the flow stress values which is directly related to the chip ow and morphology. The JC constants should be selected as per the rake angle used in the experiments to have results which match the experimental values.
4. The impact of strains, strain rates, temperatures and friction is seen on the chip morphology and shear angle. The workpiece material modeling will be done with the consideration of temperature and friction effects.
With the considerations needed for the FEM simulations we proceed to verify the results from experimentation. From the initial hypothesis, we have results which show that change in material and tool-chip interface time have an impact on the shear angle. In this thesis, we have used three different tool-chip interface times and two different materials, which are the cause for the variations observed.
Influence of the tool-chip interface time
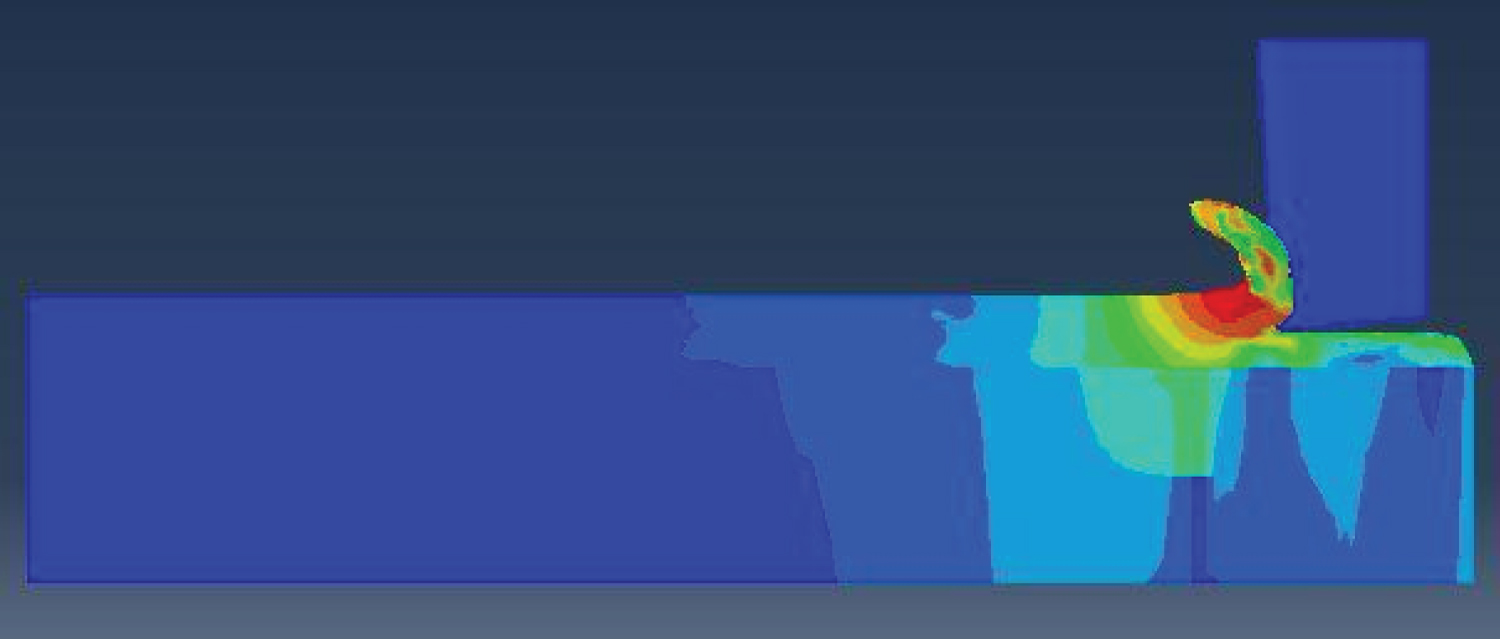
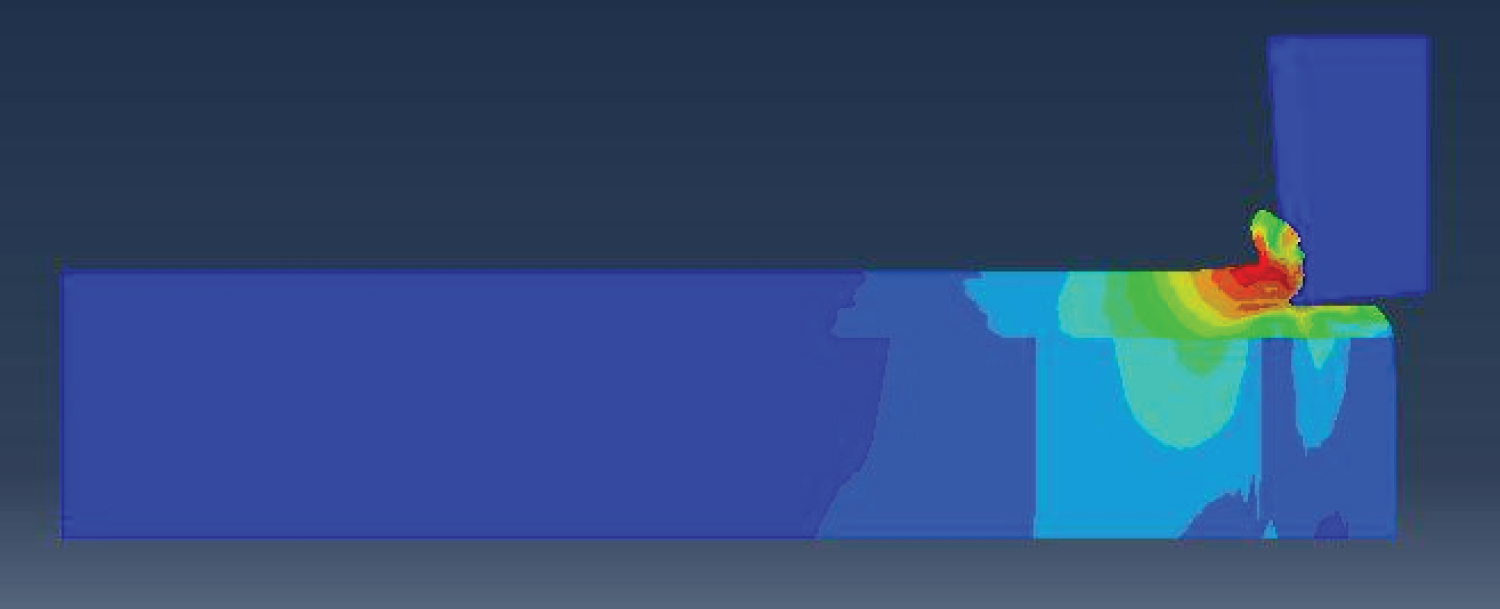
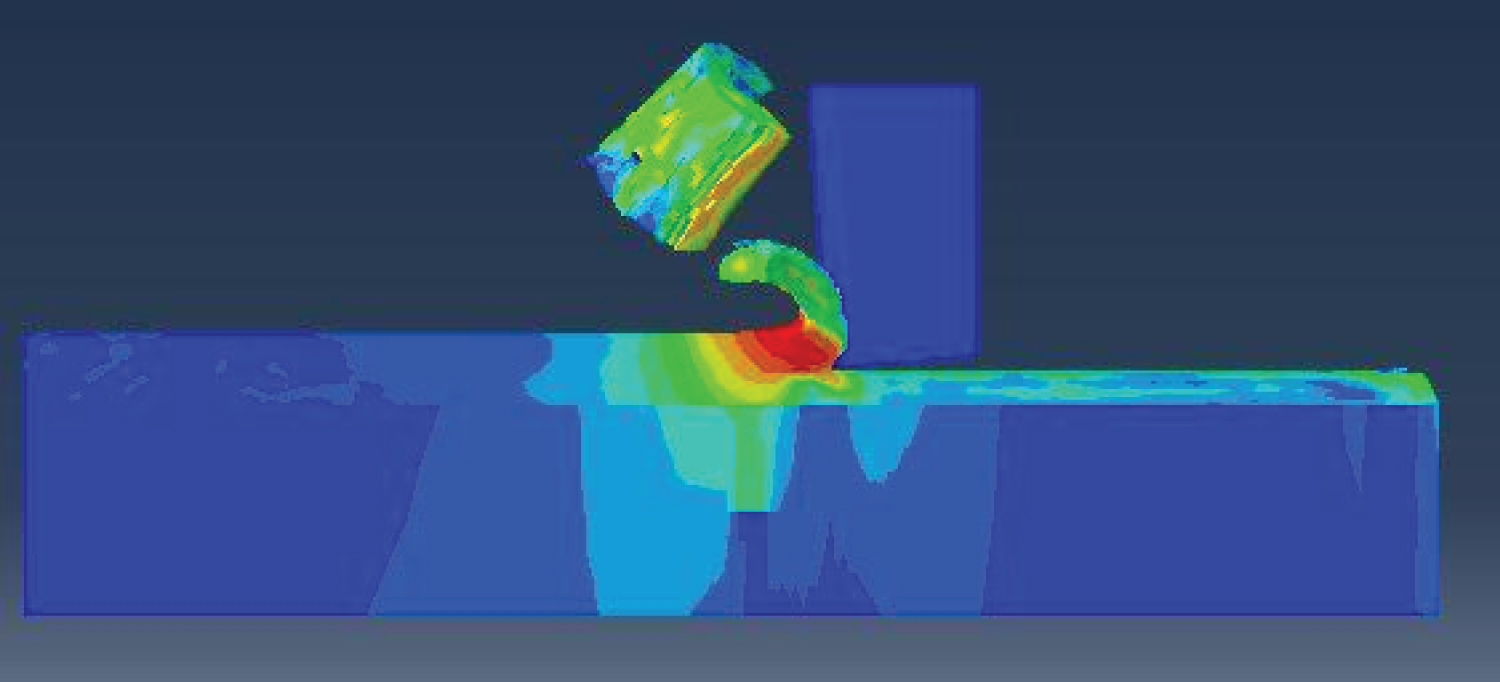
The differences in the chip morphology observed in the simulations are due to different tool-chip interface times as used in the experiments. The experiments are run at different tool-chip interface times. The engagement times are directly related to the variation of the cutting speed. The cutting speed was varied over a range of 53-250 m/min for Al-7075 and 88-325 m/min Al-2024 for interface times of 20 ms, 30 ms and 40 ms respectively. The feed is kept constant in all the simulation runs similar to the experimentation. The simulation result for Al2024 for different run times is shown in Figures 6, Figure 7 and Figure 8 and the observations are reported in Table 6. Similarly, the results for Al-7075 are reported in Table 7. The behavioral patterns are shown in Figure 9 and Figure 10.
The changes in cutting speeds have an impact on the tool-chip contact Lengths (Lc). The increase of the cutting velocity leads to the shrinkage of the shear zone and increases the shear angle as discussed in the equation 10 [4,7].
Where, ζ is chip reduction ratio, β is the shear angle, γ is the shear strain rate. From the above equation, we see that the changes in shear angle will decrease reduce the chip reduction ratio.
Influence of the workpiece material
The changes in the chip morphology observed in the results are related also to the change in material composition. Al-7075 is brittle compared to Al-2024 due to the presence of magnesium which reduces the ductility and increases the strength of the material unduly. This causes the chip formation earlier reducing the tendency to form longer chips as in the case of Al-2024 as seen in Figure 11 and Figure 12. The increase in strength due to the presence of alloy elements and the reduction in ductility results in the differences in the average shear angle, Von-Mises stress, strain at the tool-chip interface of Al7075 compared to Al2024 which can be seen in the Figure 13, Figure 14 and Figure 15.
The brittle tendency of Al-7075 doesn't allow to form long chips and the distortion observed in the mesh is also high in this case. At a given cutting speed the material brittleness lowers the value of fracture strain and thus makes the maximum stress in a flow stress curve occur earlier. This leads to instability in the primary shear zone and forms shorter chips than in the case of Al-2024. This brittle tendency due to increasing strain in the shear zone, as depicted in Figure 15, also leads to an increase in temperature at the tool-chip interface. The measurement of temperature will be conducted in future experimental and modeling work.
Experimental Results v/s Simulation Results
There is a variation observed between the experimental and simulation results obtained. But the observed trends have been in agreement to those reported in the literature [28,29] and experiments conducted for this research. This can be seen from the Figure 16, Figure 17, Figure 18, Table 8, Table 9, Table 10 and Table 11.
The reason for this variation can be attributed to the following:
1. There was no temperature data recorded in the experimentation which led to the thermal model of simulation depend on the available literature values.
2. During the experimentation, the team was focused on the shear angle rather than the temperature by products. Additionally, no cutting fluid was used but is proposed for the future work.
3. The material constitutive model has been referred from the available literature and impact of the material model has been discussed in the sensitivity analysis in this chapter.
4. The data available in the literature was not exactly recorded as per the set-up used in this research. There is a variation of the rake angle and tool geometry. The impact of rake angle is also discussed in this chapter.
5. There was an initial high mesh distortion when the tool plunges into the workpiece and this can be avoided with finer meshing in the interface. Due to limitations of academic version this couldn't be achieved.
6. The friction model considered has been referred from literature and not built from the experimentation.
The above-mentioned reasons are looked upon as future research expansion areas and are discussed in the section 8 in detail.
Contribution of the Current Research Work
In this research, the main focus was to present the dependence of shear angle on the tool-chip contact time contrary to the existing theories. This has been verified experimentally first and the numerical modeling has been done to replicate the experiments with an intention to have a predictive model and reduce future experimentation.
The trend followed in the experiments has been observed in the simulations verifying the dependence of shear angle on the tool-chip interface times, but there is a variation of the results obtained. The reasons for these variations are investigated and are looked at as future research expansion opportunities. The reasons for variations and possible future work considerations are discussed later in this paper.
Conclusions
From the results, we observe the following trends:
1. The value of shear angle decreases with the increase of tool-chip interface times as shown in Figure 17 and Figure 19.
2. A small shear angle means a long shear plane therefore, a high cutting force, high energy required for cutting, high shear strain and heavy strain hardening. This is seen in Figure 15.
3. From the Figure 13, we see the values of Von-Mises equivalent stress is inversely proportional to the tool-chip interface times and directly proportional to the brittle nature of the material.
4. The Figure 14 explains that the interface stress value increase are dependent on the material nature.
5. We observe lower residual stress values at lower cutting speeds which can be inferred from the stress plots at the chip-tool interface and from Figure 12 which explains the effect of material on the shear angle.
6. At the region of sticking friction where the normal stress of cutting is high the temperature and stress values are high. As we move away from the cutting tip these values keep decreasing.
Recommendations for Further Research
The differences in the results are due to the experiments as well as the simulations. As pertaining to the experiments, the values recorded are taken as an average of the chip thickness at three different points on a chip. Recording the chip geometry with respect to the chip length would serve as a more reliable method as it would have lesser impact of thermal interactions than the thickness. This will be considered for future research. The heat in cutting causes the expansion to be non-uniform. The heat transfer effects involved are difficult to measure and to model temperature effects accurately.
The variation between the experimental results and the simulation results can be attributed to the lack of Johnson-Cook constitutive constants related to this experimental set-up. In the experiments only the chip thickness values have been measured and due to this there is a lack of the information needed to generate material constants specific to this set-up. The constants used are of different set-up and this can be avoided in the future by recording the temperature and force values from the experiments [2,30,31].
The lack of specific material constants being the prime reason, the impact of the JC constants on the flow stress values has been explained in the sensitivity analysis. The use of JC constants of different rake angle also has an impact on the results. In this thesis, we have referred to the values of the JC constants of tool with -5 degree rake angle available in the literature [22], whereas the actual tool is of -7 degree rake. This also can be corrected if the JC constants are generated specifically to the experimental set-up. The use of inverse method based on machining tests as characterization, using the measured cutting forces and chip thickness should be used to calculate the flow stresses, strains, strain rates and temperatures in the primary shear zones. The material constants in this case are obtained using a nonlinear regression solution and the main advantage of this approach is that extreme conditions are achieved directly with machining tests. The approach to be followed for generating constants from experiments has been a validated method and is a potential area for future research expansion [2,5,32,33].
The initial mesh distortion which is the reason for the element deletion in the results has to be addressed by mesh refinement in the cutting zone. Due to the academic version of the software license the number of elements and nodes generated are limited. The lack of softening in the material model considered made it di cult to minimize the distortion and increase the smooth deformation of the material without element deletion. This needs to be taken care in the future work with high dense mesh in the contact zone and the consideration of the strain softening when the initial impact occurs to obtain results closer to experimentation. The details of high mesh density in the interface zone and the impact of it has been dealt in literature [1,25].
The impact of tool wear has been ignored in this research as the situation was avoided during experimentation. In the experimentation, there was a tool change for every test performed which reduced the impact of tool wear on the results. Considering the importance of the tool geometry, this needs a more detailed research as the coatings and edge geometries on the cutting inserts play a key role in metal cutting. This would be one of the areas of future work to consider the impact of tool wear in cutting and its impact on the results achieved. The dynamic nature of friction co-efficient is an area of interest which would dictate the chip flow and its damage model on the rake surface. The methods to record the friction values precisely have to be researched and implemented to make a sound simulation model which serves as a predictive tool for an engineer to minimize the investments on experimentation. The need for consideration of the thermal softening and strain softening effects has to be considered in the thermal modeling of the simulation model. In the current research, the standard Johnson-Cook model has been used for the simulations and the expansion of this can be done with the experimental thermal data. The impact of convection will also be taken into account by considering the lubrication effects and use of thermocouples or temperature recording equipment. By considering the temperature effects in the machining experiments, if the thermal softening can be incorporated in the constitutive law the results much closer to the experiments can be obtained. The impact of tool wear thermal softening and dynamic friction model in simulations are the active area of machining research.
Acknowledgement
The authors acknowledge financial support from Mississippi State University.


