
International Journal of Metallurgy and Metal Physics
(ISSN: 2631-5076)
Volume 3, Issue 2
Research Article
DOI: 10.35840/2631-5076/9219
Development of Dual Phase Microstructure in Medium Carbon Low Alloy Steel by Continuous Cooling Heat Treatment
Mohamed Alshwigi1, Susil K Putatunda1* and James Boileau2*
Table of Content
Figures
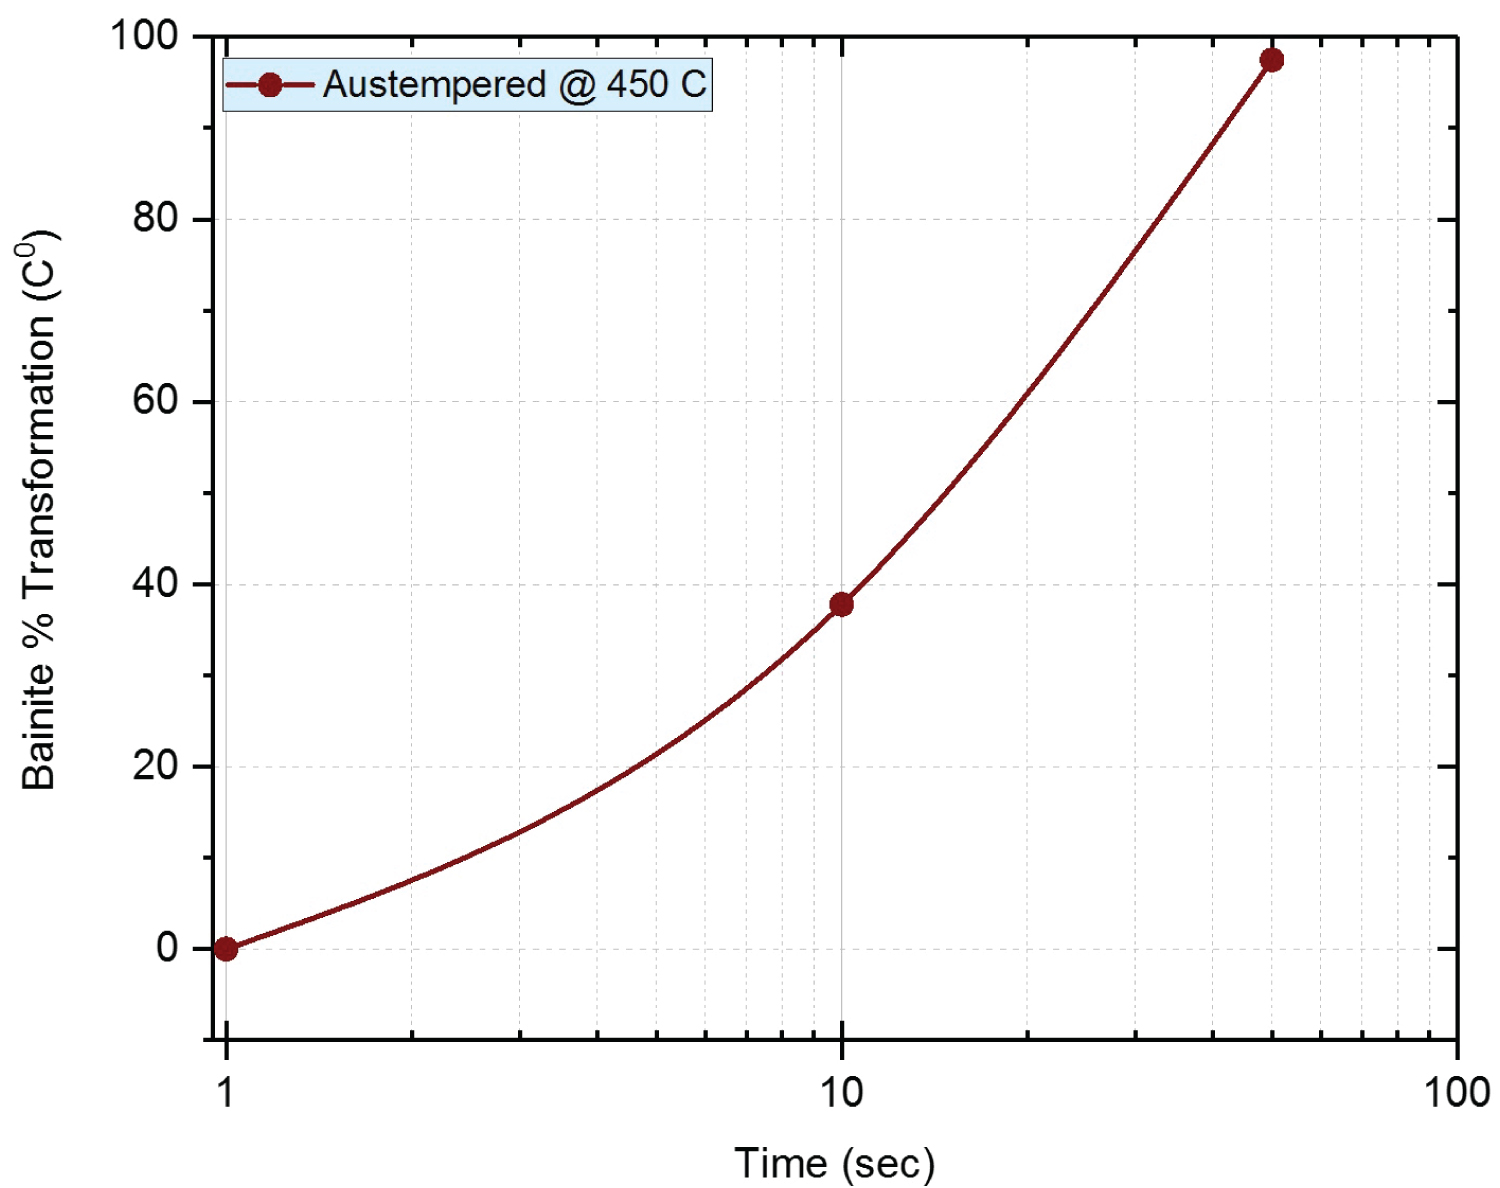
Figure 1: Fraction transformation time curve for sample B...
Fraction transformation time curve for sample B austempered at 450 ℃.
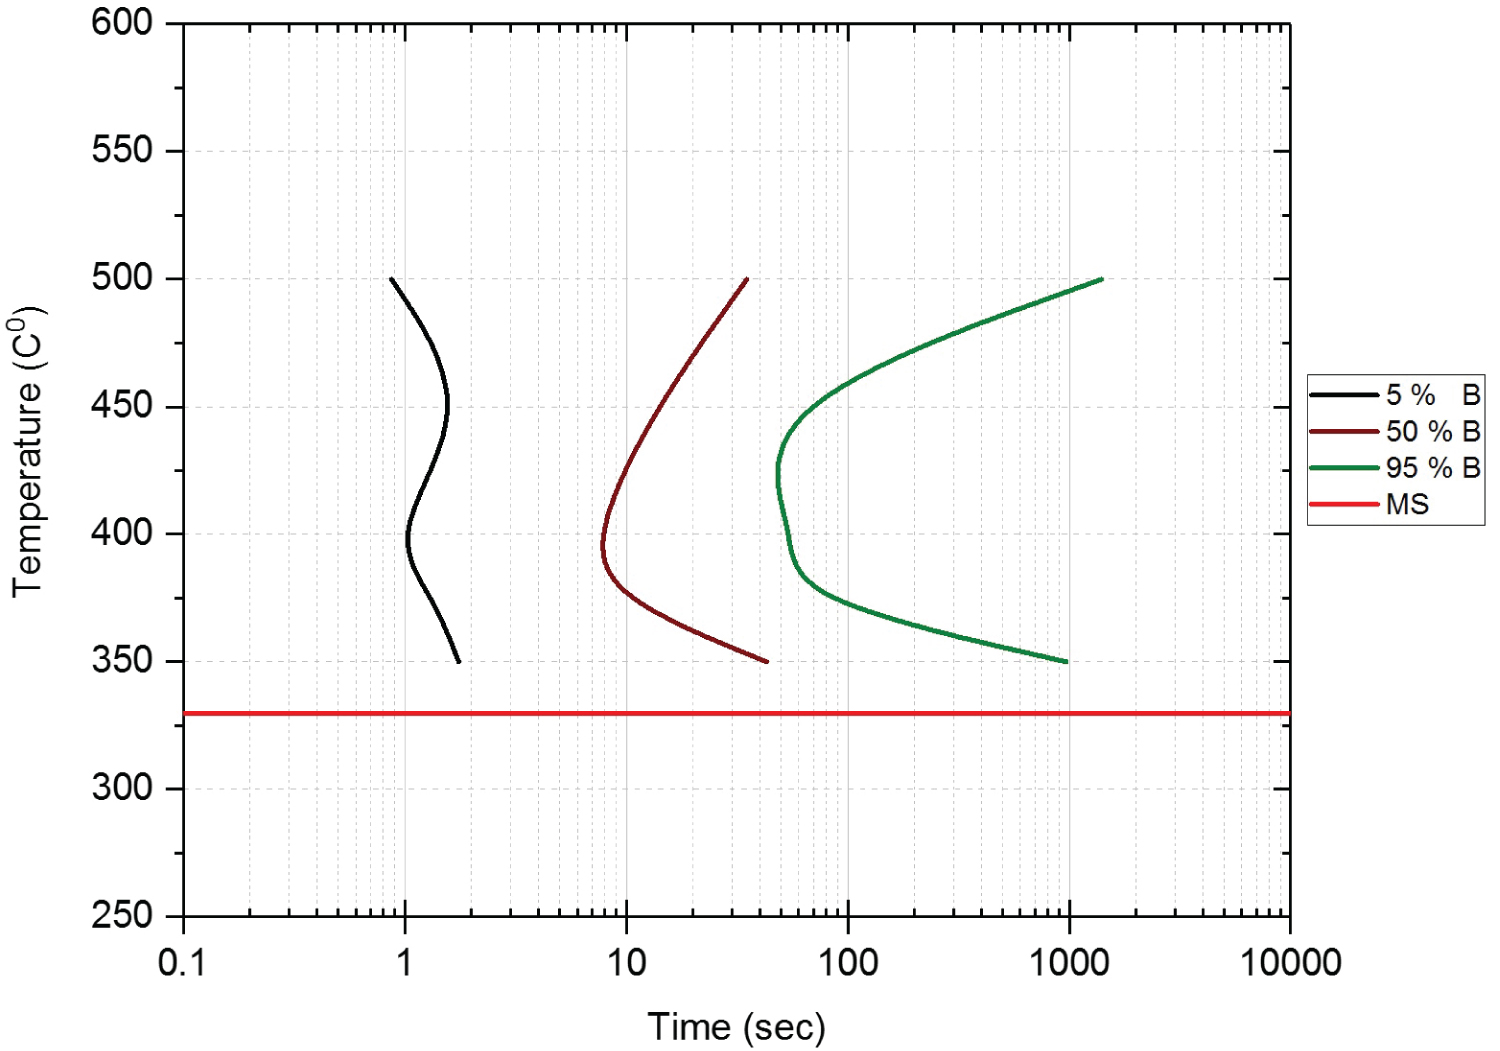
Figure 2: Experimental (TTT) diagram for 0.4% C steel for...
Experimental (TTT) diagram for 0.4% C steel for the bainitic temperature region.
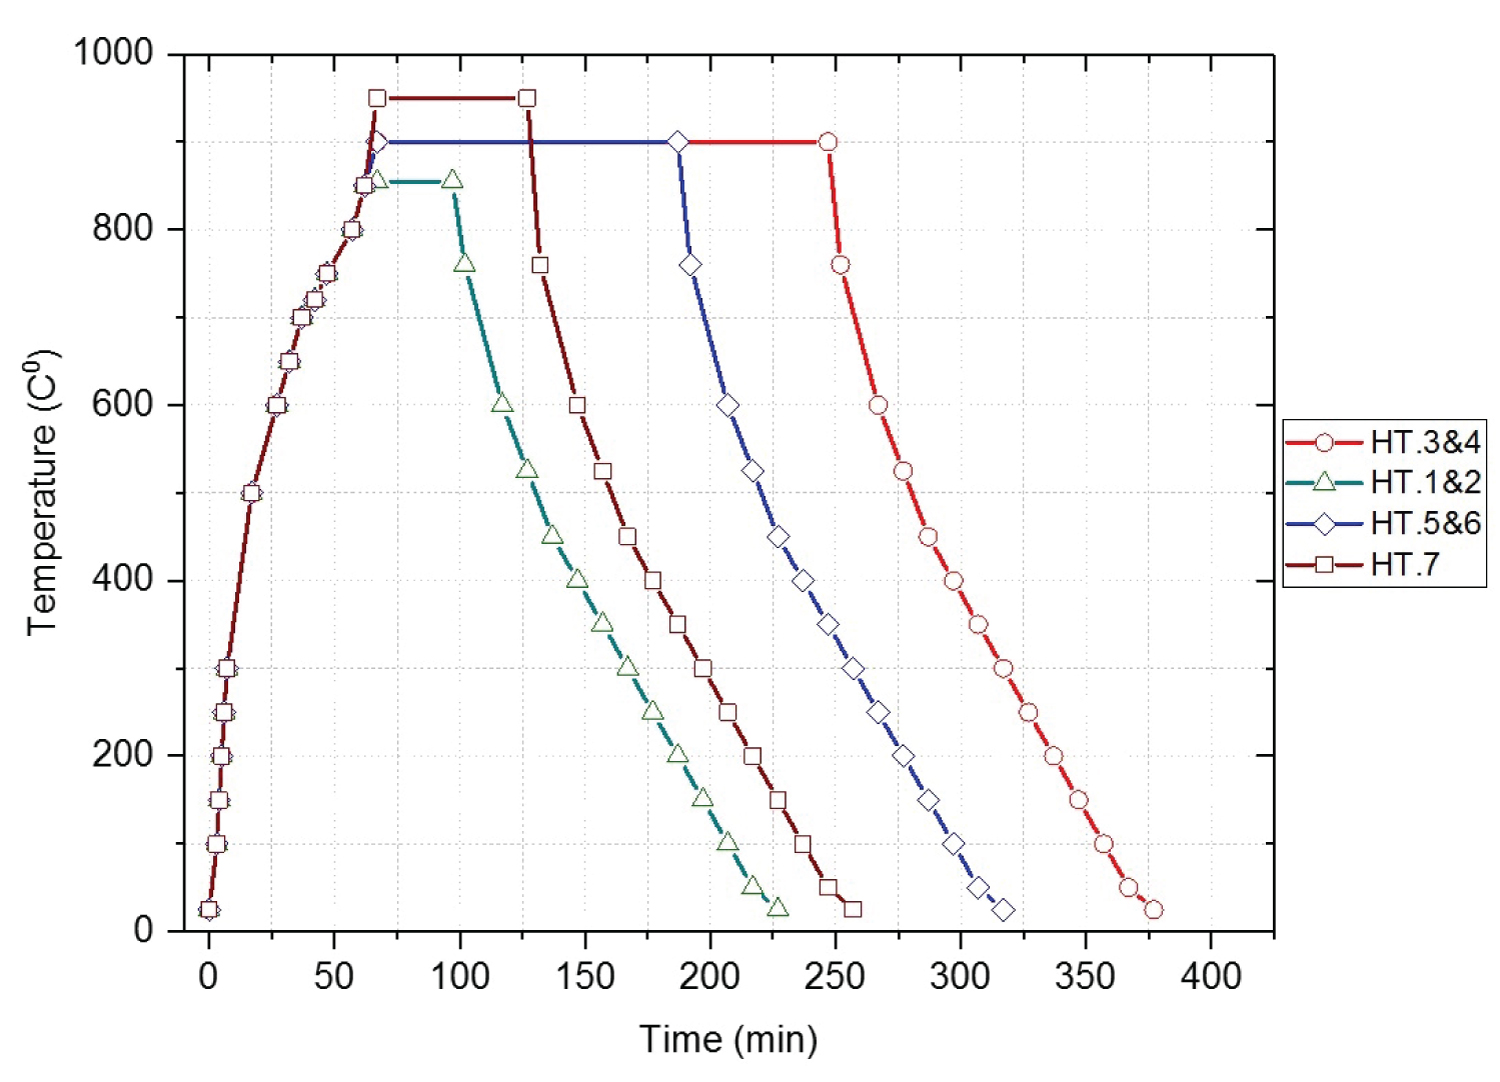
Figure 3: Heat treatment routes used for HT. samples of 0.4%...
Heat treatment routes used for HT. samples of 0.4% C steel.
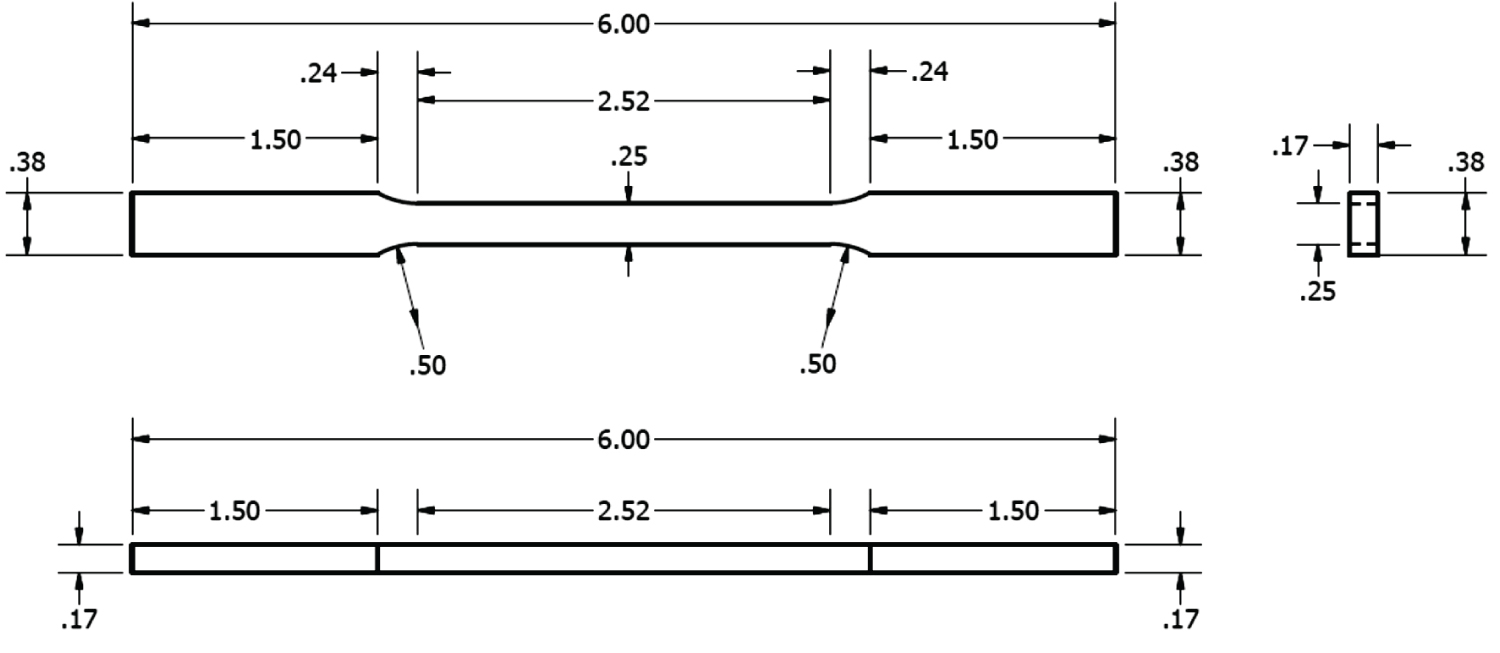
Figure 4: Rectangular sub-size tension test specimen ASTM...
Rectangular sub-size tension test specimen ASTM E8/E8M_13a.

Figure 5: Showing as received sample microstructure of 0.4%...
Showing as received sample microstructure of 0.4% C steel consisting of pearlite (dark etched) and ferrite (white etched), 500X, 2% Nital.
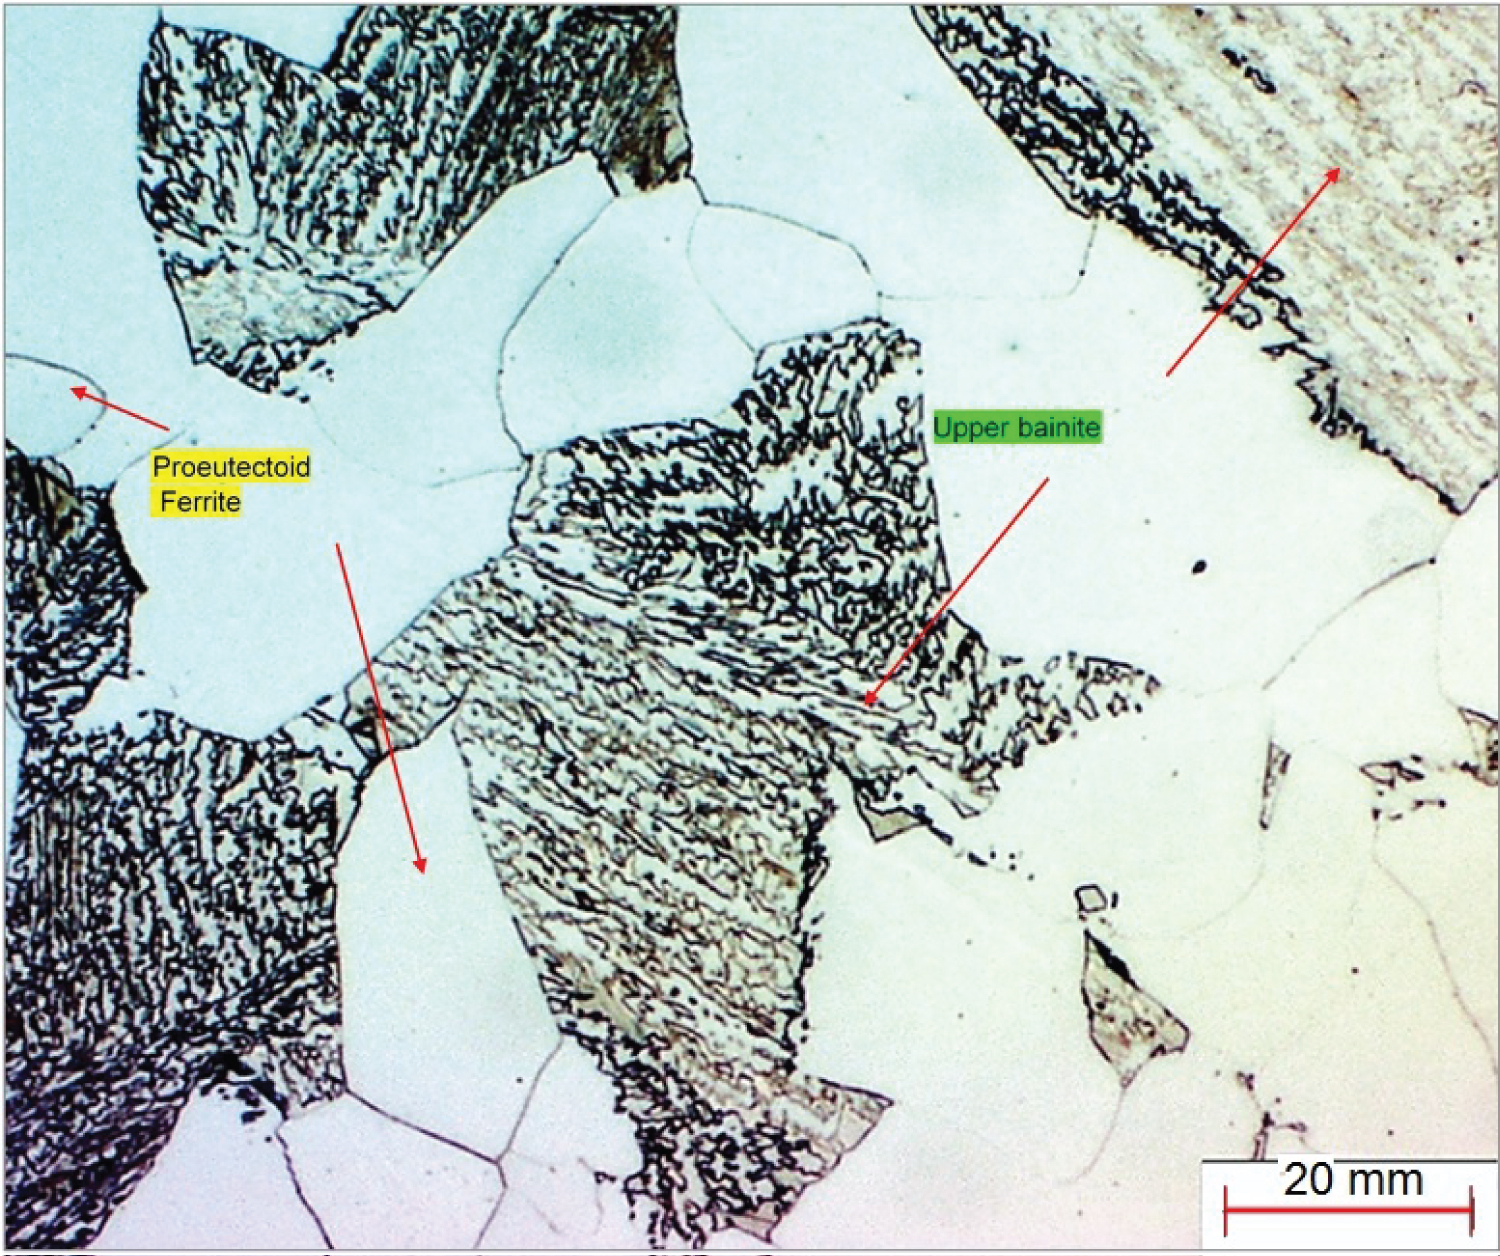
Figure 6: Showing sample HTS.3 microstructure consisting...
Showing sample HTS.3 microstructure consisting of 63% volume fraction of upper bainite (UB) and 37% volume fraction of proeutectoid ferrite (PF) (light etched), 500X, 2% Nital.
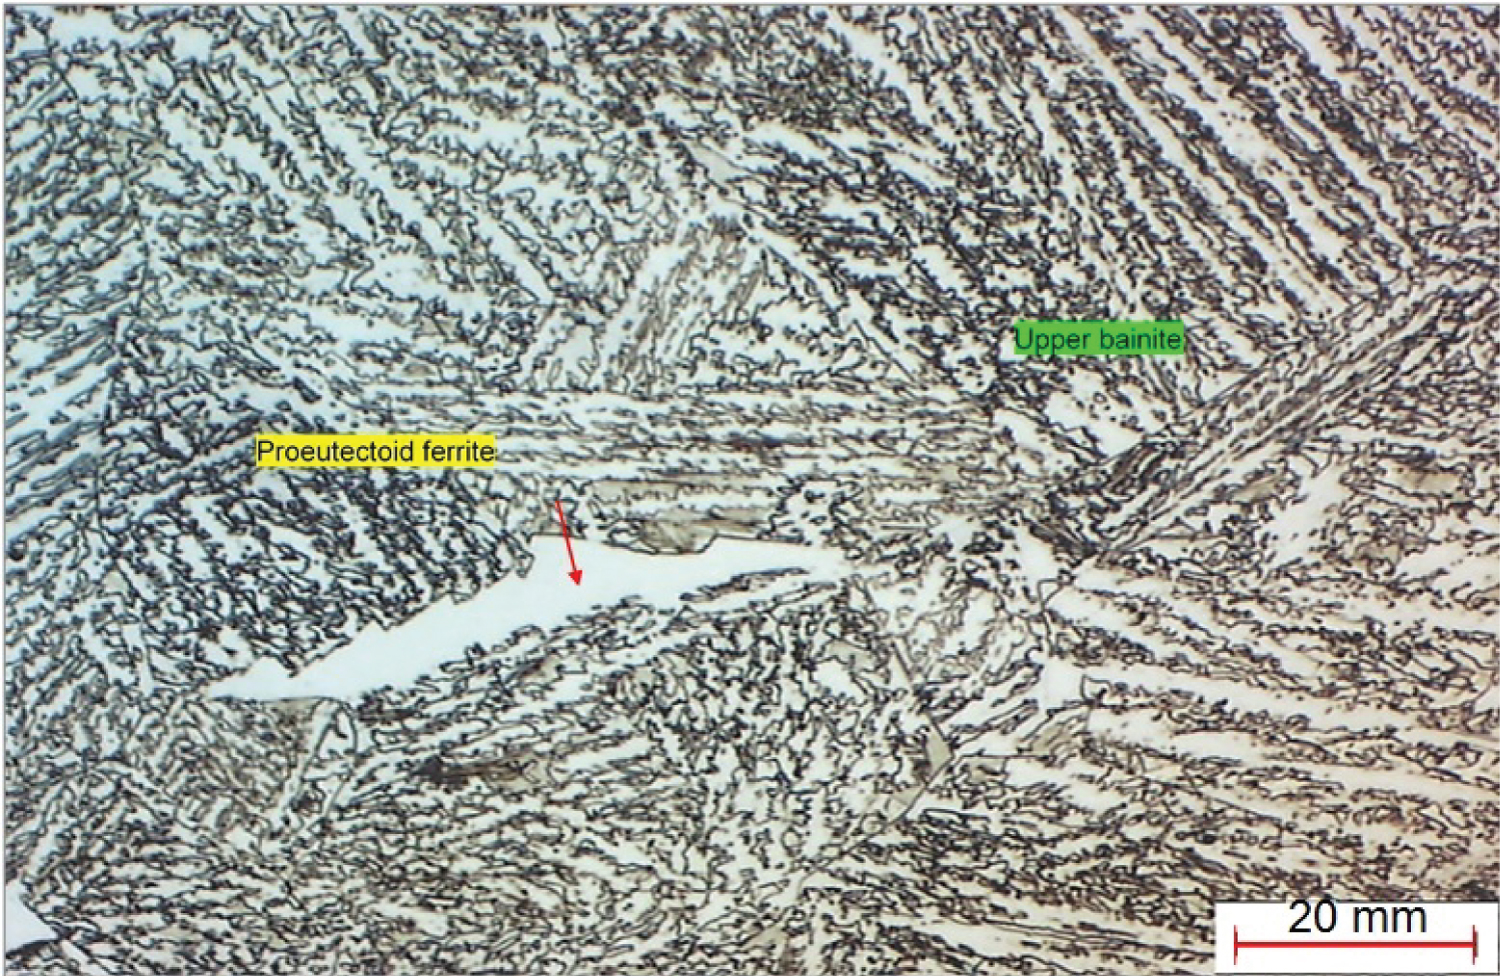
Figure 7: Showing sample HTS.6 microstructure consisting...
Showing sample HTS.6 microstructure consisting of 95% volume fraction of upper bainite and 5% volume fraction of proeutectoid ferrite (light etched), 500X, 2% Nital.
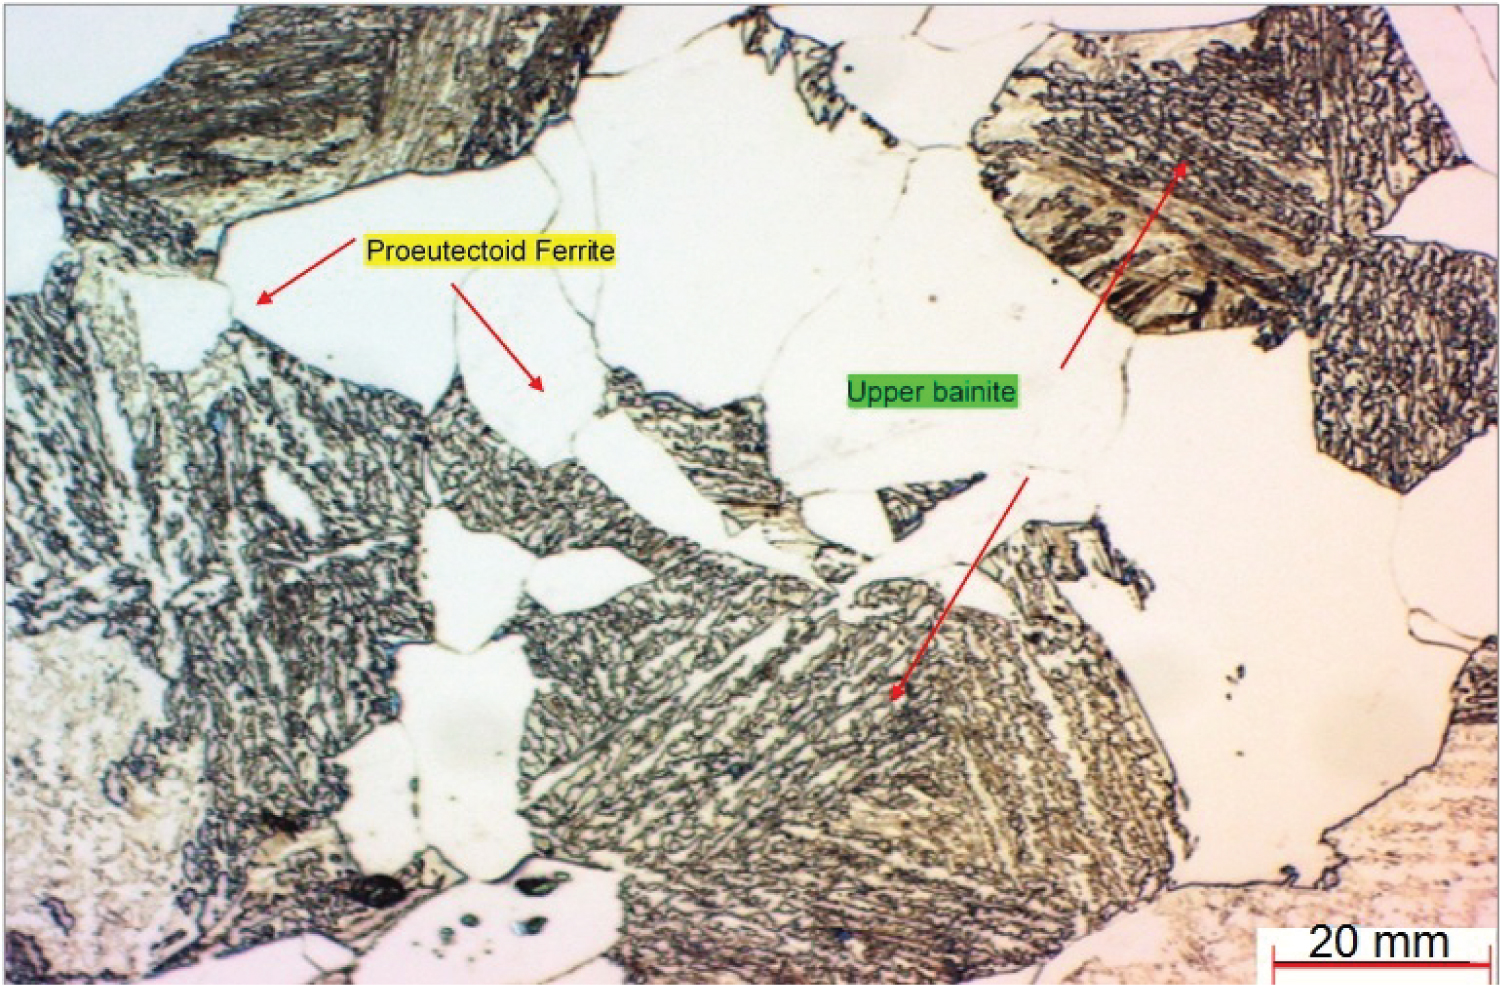
Figure 8: Showing sample HTS.7 microstructure consisting of 60%...
Showing sample HTS.7 microstructure consisting of 60% volume fraction of upper bainite and 40% volume fraction of proeutectoid ferrite (light etched), 500X, 2% Nital.
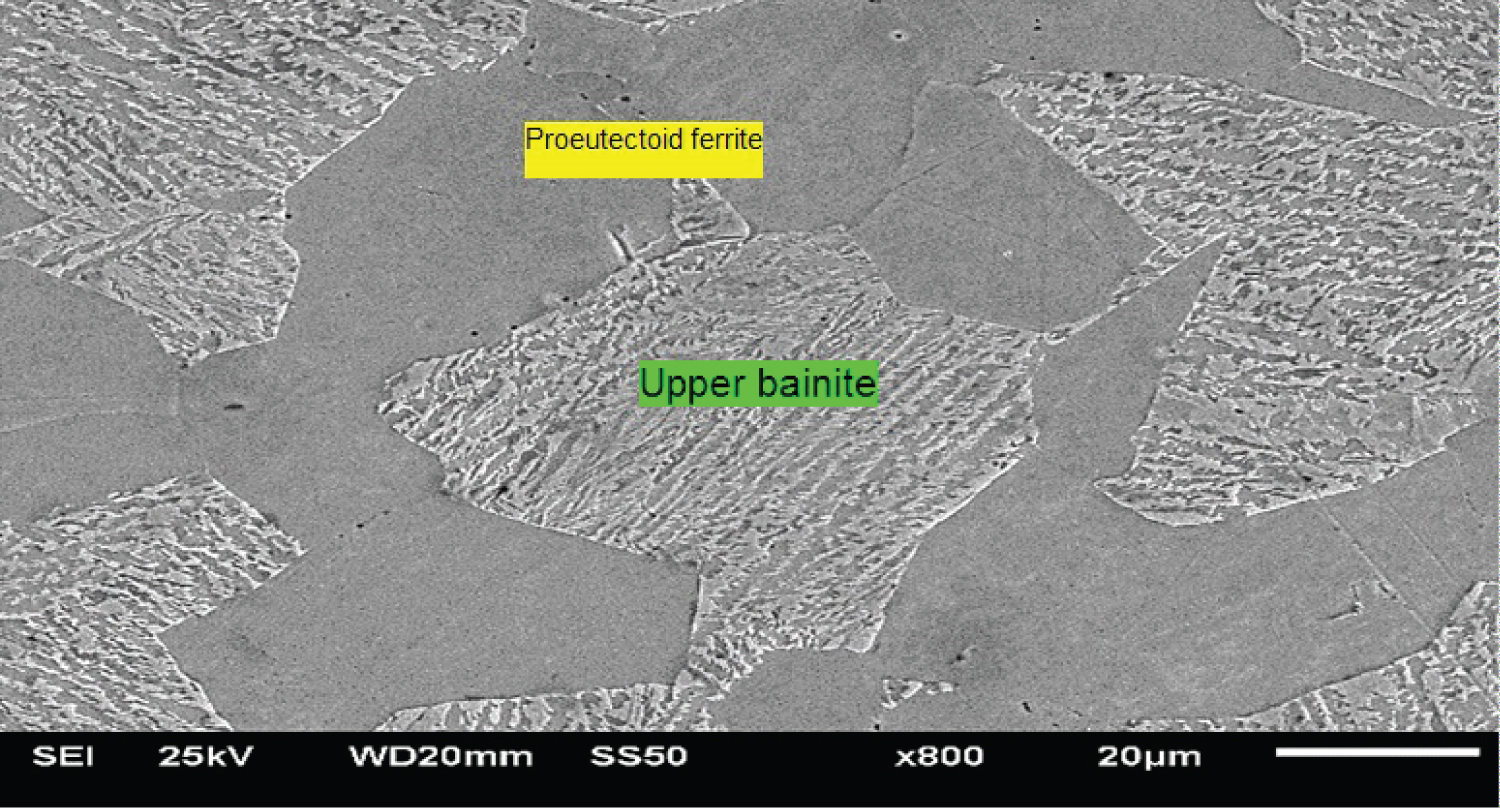
Figure 9: Sample HTS3. SEM micrograph showing 63% volume...
Sample HTS3. SEM micrograph showing 63% volume fraction of upper bainite grains and grains of proeutectoid ferrite (dark gray), 2% Nital.
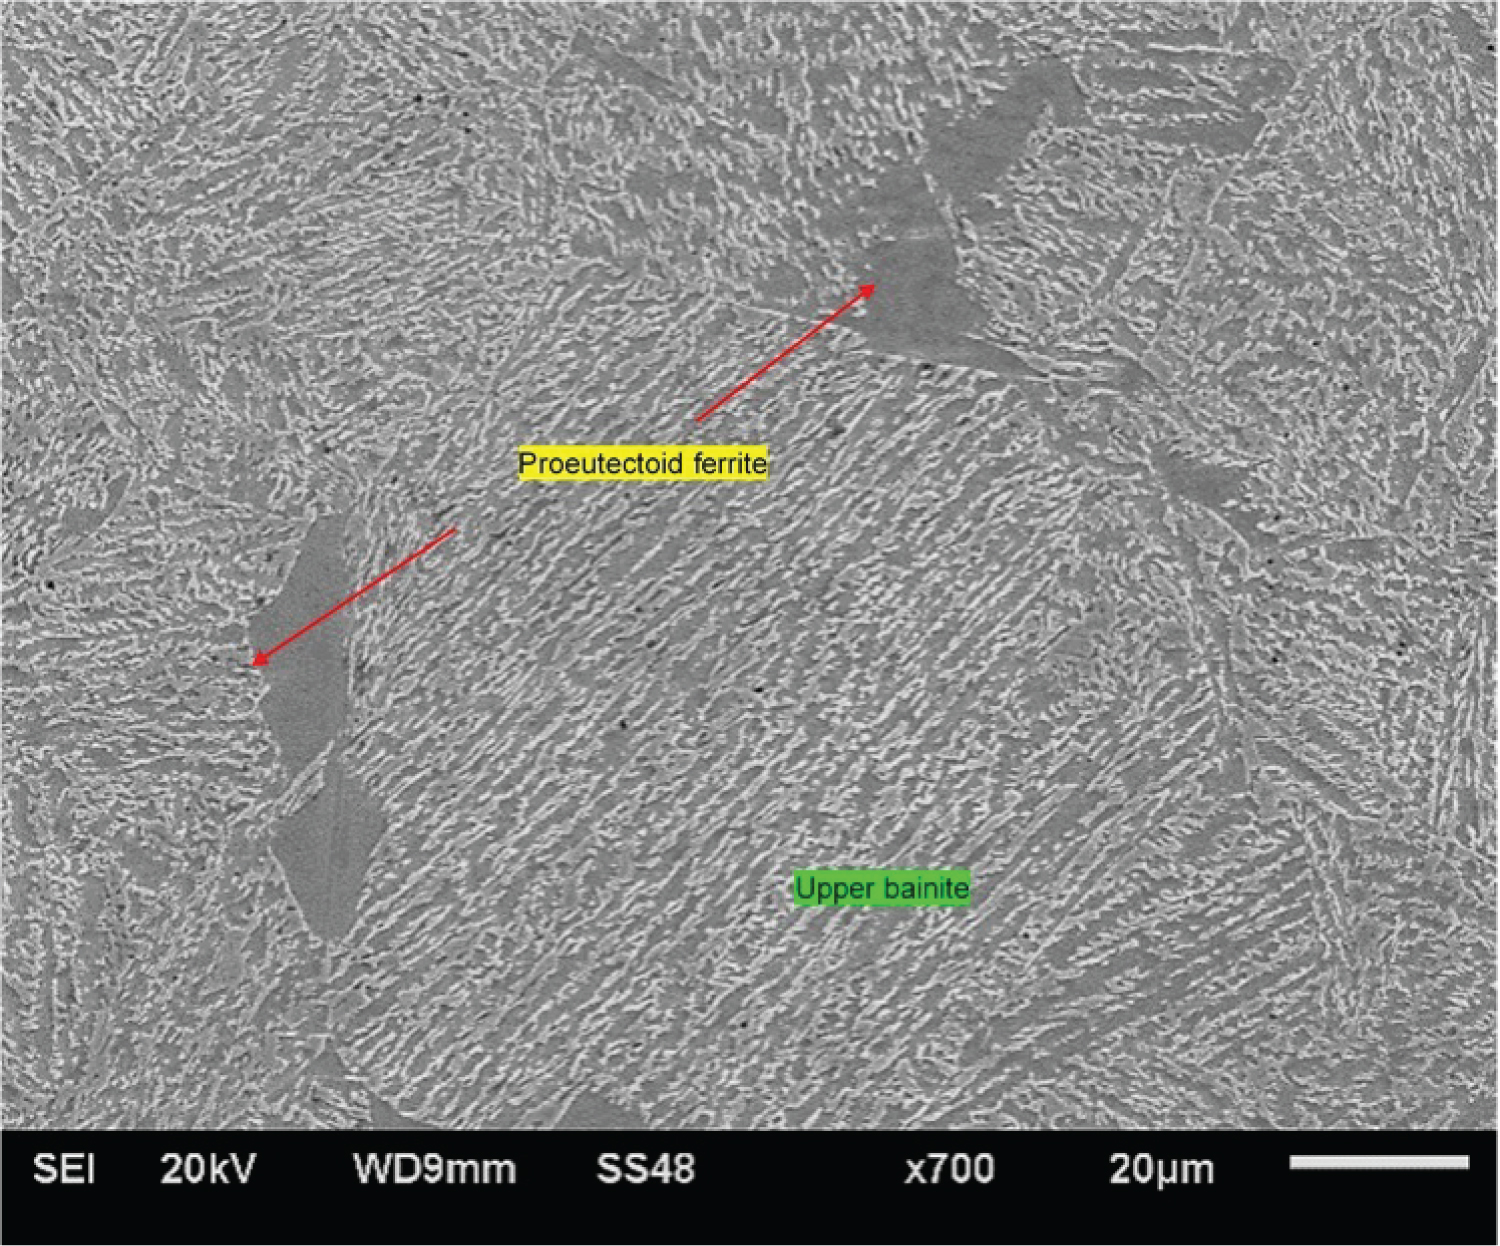
Figure 10: Sample HTS.6. SEM micrograph showing 95% volume...
Sample HTS.6. SEM micrograph showing 95% volume fraction of upper bainite with some grains of proeutectoid ferrite (dark gray), 2% Nital.
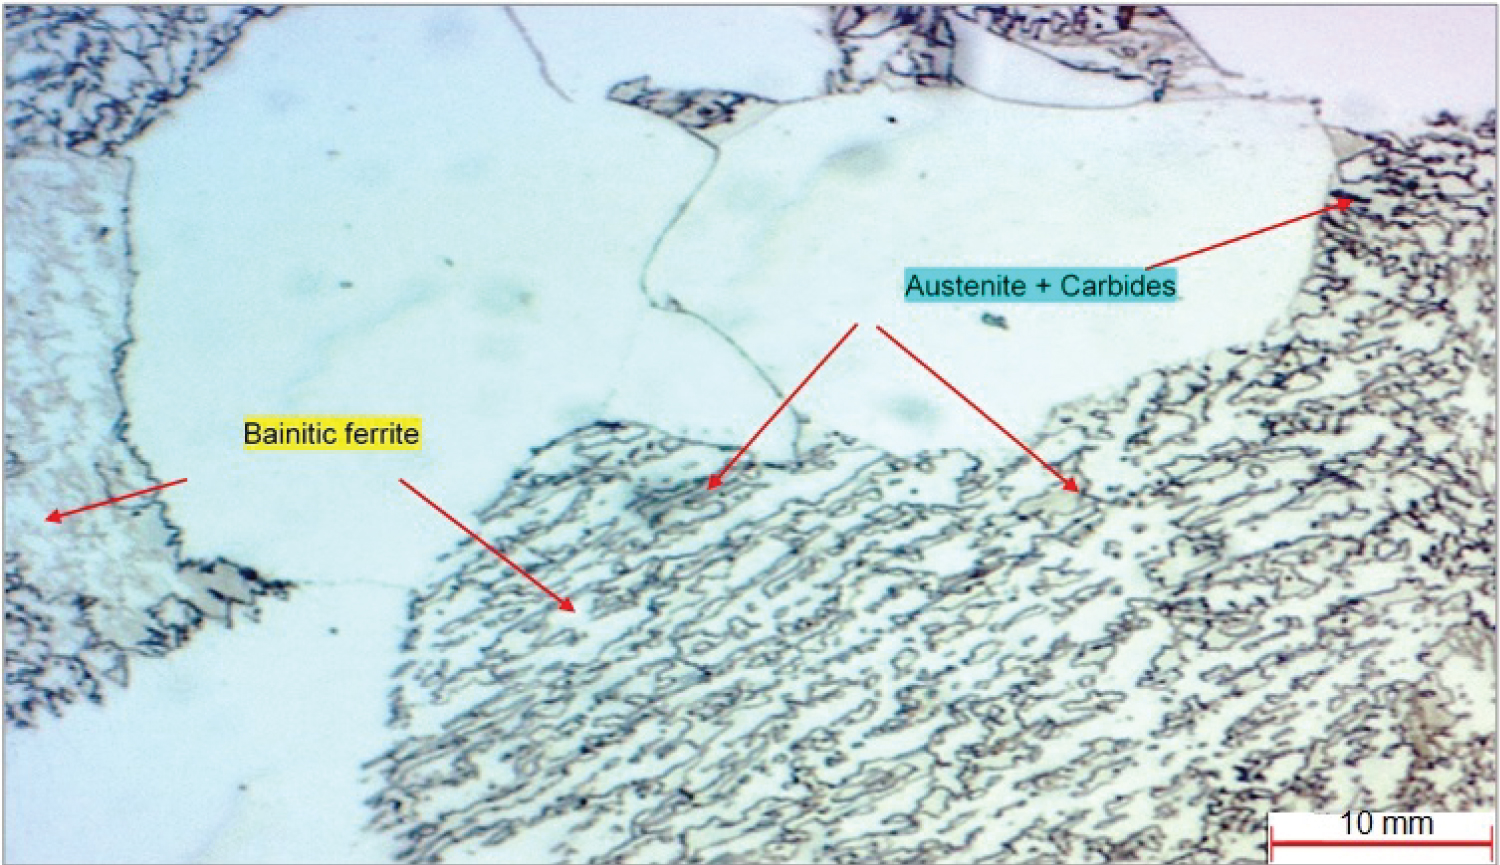
Figure 11: Sample HTS.3 Optical micrograph showing...
Sample HTS.3 Optical micrograph showing grains of upper bainite consists of bainitic ferrite (light etched) and austenite with precipitated carbides (dark etched), 1000X, 2% Nital.
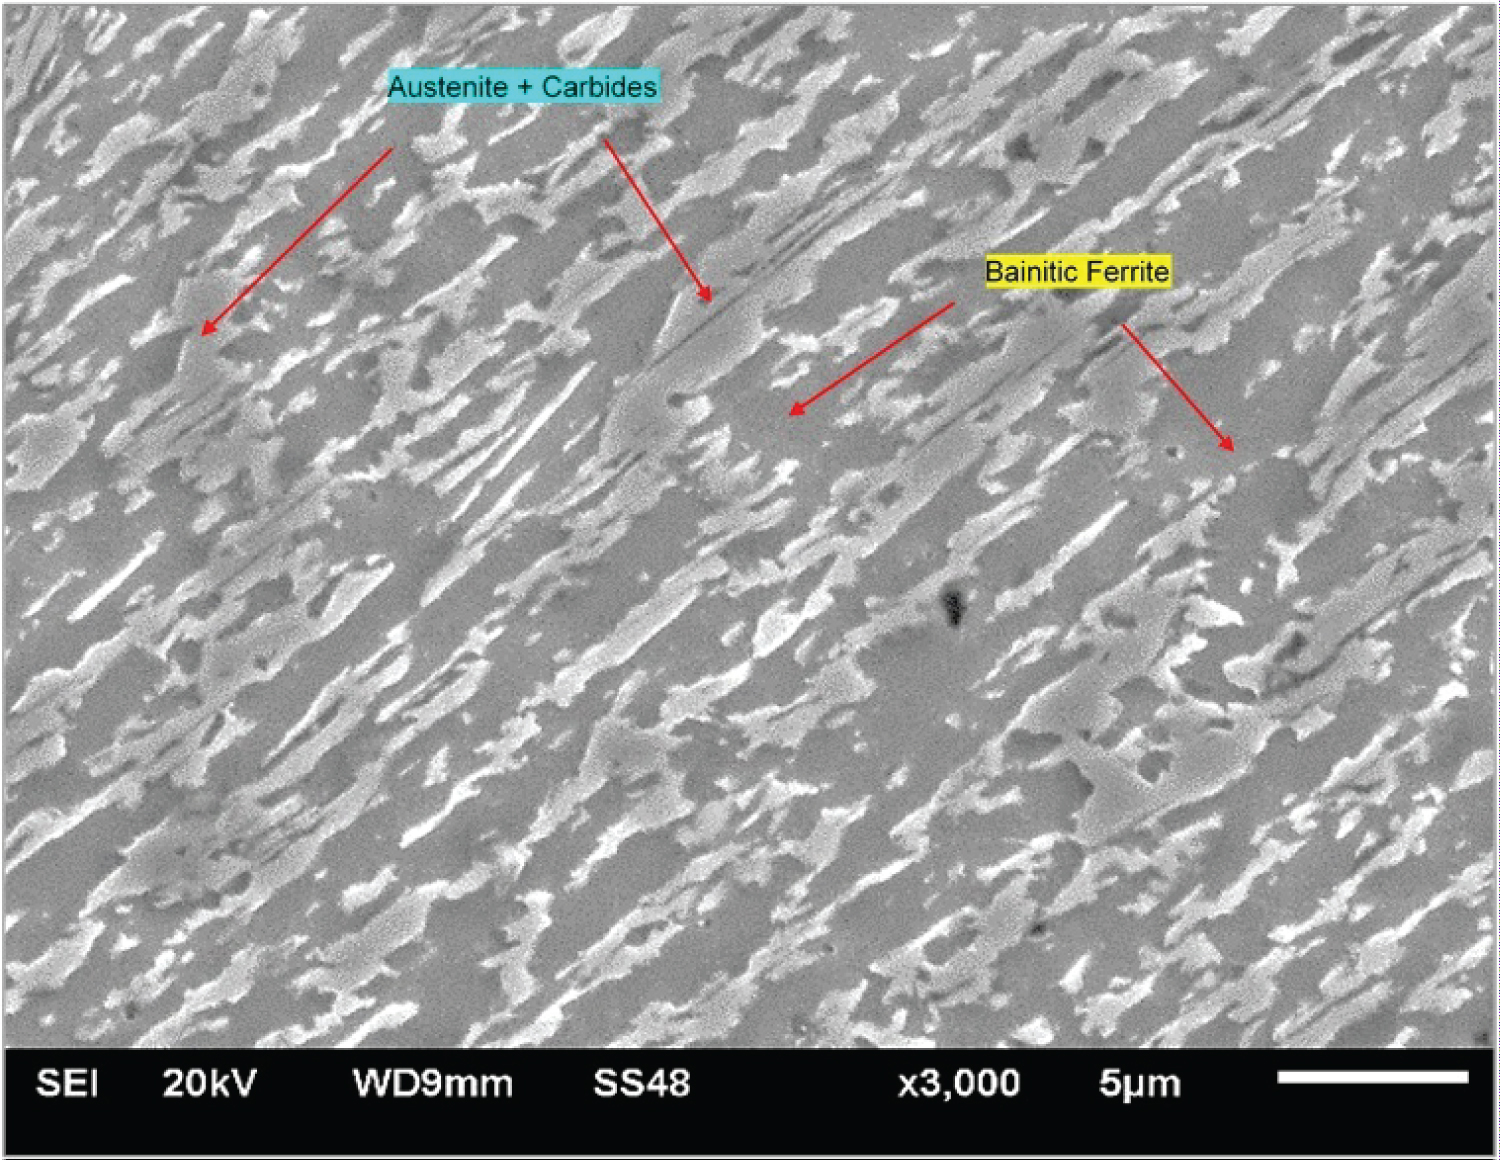
Figure 12: Sample HTS.6 SEM micrograph showing ausferrite...
Sample HTS.6 SEM micrograph showing ausferrite microstructure consists of bainitic ferrite (dark gray) and austenite with precipitated carbides (light gray), 2% Nital.

Figure 13: Sample HTS.7 XRD diffraction peaks of the (110) α- ferrite...
Sample HTS.7 XRD diffraction peaks of the (110) α- ferrite and (111) γ- austenite.
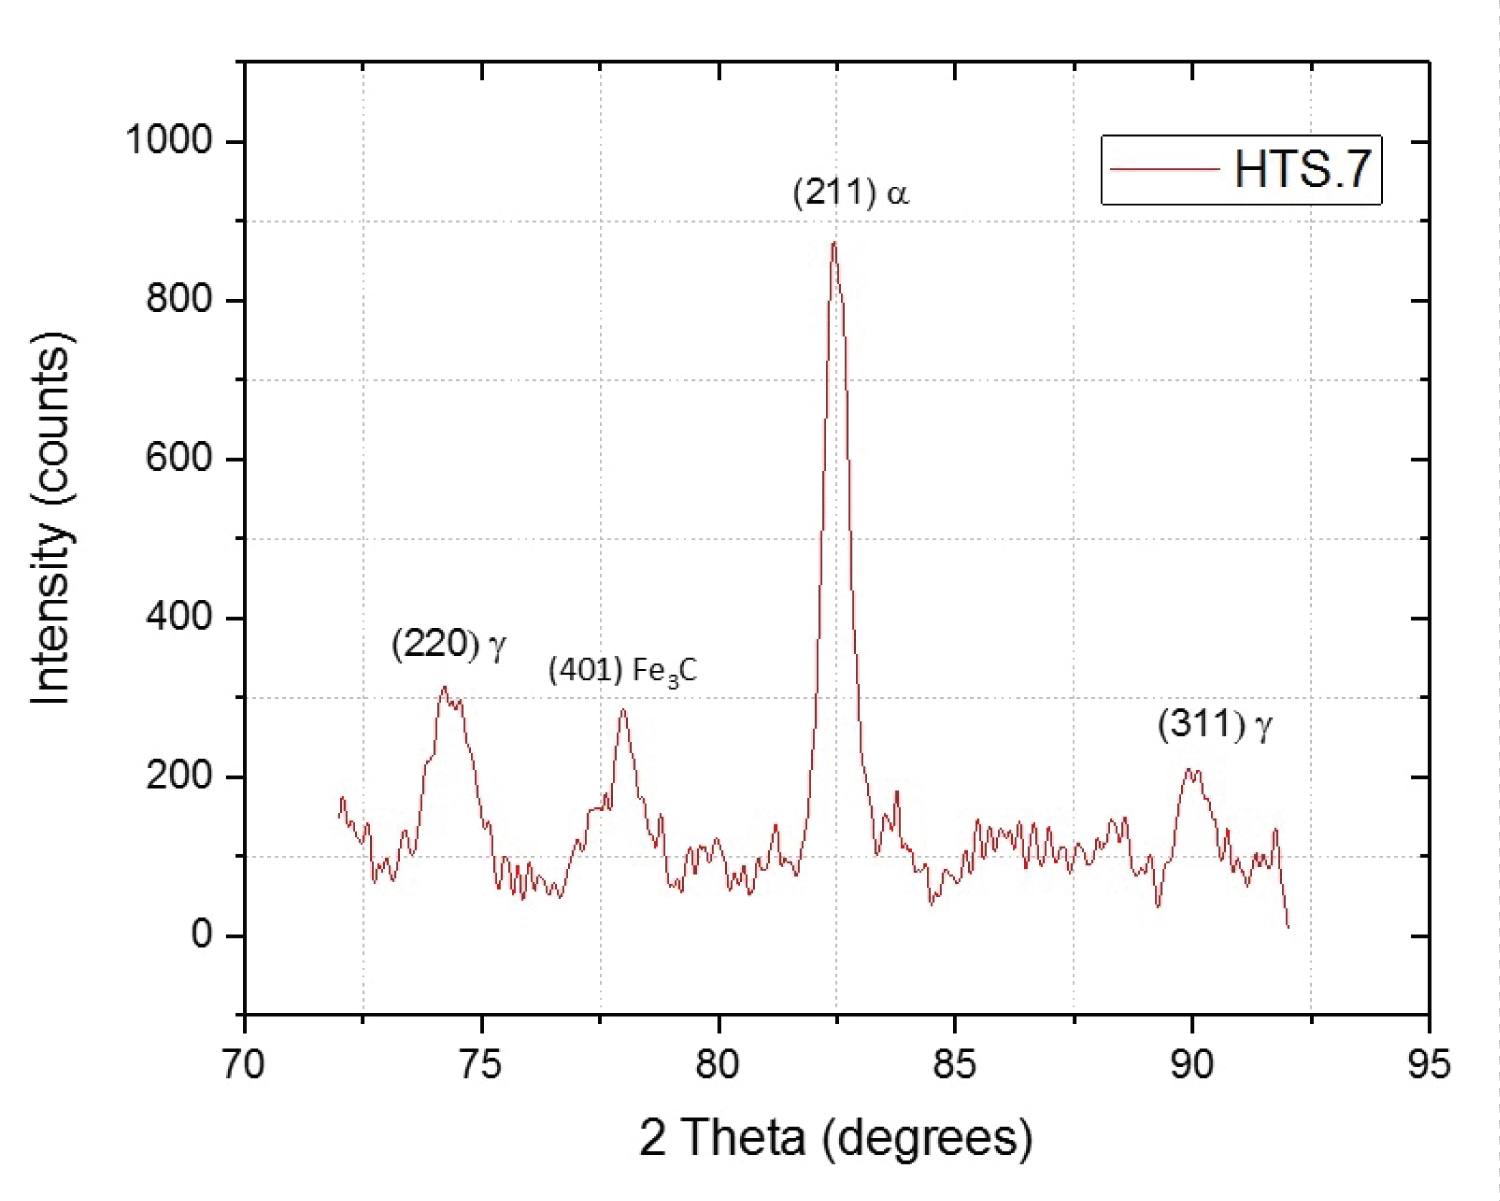
Figure 14: Sample HTS.7 XRD diffraction peaks of the (211) α - ferrite...
Sample HTS.7 XRD diffraction peaks of the (211) α - ferrite (220) & (311) γ - austenite and (401) Fe3C iron carbide.
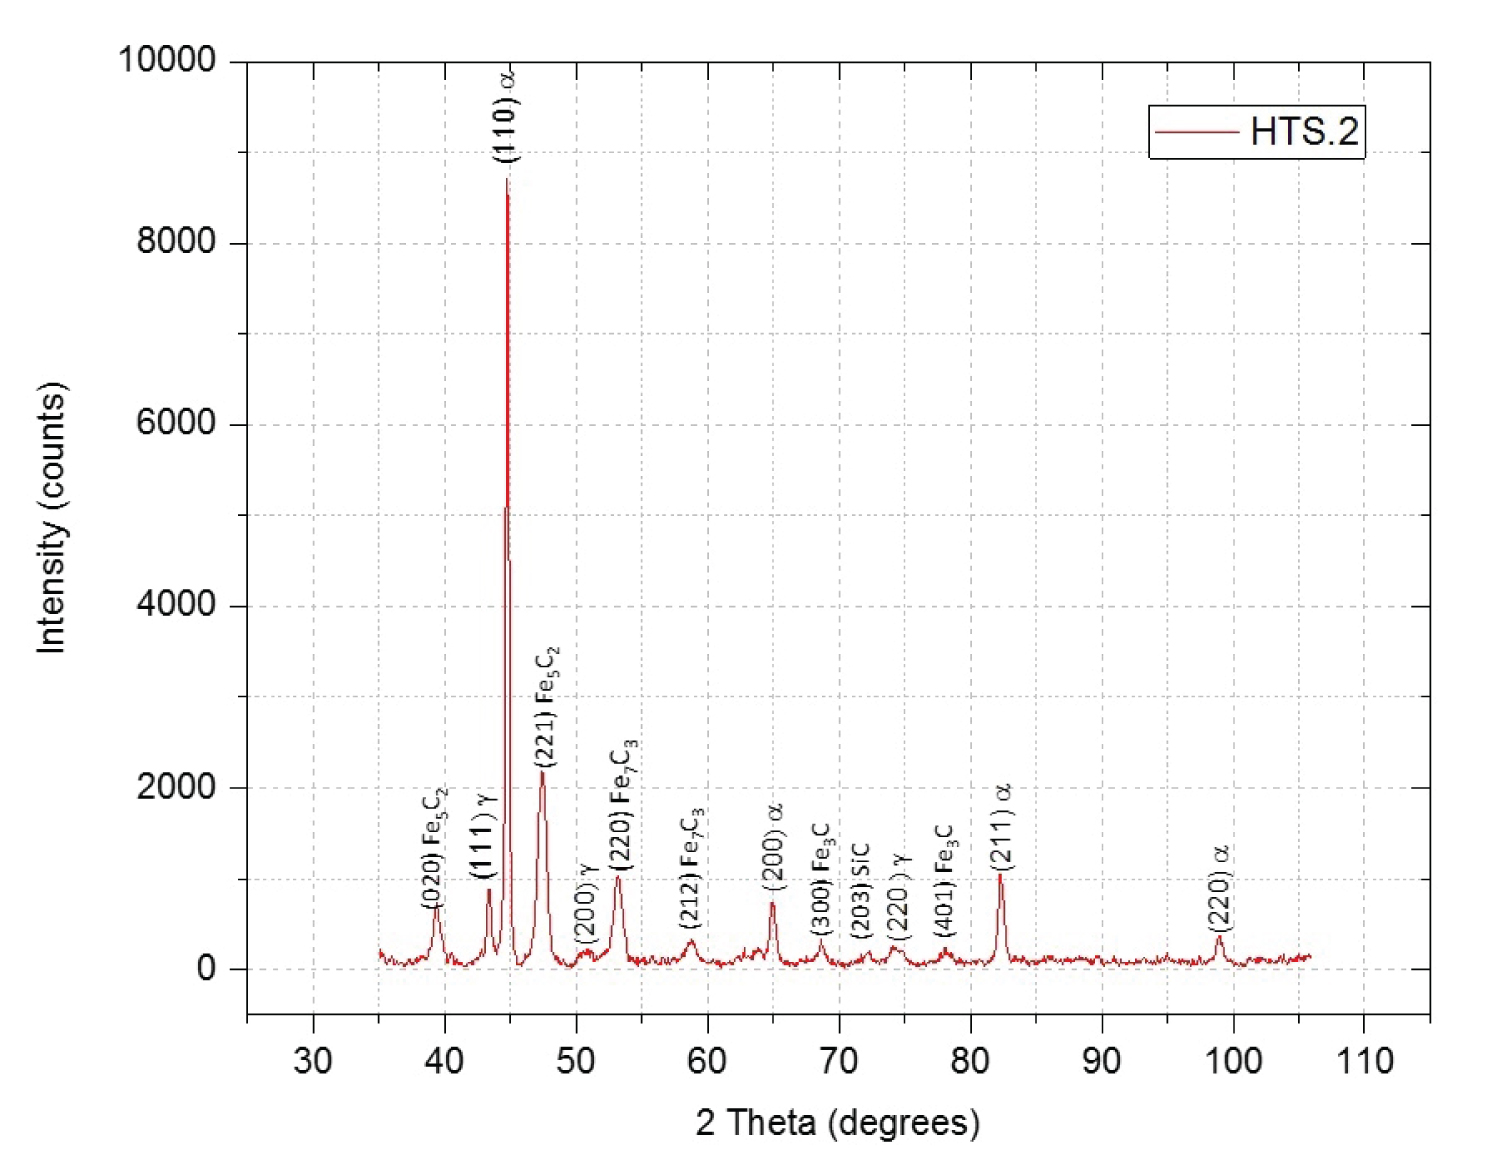
Figure 15: Sample HTS.2 XRD diffraction peaks of the (hkl)...
Sample HTS.2 XRD diffraction peaks of the (hkl) α-ferrite, γ-austenite and FexCy iron carbides.
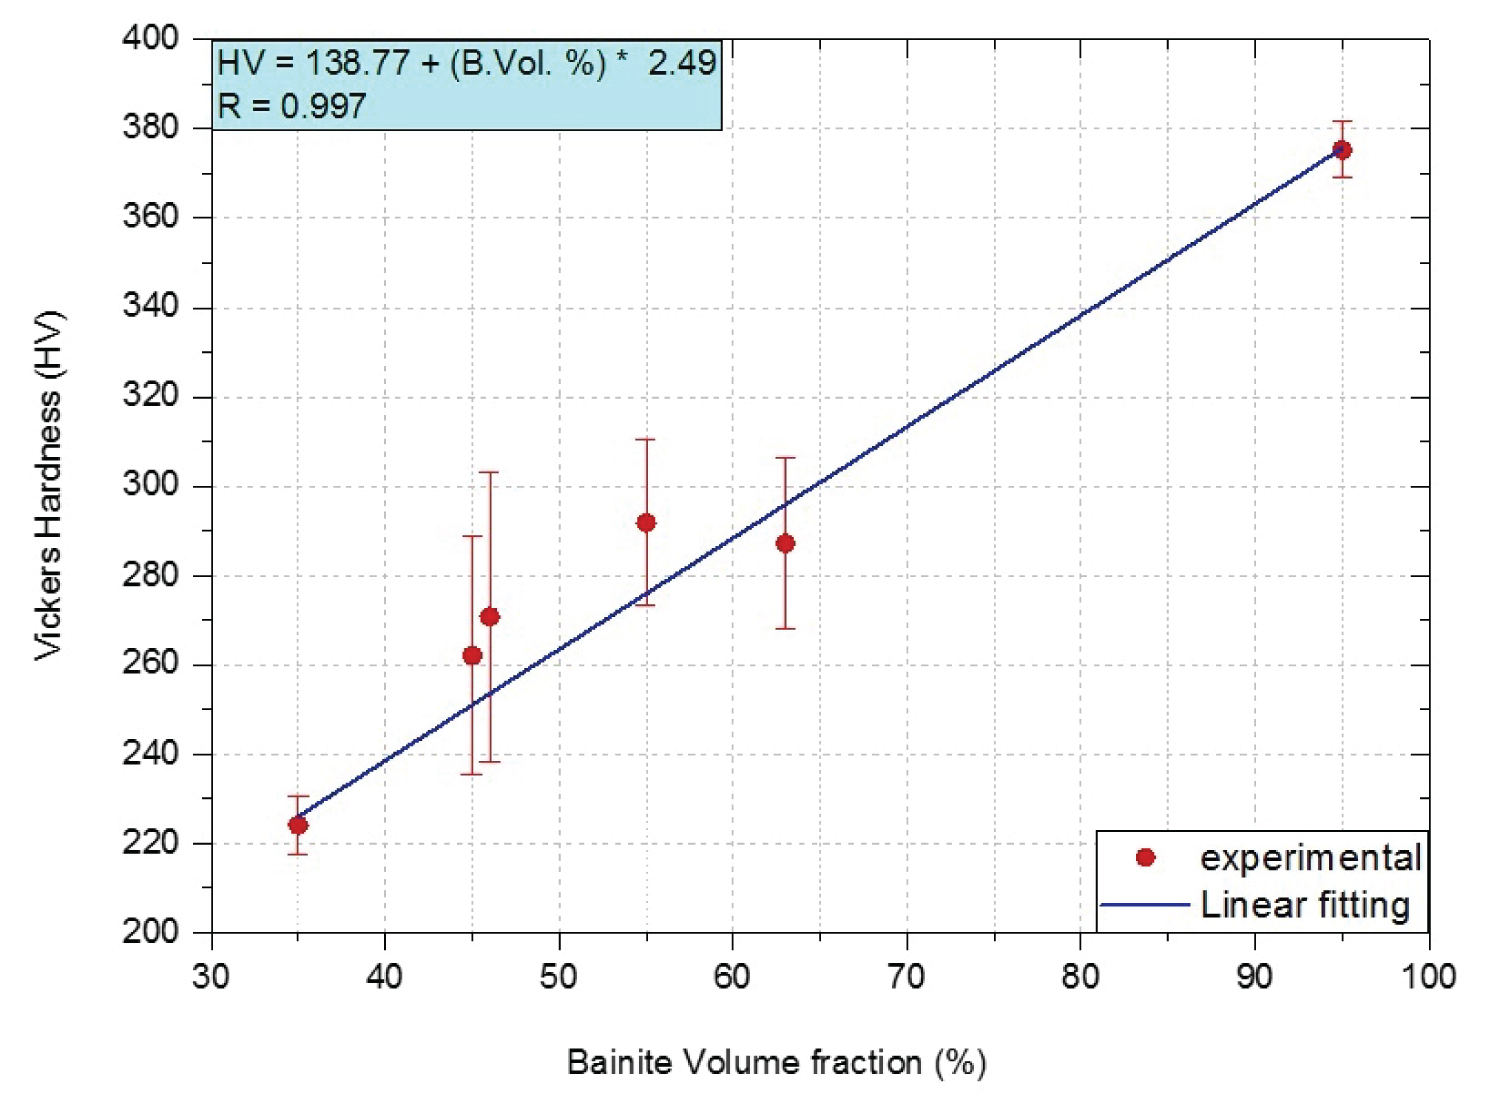
Figure 16: Microhardness of the new developed DP...
Microhardness of the new developed DP. Steel versus the bainite volume fraction %.
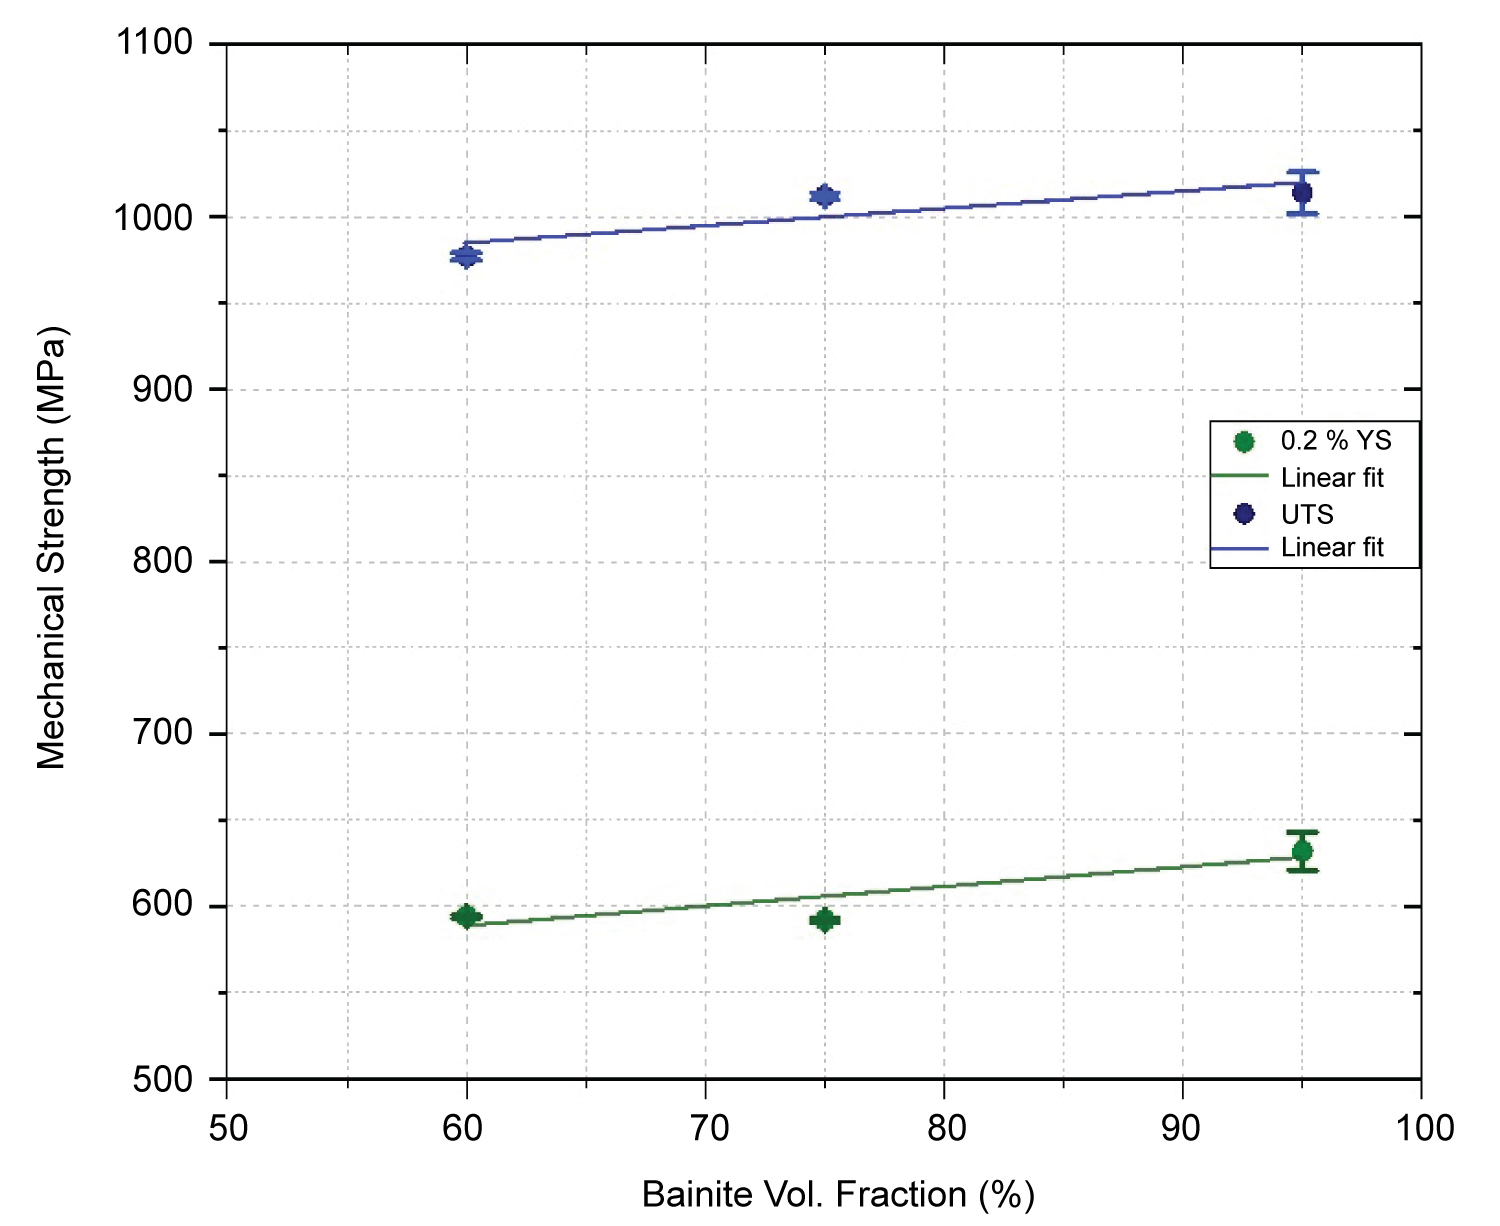
Figure 17: Mechanical properties of the developed DP...
Mechanical properties of the developed DP. Steel versus the bainite volume fraction.

Figure 18: % Elongation of the developed DP...
% Elongation of the developed DP. Steel versus the bainite volume fraction.
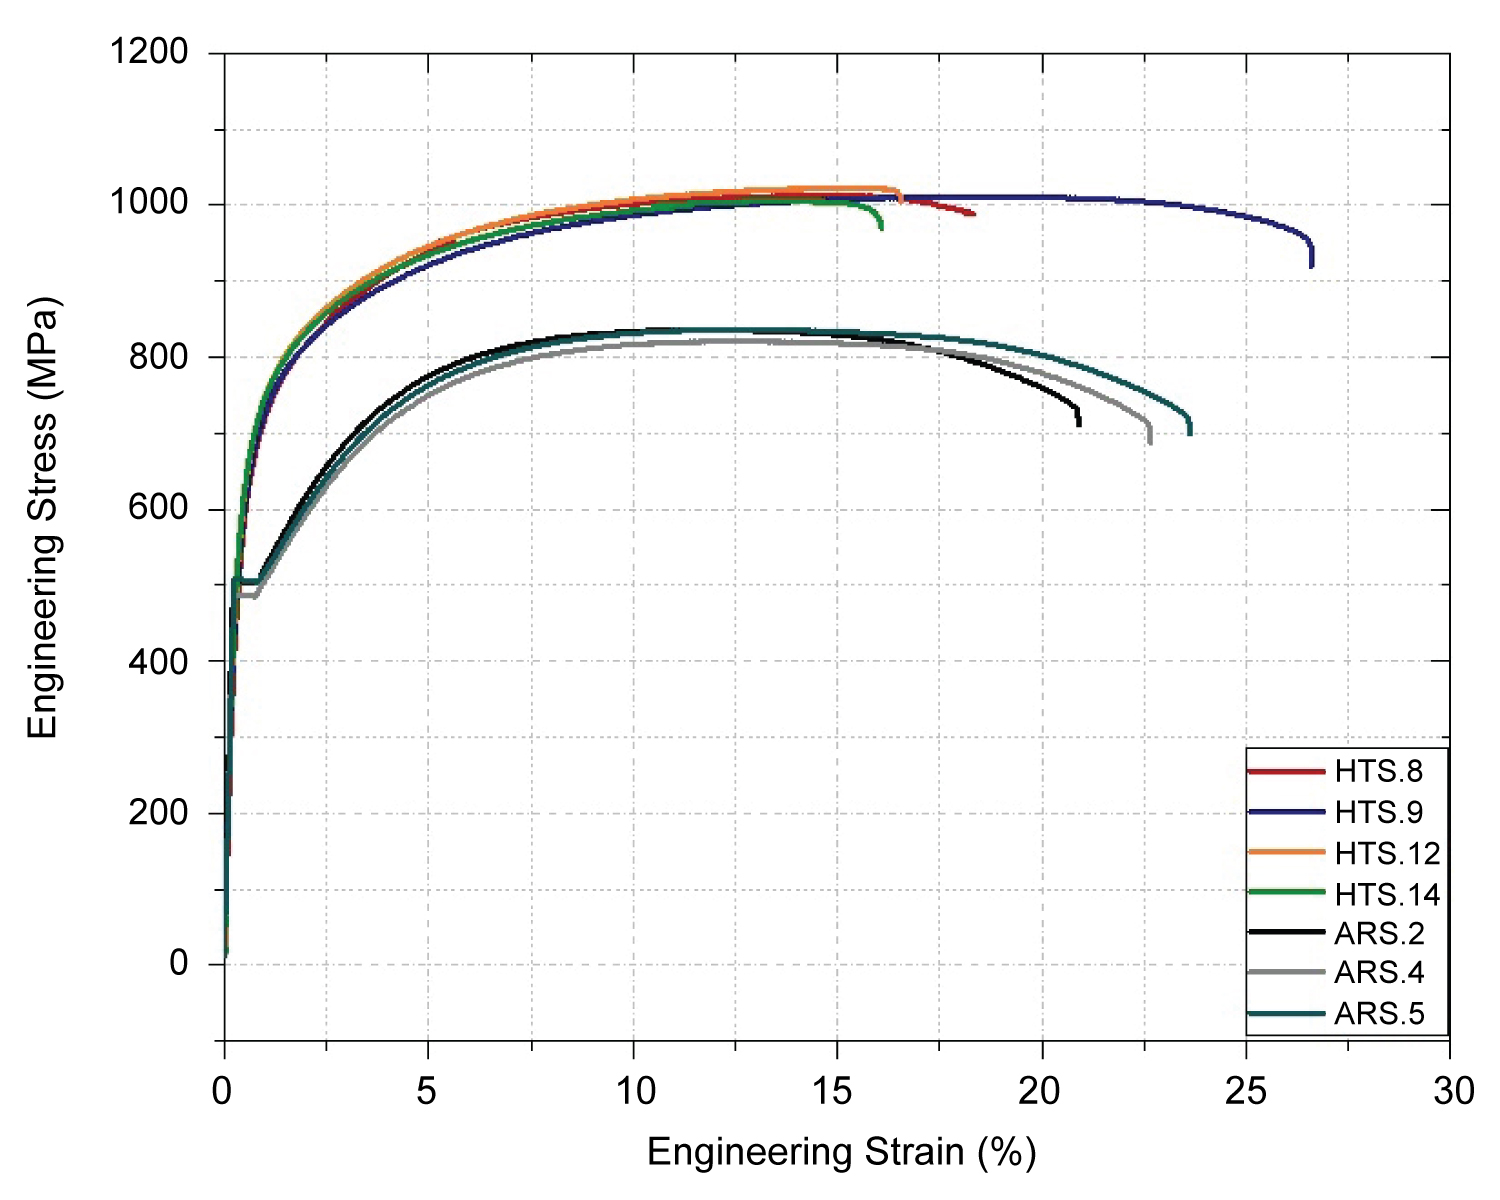
Figure 19: Mechanical properties of 0.4% C steel...
Mechanical properties of 0.4% C steel. As received samples (ARS.X) as compared to the heat-treated samples (HTS.X).
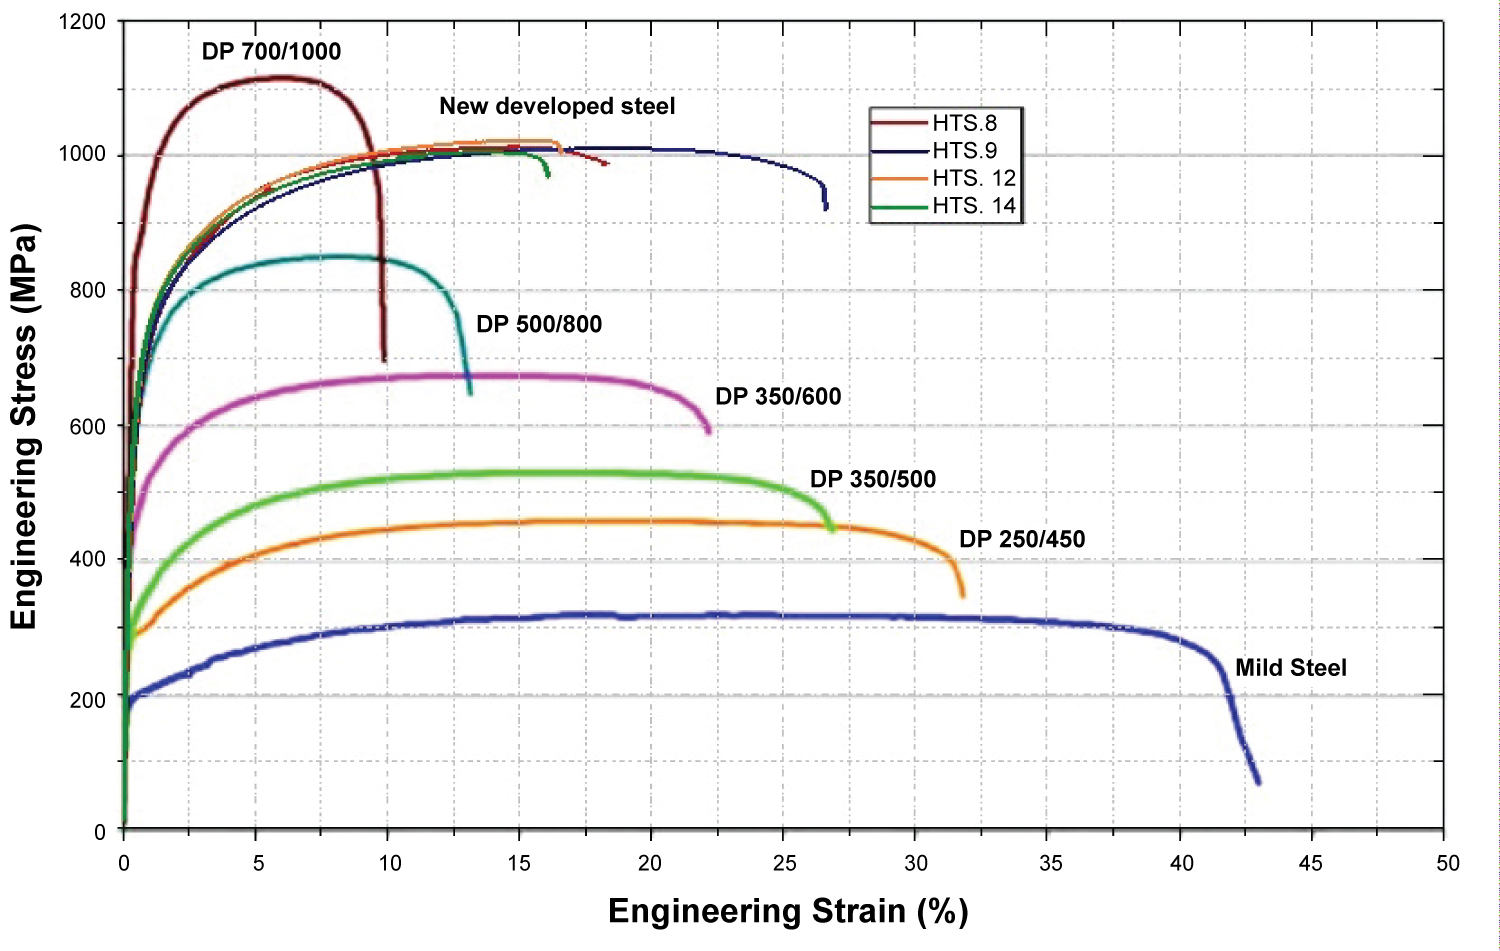
Figure 20: Mechanical properties of the new developed...
Mechanical properties of the new developed steel as compared to a series of conventional DP steel grades.
Tables
Table 1: Chemical composition of the as received steel.
Table 2: Heat treatments routes of the steel studied.
Table 3: Ferrite and bainite volume fractions of the heat-treated samples analyzed by metallography and image analysis.
Table 4: Predicted mechanical properties of the as received and heat-treated samples.
Table 5: Measured mechanical properties of the as received samples (ARS.X).
Table 6: Measured mechanical properties of the heat-treated samples (HTS.X).
References
- Stuart Keeler, Menachem Kimchi (2014) Advanced high-strength steels application guidelines version 5.
- Codrick J, Martis, Susil K Putatunda, James Boileau (2013) Processing of a new high strength high toughness steel with duplex microstructure (Ferrite + Austenite). Materials and Design 46: 168-174.
- M Demeri (2013) Advanced high-strength steels-science, technology, and application. ASM International.
- MS Rashid (1981) Dual phase steels. Annual Review of Materials Science 11: 245-266.
- N Fonstein (2015) Advanced high strength sheet steels. east chicago: Springer International Publishing.
- N Saeidi, A Ekrami (2009) Comparison of mechanical properties of martensite/ferrite and bainite/ferrite dual phase 4340 steels. Materials Science and Engineering: A 523: 125-129.
- A Varshney, S Sangal, S Kundu, K Mondal (2016) Super strong and highly ductile low alloy multiphase steels consisting of bainite, ferrite and retained austenite. Materials & Design 95: 75-88.
- Reza Abbaschian, Lara Abbaschian, Robert E Reed-Hill (2009) Physical metallurgy principles. (4th edn), Cengage Learning, Stamford, CT 06902.
- (2013) ASTM E8/E8M-13a Standard test methods for tension testing of metallic materials. ASTM International.
- L Wojnar (1999) Image analysis: Applications in materials engineering. CRC Press.
- Wojnar, KJ Kurzydlowski, J Szala (2004) Quantitative image analysis, metallography and microstructures. ASM International 9: 403-427.
- K Radwanski (2016) Structural characterization of low-carbon multiphase steels merging advanced research methods with light optical microscopy. Archives of Civil and Mechanical Engineering 163: 282-293.
- HKDH Bhadeshia (2001) Bainite in Steels. IOM communication Ltd, London.
- EJ Pavlina, CJ Van Tyne (2008) Correlation of yield strength and tensile strength with hardness for steels. Journal of Materials Engineering and Performance 17: 888-893.
Author Details
Mohamed Alshwigi1, Susil K Putatunda1* and James Boileau2*
1Wayne State University, USA
2Ford Motor Company, USA
Corresponding author
Susil K Putatunda, Department of Chemical Engineering and Materials Science, Wayne State University, 5050 Anthony Wayne Drive, Detroit, MI 48202, USA, Tel: +1-3135773808, Fax: +1-3135773810.
Accepted: October 16, 2018 | Published Online: October 18, 2018
Citation: Alshwigi M, Putatunda SK, Boileau J (2018) Development of Dual Phase Microstructure in Medium Carbon Low Alloy Steel by Continuous Cooling Heat Treatment. Int J Metall Met Phys 3:019.
Copyright: © 2018 Alshwigi M, et al. This is an open-access article distributed under the terms of the Creative Commons Attribution License, which permits unrestricted use, distribution, and reproduction in any medium, provided the original author and source are credited.
Abstract
The focus of this investigation was on the creation of a unique dual phase microstructure in a medium carbon low alloy steel. The developed microstructure consisting of proeutectoid ferrite and upper bainite. This unique microstructure is expected to result in a special class of dual phase (DP) steel with excellent mechanical properties. The heat treatment process involves continuous cooling of the steel at a moderate cooling rate from the austenitizing temperature of 900 ℃ to the room temperature. The resultant microstructure had a proeutectoid ferrite volume fraction range of 5% to 65% and an upper bainite volume fraction range of 35% to 95% which is a combination of bainitic ferrite with precipitated carbides and austenite. Initial studies indicate that the developed DP steel had mechanical properties superior to the steels with traditional ferrite-pearlite microstructure steels and the commercially ferrite-martensite dual phase steels. The developed DP steel has an improved hardness of 34 Rockwell scale C as compared to the as received steel which has a ferrite-pearlite microstructure that has a hardness of 10 Rockwell scale C. The new developed DP steel has increased 22% in both yield and tensile strengths.
Keywords
Dual phase steel, Upper-bainite microstructure, Continuous cooling heat treatment, Advanced high strength steels (AHSS), Bainite microhardness
Introduction
The demand for improved fuel economy while maintaining structural integrity and fracture toughness of automotive components require the development of steels with combination of unique mechanical properties such as high yield strength, fracture toughness and very high fatigue strength. This requires development of steels with unique microstructures. This has led to advanced high strength steels (AHSS) such as dual phase (DP) steels with better mechanical properties [1].
The first-generation advanced high strength steels are the dual phase (DP), Complex phase (CP) and transformation induced plasticity (TRIP) steels. However, these steels have several limitations such as lower tensile strength and fracture toughness than what is needed for significant weight reduction and energy savings in the 21st century structural components. The second-generation advanced high strength steels are twin induced plasticity (TWIP) and Light weight with induced plasticity (L-IP) steels. These steels contain high amounts of alloying elements which make them prohibitively expensive and moreover processing these steels are difficult because of large amounts of austenite. Furthermore, these steels are prone to delayed fracture. Thus, there is a need to develop third generation advanced high strength steels with combination of high strength and high toughness.
It was theorized here that instead of large amounts of expensive alloying elements it may be possible to have a combination of very high strength and high fracture toughness in steels by having a microstructure consisting of ultrafine ferrite and fine retained austenite between the ferrite needles. Previous studies by these investigators have also shown that retained austenite must exist in the right morphology i.e. it must exist in the form of ultra-fine retained austenite between the ferrite needles to provide a significant increase in the strength and toughness. This can be produced in steel with high silicon content by austempering process [2]. Based on this approach earlier a medium carbon high silicon steel was developed. However, the carbon content of steel was relatively high (about 0.4%) which increases the carbon-equivalent of the steel and may cause difficulty in welding or joining processes. Therefore, a modified version of this steel was developed. In this investigation, the influence of austempering process on the microstructure and mechanical properties of this steel was also examined.
Dual phase steels are classified as one of the advanced high strength steels (AHSS) that have a wide range of applications in the automotive industry as they are less expensive and have more strength to weight ratio than other high strength steels [3]. In typical dual phase steel, the microstructure consists of martensite, lower bainite, and austenite islands in a ferritic matrix [4]. This combination of these phases give the steel high strength and good formability for automotive applications [5]. The dual phase steel of ferrite-bainite microstructure is typically produced by intercritical annealing to nucleate ferrite grains and then austempering heat treatment at the required temperature to produce bainite [6]. Another way to produce a ferrite-bainite dual phase steel is to continually cool the steel for different durations of times after austenization followed by austempering at different temperatures [7]. In our study, the steel that was developed had a dual phase microstructure consisting of proeutectoid ferrite and upper bainite phases which as a combination would have better ductility and Charpy impact energy than the typical dual phase steels with martensite-ferrite and the full bainitic microstructures as mentioned in other studies referenced in [6,7]. The heat treatment process involved in developing this steel was continuous cooling of the steel in a furnace at a moderate cooling rate from the austenitizing temperature of 900 ℃ to the room temperature.
Materials and Methods
Materials studied
The material used in this study was a medium carbon low alloy steel with high silicon content and its composition in weight percent (Wt. %) consists of the elements as shown in Table 1.
Experimental (TTT) diagram construction
An isothermal transformation diagram (TTT) diagram for the studied steel was experimentally constructed for the bainitic temperature region to have some knowledge about the thermal behavior of the steel and to map out the bainitic transformation fractions of the steel at these temperatures. This was done by holding a series of small steel samples isothermally at different austempering temperatures for different time periods and then determining the fraction of the transformation product in each specimen [8]. The transformed volume fraction of each phase for each specimen was then calculated by quantitative metallography using image processing of micrographs for the transformed specimens to get the fraction transformation time curve as the one shown for sample B in Figure 1.
Then from these fraction transformation time curves, the time required to start and to complete the transformation of the bainite phase for each austempering temperature were obtained. This was done by observing the time to get a finite amount of bainite transformation of about 1 percent corresponding to the start of the transformation and the end of the transformation is then taken as the time to transform 99 percent of the austenite to bainite [8]. Due to the limited measurement of phase amount transformation at the starting and ending point, the actual start and end points of transformation fractions were taken as 5 and 95 percent respectively as can be shown in Figure 2.
Heat treatment
Seven small samples of 10 mm × 10 mm × 6 mm in dimensions were cut and then they were heat treated for different austenitizing temperatures and times to examine the different amounts of microstructures phases that possibly we can get at these conditions. The heat treatment routes are as shown in Table 2.
The heat treatment cycles of all the samples are shown in Figure 3. The heating and cooling rates of all the specimens were measured experimentally using the furnace inherent thermocouple and temperature gauges.
Another seven machined samples for tensile testing were prepared as shown in Figure 4 [9]. The samples were also heat treated (continuous cooling) to verify the improved increase in the mechanical strength of the developed steel.
Results and Discussion
Microstructure metallography
After heat treatment, all specimens were prepared for microscopic examinations using both optical and SEM methods. The volume fractions of proeutectoid ferrite (PF) and upper bainite (UB) phases were measured utilizing optical microscopic image analysis [10,11] and the results for this analysis are shown in Table 3. It is noted that the pre-quenched samples HTS.2 and HTS.6 in which they initially have a starting microstructure of martensite, have produced more bainite volume fractions than those with the pre-annealed samples HTS.1 and HTS.5 respectively after the same heat treatment process.
The optical micrographs of the as received and the heat-treated samples of the steel are shown in Figure 5, Figure 6, Figure 7 and Figure 8 respectively.
From these micrographs of the samples, we can see that the heat-treated steel has a dual phase microstructure of proeutectoid ferrite grains and upper bainite grains. It is apparent that the upper bainite grains are grown on the previous pearlite grains in the annealed sample. Also, the bainite grains morphology is coarse which confirms it as upper bainite with precipitated carbides and austenite.
The SEM micrographs are shown in Figure 9 and Figure10 below. In Figure 9, the dual phase microstructure consists of proeutectoid ferrite and upper bainite phases in which the upper bainite has 63% volume fraction and the proeutectoid ferrite has 37% volume fraction. In Figure 10, the microstructure is 95% upper bainite.
The upper bainite phase of the developed steel consists of coarse bainitic ferrite cells and austenite with precipitated carbides [12]. As shown at higher magnifications in the microscopic and the SME micrographs in Figure 11 and Figure 12 for sample HTS.3 and HTS.6 respectively. Some of the upper bainite grains have a granular morphology as confirmed by Habraken and coworkers [12,13].
X-ray diffraction
X-ray diffraction (XRD) analysis was performed to estimate the volume fractions of the ferrite and austenite phases as well as to find out if there are any carbides precipitates. It is shown in Figure 13, Figure 14 and Figure 15 that peaks of ferrite, retained austenite and carbides are present in the heat-treated steel. This confirms that the upper bainite phase was developed during the heat-treatment process.
Hardness testing
Vickers and Rockwell hardness readings of the heat-treated steel were done for all the samples and were compared to the as received steel samples. There was a hardness improvement for all the heat-treated samples on both scales. The increase in the hardness of the 95% bainite specimen was up to 240% in Rockwell scale C and up to 140% increase in Vickers hardness as compared to the as received one. A relationship between the Vickers hardness and bainite volume fraction was founded for the heat-treated steel samples as shown in Equation 1. This relationship can predict the bainite volume fraction based on the microhardness measurement HV for both of proeutectoid ferrite and upper bainite and using the phase mixture rule. The relationship is expressed as follow:
HV = 138.77 + (B.Vol.%) × 2.49 (1)
Where:
HV = Vickers hardness of bainite phase.
B. Vol % = Bainite volume fraction.
The relationship between the upper bainite phase volume fraction and its Vickers hardness for the heat-treated steel has a linear prediction are shown in Figure 16, where the HV is the bainite phase microhardness and B. Vol % is Bainite volume fraction. On the other hand, similar relationship for these heat-treated samples with macro-hardness was also obtained and it is as shown in Equation 2.
B.Vol % = 9.2118 × HRC - 220.69 (2)
Where:
B. Vol % = Bainite volume fraction.
HRC = Rockwell hardness Scale C for the upper bainite phase.
Mechanical properties
The yield and tensile strength of the as received and the heat-treated samples were firstly predicted using the empirical Equations 4 and 5 used by E.J. Pavlina and C.J. Van Tyne [14], these empirical equations are as follows:
The yield strength prediction;
YS = - 90.7 + 2.876 × HV (3)
Where yield strength YS has units of MPa and HV is Vickers hardness. Equation 4 has a coefficient of determination, R2, of 0.9212 and a standard error of 102 MPa.
The tensile strength prediction;
TS = - 99.8 + 3.734 × HV (4)
Where yield strength YS has units of MPa and HV is Vickers hardness. Equation 5 has a R2 value of 0.9347 and a standard error of 112 MPa.
The yield and tensile strength predictions based on the phase mixture rule of the micro and bulk hardness for the treated samples as compared to the as received samples are shown in Table 4.
To confirm the predicted mechanical properties, a second batch of seven tensile test specimens were heat treated using the above-mentioned technique. The experimentally measured tensile strength for all the samples, the as received and the heat-treated ones, are all shown in Table 5 and Table 6 respectively. The new developed DP steel has increased in both yield and tensile strength and slightly decreased in the elongation as shown in Figure 17 and Figure 18 respectively. The new developed DP steel has increased in both yield and tensile strength and slightly decreased in the elongation as shown in Figure 19. The newly developed dual phase steel has mechanical properties comparable to the conventional dual phase steels as can be easily seen in Figure 20.
Conclusion
An improve in the mechanical properties of 0.4% carbon low alloy steels was achieved by continuous cooling heat treatment. This heat treatment technique produced a useful dual phase microstructure consisting of proeutectoid ferrite and upper bainite phases. The heat treatment process involved continuous cooling of the steel at a moderate cooling rate from the austenitizing temperature of 900 ℃ to room temperature. The produced dual phase microstructure has a volume fraction range of 5-65% proeutectoid ferrite and a volume fraction range of 35-95% upper bainite. The new developed DP steel has an improved hardness of 34 Rockwell scale C as compared to the as received steel which has a ferrite-pearlite microstructure that has a hardness of 10 Rockwell scale C. The new developed DP steel has increased 22% in both yield and tensile strengths. The measured yield and tensile strength of the new developed DP steel were 613 MPa and 1013 MPa respectively as compared to the untreated steel which has 500 MPa yield strength and 830 MPa tensile strength. The new developed microstructure is expected to result in a special class of dual phase (DP) steel with excellent mechanical properties.

