International Journal of Metallurgy and Metal Physics
(ISSN: 2631-5076)
Volume 3, Issue 2
Research Article
DOI: 10.35840/2631-5076/9223
A Novel Method for Determining the Fatigue Threshold and Fracture Toughness from a Single Test
Susil K Putatunda1*, Sagar Bajaj1and James Boileau2
Table of Content
Figures
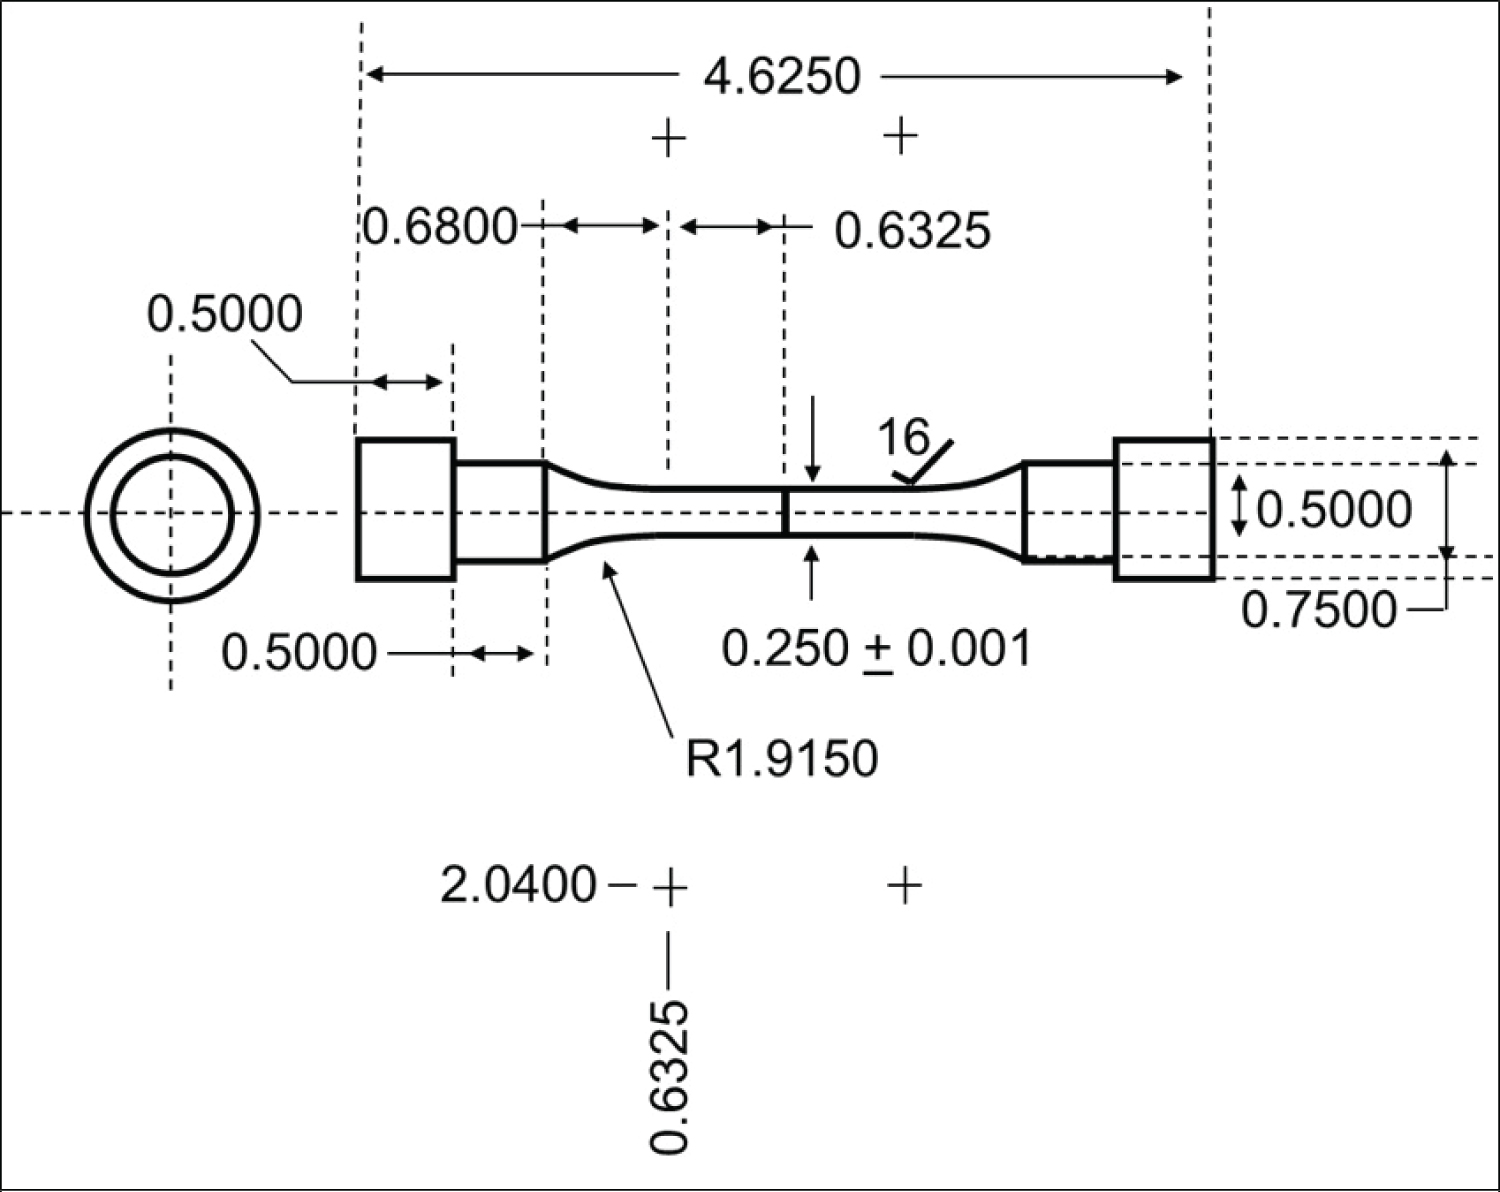
Figure 1: Tensile sample dimensions (all units in inches)....
Tensile sample dimensions (all units in inches).
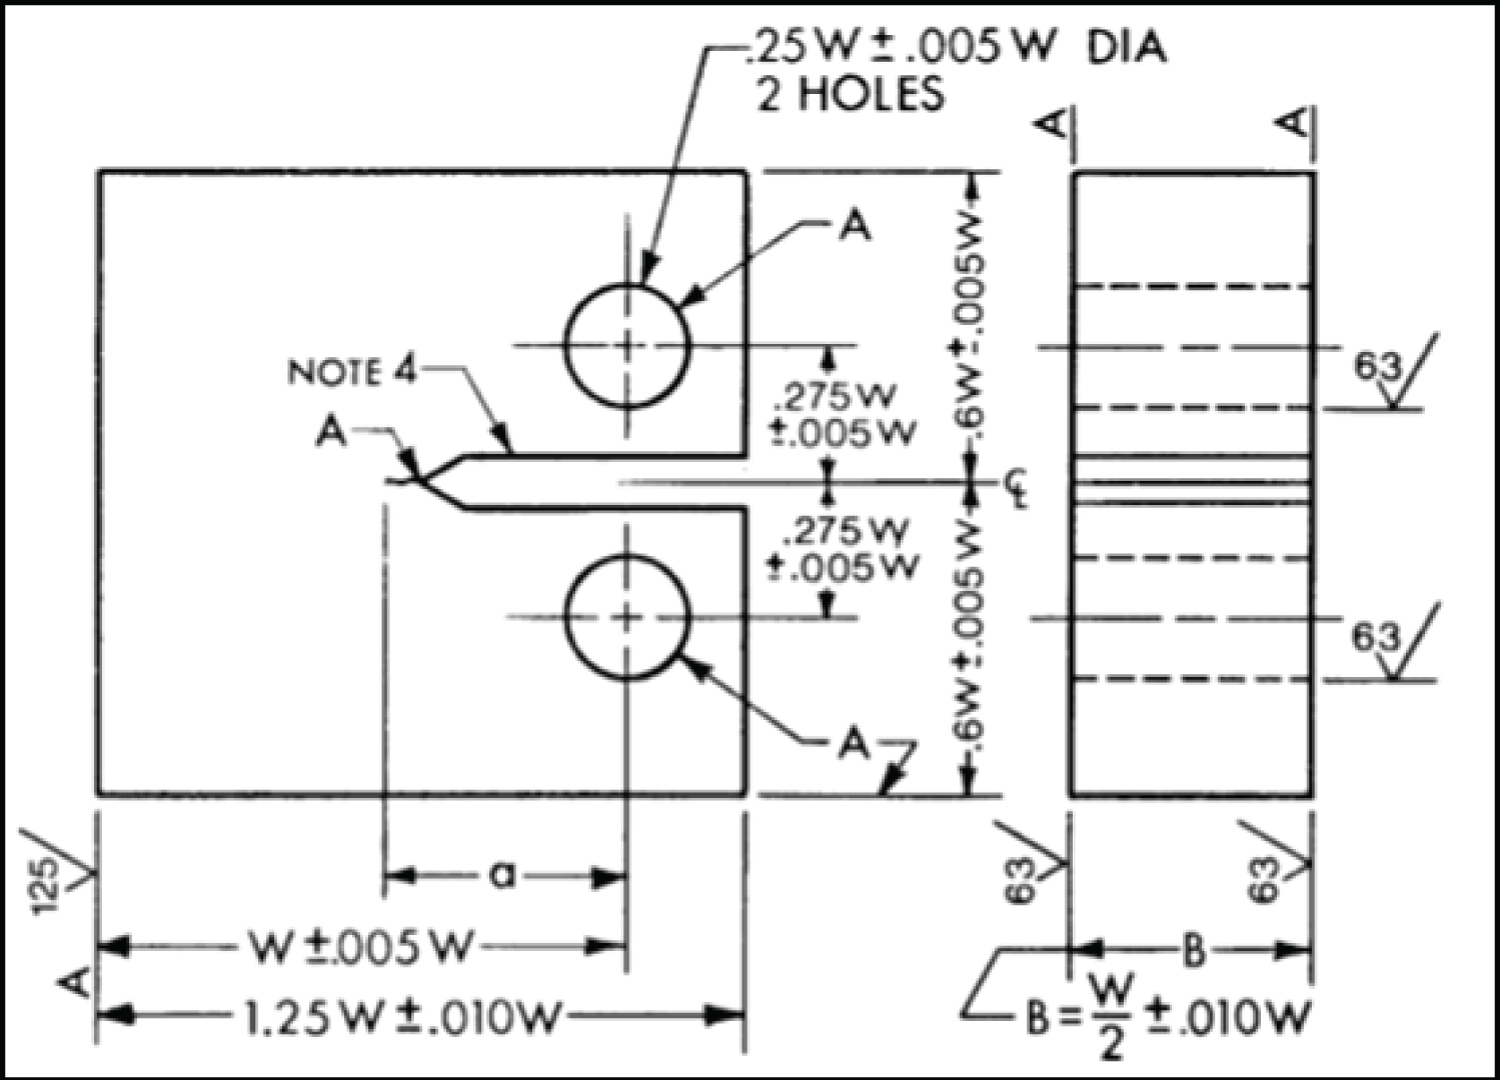
Figure 2: Compact tension sample dimensions...
Compact tension sample dimensions [1] (all units in inches).
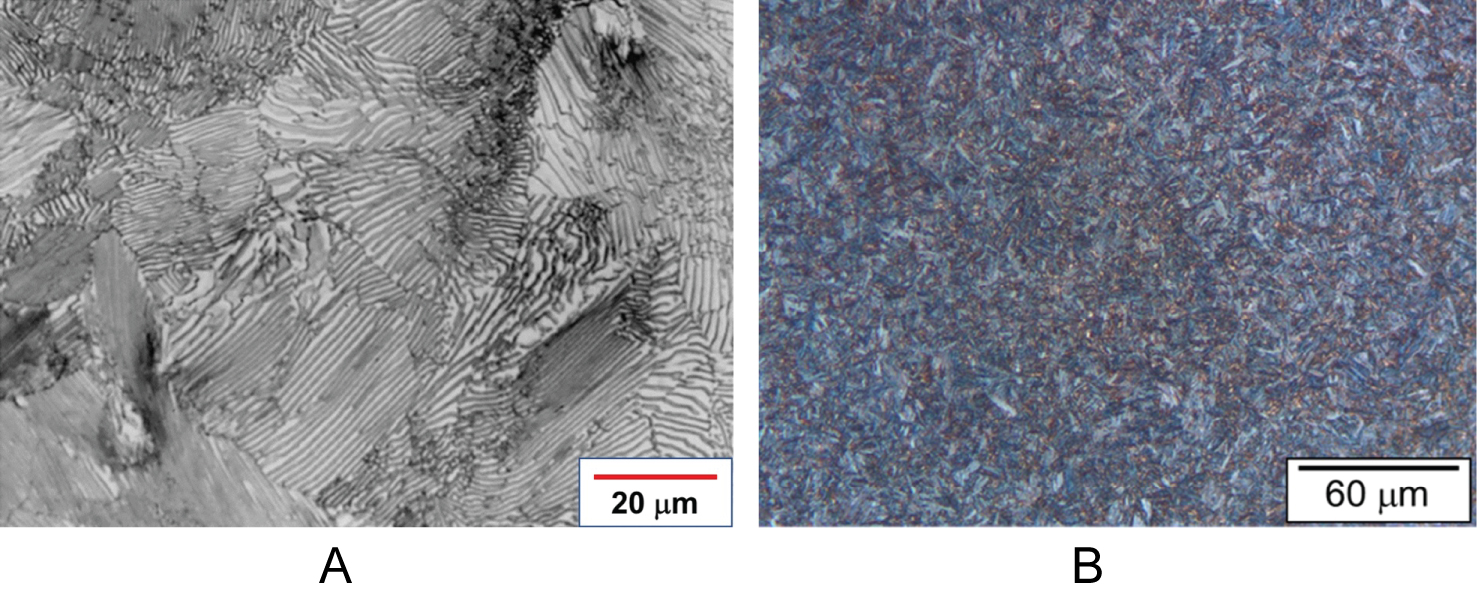
Figure 3: Typical microstructural features observed in the...
Typical microstructural features observed in the 4140 steel alloy. a) As-Received (Cold-Rolled and Annealed); b) Austenitized at 950 C for 1 Hour, Quenched, and Austempered at 322 C for 2 Hours.
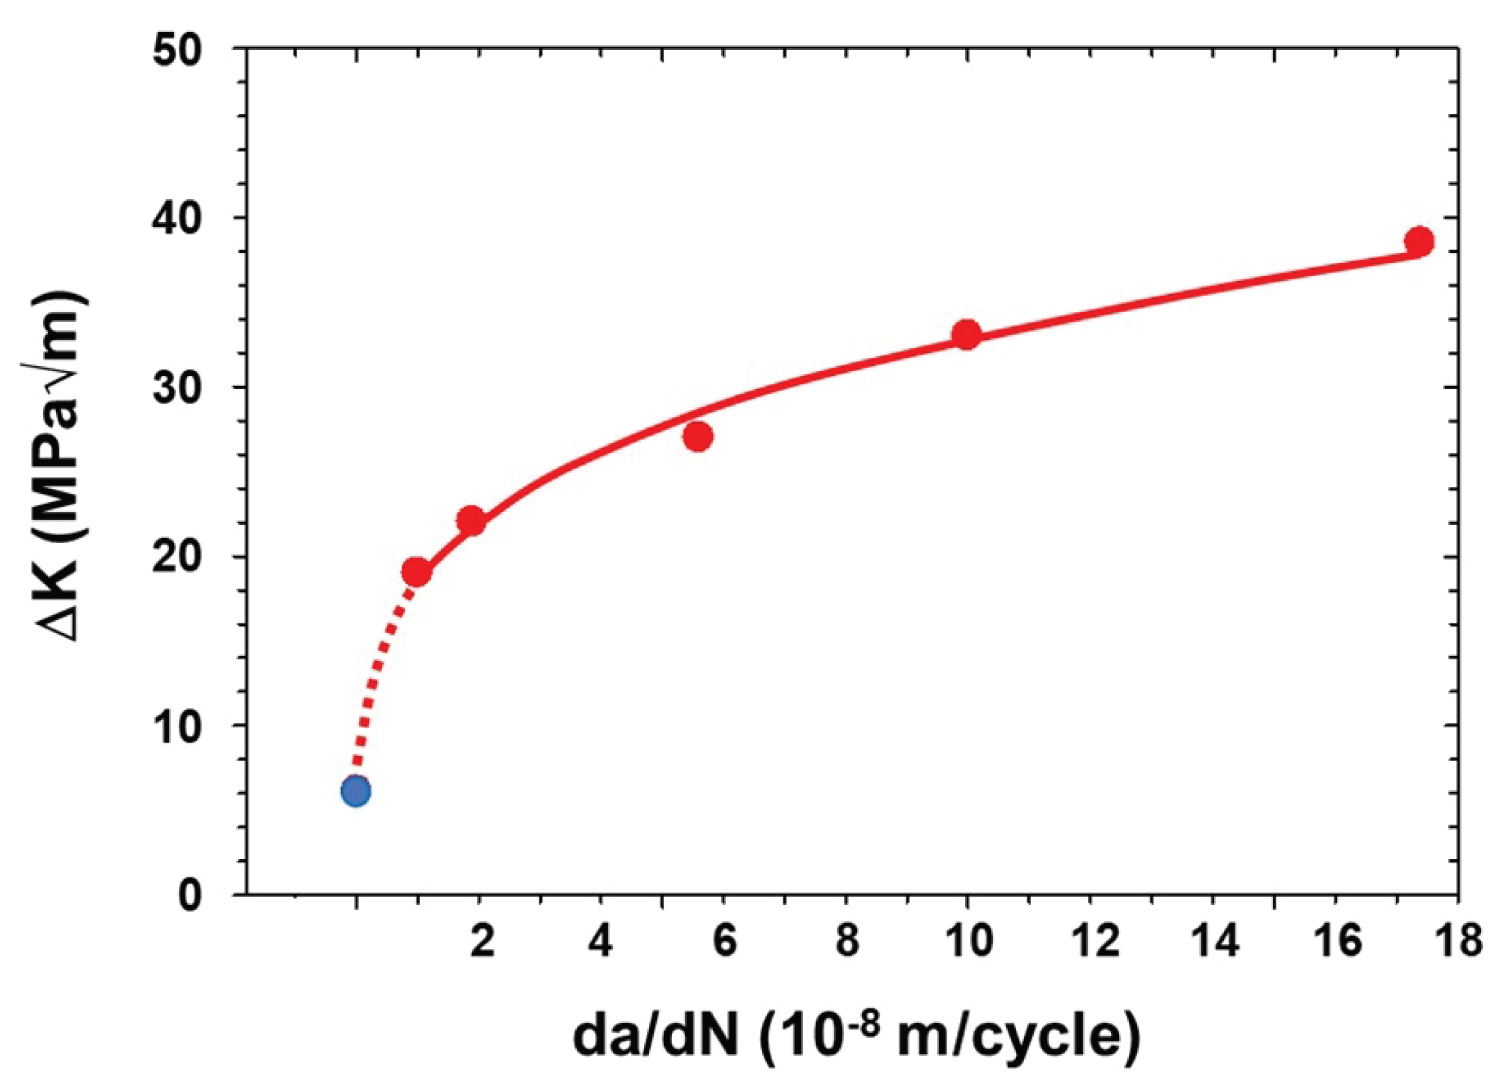
Figure 4: The fracture toughness data for the austempered...
The fracture toughness data for the austempered AISI 4140 steel. (Dashed line represents the extrapolation to 10-10m/cycle, which shows the projected fatigue threshold value as per the proposed single test method technique).
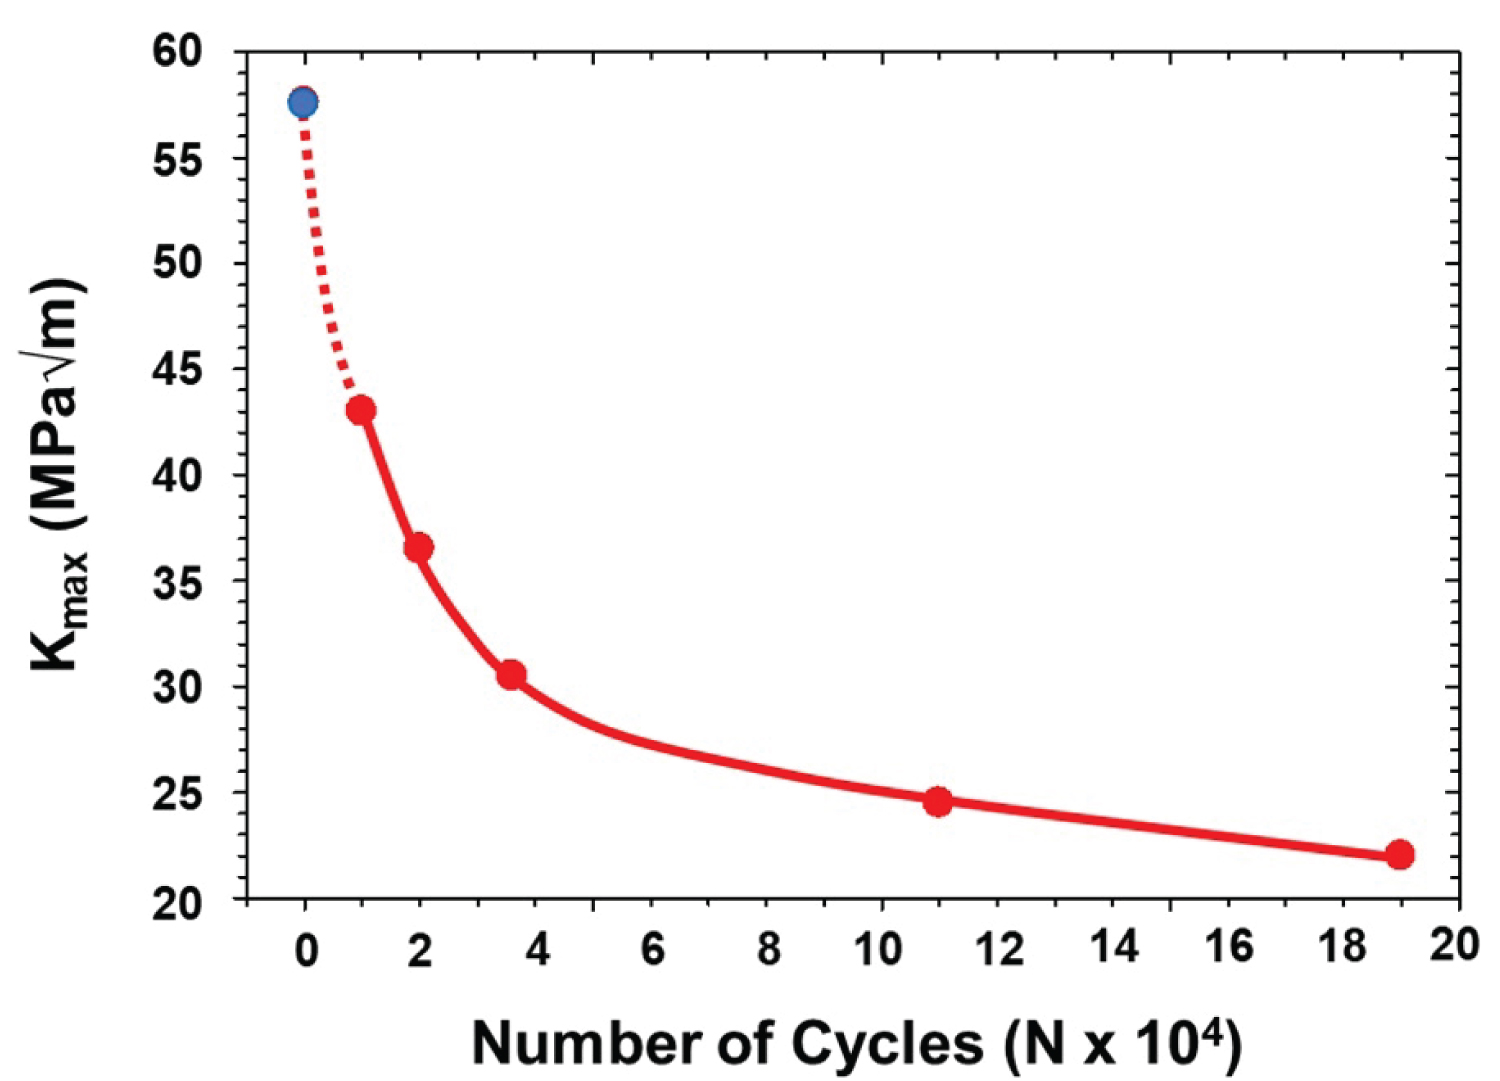
Figure 5: Kmaxvs. Number of cycles for the austempered...
Kmaxvs. Number of cycles for the austempered AISI 4140 steel. (Dashed line represents the extrapolation to 0 cycles, which shows the projected fracture toughness value as per the proposed single test method technique).
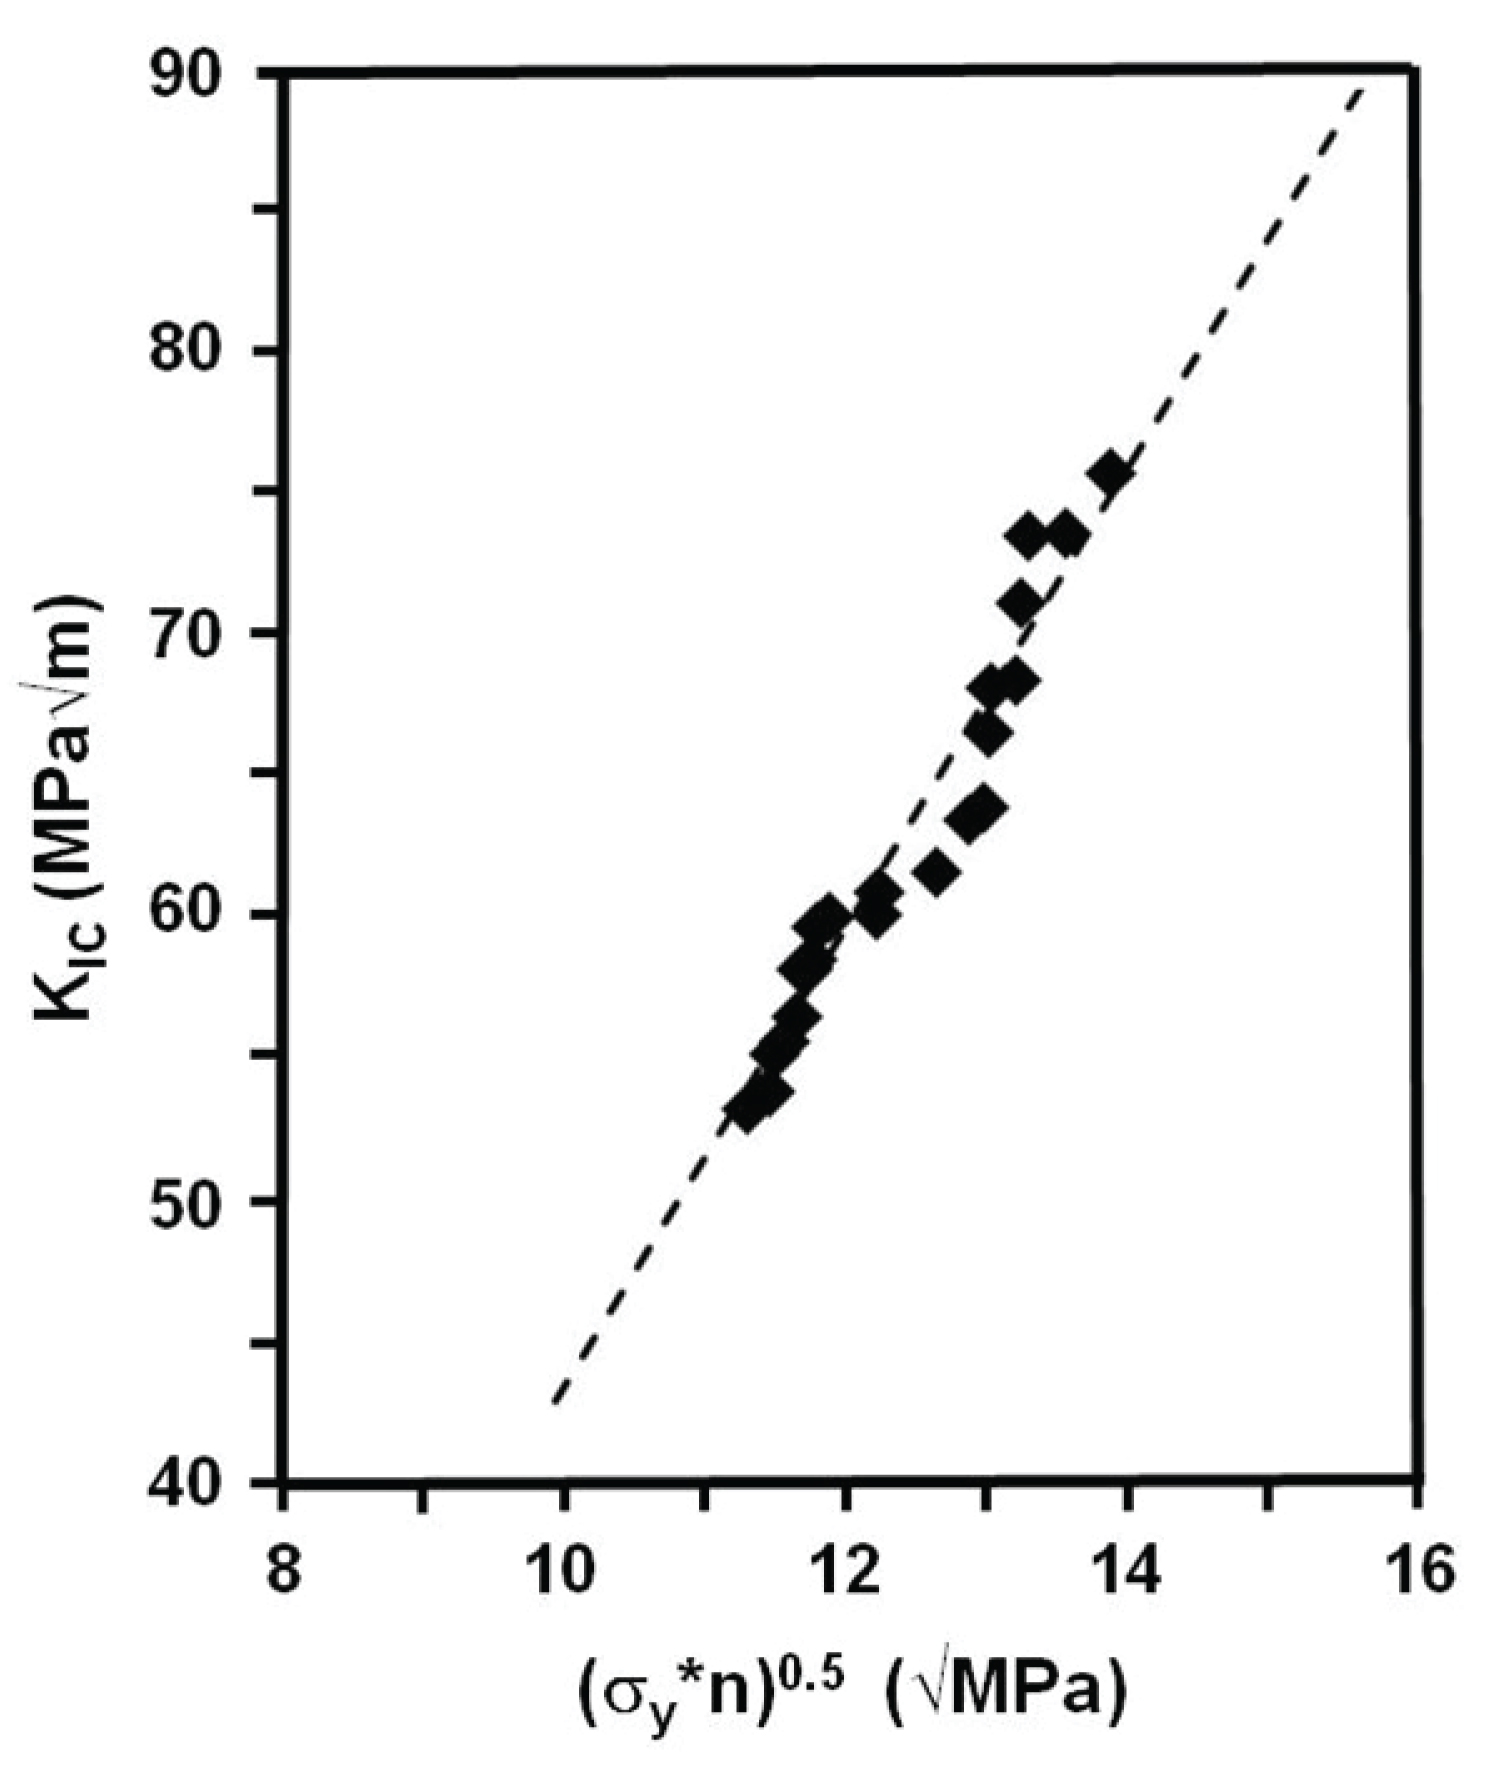
Figure 6: Linear plot between the fracture toughness and...
Linear plot between the fracture toughness and the microstructural-based features of a 4140 austempered steel.
Tables
Table 1: Chemical composition of the AISI 4140 steel alloy examined in this study.
Table 2: The effect of heat-treatment on the average mechanical properties of AISI 4140 steel alloy.
Table 3: The effect of measurement method on the average fatigue threshold and fracture toughness of the austempered AISI 4140 steel alloy.
Table 4: Values used in the calculation of the model relating the fracture toughness with the microstructural features in bainitic steels (η = 0.15).
References
- (2010) ASTM Standard E-399: Standard test method for measurement of fatigue crack growth rates. ASTM, West Consohohocken, USA.
- (2010) ASTM Standard E-647: Standard test method for measurement of fatigue crack growth rates. ASTM, West Consohohocken, USA.
- PP Rao, SK Putatunda (1998) Dependence of fracture toughness of austempered ductile cast iron on austempering temperature. Met Mat Trans 29: 3005-3016.
- J Cwiek (2009) Hydrogen degradation of high-strength steels. J Achiev Mater Manuf Eng 37: 193-212.
- TV Philips, TJ McCaffrey (1990) Ultra-high strength steel, Metals Handbook. (10th edn), ASM Materials Park, OH, 430-438.
- HKDH Bhadeshia, DV Edmonds (1983) Bainite in silicon steels: New composition-property approach: Part-I. J Mat Sci 17: 411-419.
- Z Yang, F Zhang, Y Ji, Y Wang, B Li, et al. (2016) Notably improved mechanical properties via introducing a short austempering treatment on low-carbon martensite steel. Mat Sci Eng: A 673: 524-529.
- L Zhao, L Qian, J Meng, Q Zhou, F Zhang (2016) Below-Ms austempering to obtain refined bainitic structure and enhanced mechanical properties in low-C high-Si/Al steels. Scripta Materialia 112: 96-100.
- TS Wang, J Yang, CJ Shang, XY Li, B Zhang, et al. (2009) Microstructures and impact toughness of low-alloy high-carbon steel austempered at low temperature. Scripta Materialia 61: 434-437.
- C Xiang, L Yanxiang (2007) Fracture toughness improvement of austempered high silicon steel by titanium, vanadium and rare-earth element modification. Mat Sci Eng: A 444: 298-305.
- SK Putatunda, C Martis, J Boileau (2011) Influence of austempering temperature on the mechanical properties of a low carbon alloy steel. Mat Sci Eng: A 528: 5053-5059.
- SK Putatunda, AV Singar, R Tackett, G Lawes (2009) Development of a high strength high toughness ausferritic steel. Mat Sci Eng: A 513-514: 329-339.
- (2010) ASTM Standard E-8. Standard methods for tension testing of metallic materials. ASTM, West Consohohocken, USA.
- VR Nagarajan (2014) Influence of dissolved hydrogen on the fatigue crack growth behavior of AISI 4140 steel. Wayne State University, USA.
- JH Chuang, LW Tsay, C Chen (1998) Crack growth behavior of heat-treated 4140 steel in air and gaseous hydrogen. Int J Fatigue 20: 531-536.
- VR Nagarajan, SK Putatunda (2014) Influence of dissolved hydrogen on the fatigue crack growth behavior of AISI 4140 steel. Int J Fatigue 62: 236-248.
- J Lukas (2001) Fatigue crack propagation limit curves for different metallic and non-metallic materials. Proc Int Conf on Fracture 10 (ICF10), Honolulu, USA.
- A McEvity, RO Ritchie (1998) Crack closure and the fatigue-crack propagation threshold as a function of load ratio. Fat Fract Eng Mat Struct 21: 847-855.
- J Yang, SK Putatunda (2005) Near-threshold fatigue crack growth behavior of austempered ductile cast iron (ADI) processed by a novel two-step austempering process. Mat Sci Eng: A 393: 254-268.
- MHK Sanij, SSG Banadkouki, AR Mashreghi, M Moshrefifar (2012) The effect of single and double quenching and tempering heat treatments on the microstructure and mechanical properties of AISI 4140 steel. Materials & Design 42: 339-346.
- GT Hahn, AR Rosenfield (1968) Sources of fracture toughness: The relation between KICand the ordinary tensile properties of metals. ASTM, USA, 5-32.
Author Details
Susil K Putatunda1*, Sagar Bajaj1and James Boileau2
1Wayne State University, USA
2Ford Motor Company, USA
Corresponding author
Susil K Putatunda, Department of Chemical Engineering and Materials Science, Wayne State University, 5050 Anthony Wayne Drive, Detroit, MI 48202, USA, Tel: +1-3135773808, Fax: +1-3135773810.
Accepted: November 01, 2018 | Published Online: November 03, 2018
Citation: Putatunda SK, Bajaj S, Boileau J (2018) A Novel Method for Determining the Fatigue Threshold and Fracture Toughness from a Single Test. Int J Metall Met Phys 3:023.
Copyright: © 2018 Putatunda SK, et al. This is an open-access article distributed under the terms of the Creative Commons Attribution License, which permits unrestricted use, distribution, and reproduction in any medium, provided the original author and source are credited.
Abstract
The fatigue threshold (∆Kth) and fracture toughness (KIC) are key parameters used in the design of structural components to minimize the degree of crack propagation. There are well-established ASTM standards for evaluating these two parameters. However, these tests can be lengthy and often require multiple test specimens with different geometries. Therefore, it would be advantageous if a simpler and less time-consuming test procedure could be developed to characterize both ∆Kthand KIC.
Therefore, this investigation was undertaken to develop a novel single test method (STM) for determination of both the fatigue threshold (∆Kth) and fracture toughness (KIC). Tensile and compact tension specimens were prepared from an austempered AISI 4140 steel and tested using the developed STM procedure; in addition, additional samples were prepared and tested using the ASTM E-647 and E-399 procedures for comparison. The test results show that the values obtained by the proposed STM were in good agreement with the results obtained by standard ASTM test procedures. This indicates that the proposed STM is a valid method of determining both ∆Kthand KICfor the austempered AISI 4140 steel.
In addition, the validity of an analytical model relating the fracture toughness with the strain hardening exponent and yield strength was examined in this material. Test results indicate good agreement between the experimentally determined values and the values predicted by the proposed model.
Introduction
The plane-strain fracture toughness (KIC) and the fatigue threshold (∆Kth) are two very important parameters in the design of structural components. The plane-strain fracture toughness (KIC) is a measure of a material's resistance to crack growth under sustained monotonic loading conditions [1]. During crack growth within a material, a plastic zone develops ahead of the crack tip; in this zone, when the local stress exceeds the fracture stress, the crack propagates. Plain strain fracture toughness is a condition where the plastic zone is small relative to the sample thickness. A singular stress distribution will arise, ensuring that the resulting fracture toughness value is a conservative measurement suitable for design purposes. Thus, structural components designed on the basis of plane-strain fracture toughness are expected to survive in service without undergoing catastrophic failure during monotonic loading.
The fatigue threshold (∆Kth) is a second important parameter used to design fatigue-resistant and fatigue-tolerant structures exposed to cyclic loading. ∆Kthis formally defined as the stress intensity range (∆K) at which the crack growth rate approaches a zero value under cyclic loading conditions. Practically, ∆Kthis defined as the value of stress intensity range at which the crack growth rate (da/dN) reaches a value of 10-10m/cycle [2].
Standard test methods for the determination of KICand ∆Kthare well established and are available (such as those in ASTM E-399 [1] and E-647 [2]). However, these test procedures require multiple tests using samples conforming to specific sizes and geometries. In addition, it is currently not possible to determine the values of KICand ∆Kthof any material by a single test method. Thus, development of a single, reasonably simple test method would be very advantageous. This would yield a test method that would be allow for a more rapid determination of the two very valuable design parameters while minimize the expenses associated with material and sample preparation.
Thus, the primary objective of this investigation was to develop a single test method (STM) that is capable of determining both the plane-strain fracture toughness (KIC) and the fatigue threshold (∆Kth) using a single test sample. The test data obtained by this new procedure would be compared with the fatigue threshold and fracture toughness obtained by the standard ASTM standard test methods. In addition, the study would provide the opportunity to assess the validity of a previously-developed model relating the fracture toughness with the yield strength and strain-hardening exponent [3].
For this study, an AISI 4140 steel alloy was chosen. This alloy, which contains Cr and Mn as the primary alloying elements, was chosen as it is commonly used in many structural applications that must be designed to resist failure due to cyclic loading [4,5]. Austempering was chosen as the heat-treatment process. Austempering is an alternative heat-treatment process to the traditional process of austenitizing, quenching, and tempering to obtain hardened steels [6-8]. This process has been result in to yield strengths similar to those observed for quenched and tempered steels [9,10]; in addition, the fracture toughness of the austempered steels can be superior to those in the quenched and tempered steel alloys [11,12]. However, a limited amount of information is available in the literature on mechanical properties austempered 4140 steels. Therefore, a need exists for fracture toughness data for austempered AISI 4140 steels.
Proposed Test Method
The basic concept of the proposed single-sample test method (STM) is as follows:
1. Compact tension samples are used for fatigue threshold testing;
2. The fracture crack growth rates (FCGR) as a function of stress intensity factor can be determined from the fatigue threshold test data;
3. By extrapolating the FCGR data from the fatigue threshold tests to a crack growth rate of 10-10m/cycle, the fatigue threshold (∆Kth) can be determined; and
4. By extrapolating the FCGR data from the fatigue threshold tests to the value at zero cycles, the plane-strain fracture toughness (KIC) can be determined.
Experimental Procedure
Material
The material used in this investigation is AISI 4140, a low-alloy steel that contains Cr and Mn as the primary alloying elements. The specific chemical composition of the material is reported in Table 1. The material was received in the form of a cold-rolled and annealed plates.
Heat treatment
Austempering was chosen as the heat-treatment process for the as-received steel plates. The samples to be examined in this study were a subset of a larger study examining the effect of austempering temperature on the mechanical properties of AISI 4140 steel. Thus, the as-received plates were first austenitized at 950 ℃ for 2 hours. The plates were then immediately transferred to a molten salt bath at 332 ℃, where they were held for 1 hour. The austempering in the 332 ℃ temperature region was selected to provide a fully lower bainitic structure. The specimens were then removed from the salt bath and allowed to air cool to room temperature.
Sample creation
From the austempered steel plates, tensile samples were prepared as per ASTM E-8 [13]; The long axis of the specimens was orientated parallel to the rolling direction of the plate. A total of 25 tensile specimens as shown in Figure 1 were prepared.
Compact Tension (CT) samples were prepared as per ASTM E-399 [2]. The CT specimens had a "T-L" orientation (rolling direction was parallel to the notch.) For these samples, the width of samples (W) was 50.8 mm while the thickness (B) was 19.05 mm; the aspect ratio (a/W) was approximately 0.45 in all of the samples. The large surfaces on each CT specimen was ground through 600 grit emery paper before being cleaned and degreased with acetone. A total of 35 CT specimens as shown in Figure 2 were prepared and tested.
Microstructural analysis
To examine the microstructures of the samples, selected sections were cut, mounted, and polished in accordance with standard metallographic procedures; A 2% Nital solution was used to etch the as-received samples, while a sodium bisulfate etch was used for the austempered samples. X-ray diffraction (XRD) was performed using monochromatic copper Kαradiation at 40 KV and 100 mA. A Rigaku rotating head anode diffractometer was used to scan an angular 2θ range from 42°-46° and 72°-92°; the scanning speed was of 0.25 degrees/minute.
Tensile testing
Tensile testing of the austempered samples was carried out in accordance with ASTM E-8 [13]. The tests were run on an MTS Model 810 servo-hydraulic frame at a constant strain rate of 4 × 10⁻⁴/sec, at room temperature, and in ambient air. The Ultimate Tensile and Yield Strengths, % Elongation, and strain hardening exponent ("n") were calculated from the load vs. displacement plots. 25 samples were tested.
Fatigue threshold testing
To determine the validity of using a single test method to determine both the fracture toughness (KIC) and fatigue threshold (∆Kth), each compact tension sample was initially pre-cracked in fatigue to produce a 2 mm sharp crack front in accordance with ASTM E-647 [2]. Subsequently, they were cyclically loaded at ∆K levels of approximately 20, 22, 28, 33, and 38 MPa√m; at each ∆K level, five specimens were tested for approximately 2-3 hours each at room temperature and in ambient air. These tests were carried out in a MTS 810 servo-hydraulic test system at 5 Hz using a constant amplitude sinusoidal waveform; The load ratio was chosen as R = Kmin/Kmax= 0.10. All samples were run under load control, at room temperature, and in ambient atmosphere. The samples were run until the crack was grown an additional 2 mm in length (approximately 4 mm in total length including the pre-crack); at this point, the test was suspended, and the sample was removed intact.
The individual crack lengths were measured on each specimen surface using an optical microscope and recorded as a function of the number of fatigue cycles. As defined by ASTM E-647, the ratio of the change in crack length (da) to the number of cycles (dN) was calculated and plotted to obtain a graph of ∆K against da/dN. The multiple tests performed at each ∆K level allowed for the creation of a well-defined curve for Region II. A power law-based curve fitting was then used to yield a relationship between ∆K and da/dN, which was used to determine ∆Kthby extrapolating to a da/dN value of 10-10m/cycles.
For comparison purposes with the data from the proposed single test method, ∆Kthwas also determined by using the method detailed in ASTM E-647 for these austempered samples. A total of 5 samples were tested to failure to get data for both Regions I and II; these tests were conducted at room temperature, in ambient air, and took up to 15 days to complete. The Paris constants values were calculated using the data points of da/dN vs. ∆K in the linear region.
Fracture toughness testing
The plain-strain fracture toughness was determined in accordance with the ASTM E-399 test procedure [1]. For these tests, the samples that had undergone fatigue threshold testing (as detailed in Section 4.6) were again placed in a MTS 810 servo-hydraulic MTS test machine and loaded in tension. By using a clip gauge placed in the knife edge attachment on the specimen, load-displacement diagrams were obtained. From these diagrams, the final fracture loads, PQ, were determined. From the obtained PQvalues, the stress intensity values (KQ) were then calculated using the standard stress intensity factor calibration function for the CT specimens. Since the KQvalues satisfied all of the requirements for a valid KICtest as per ASTM E-399, they were judged to be valid KICvalues. A total of 23 specimens were tested; the average, standard error, and standard deviation values were calculated using common statistical techniques.
For comparison purposes with the data from the proposed single test method, KICwas also determined by using the method detailed in ASTM E-399 for these austempered samples. A total of 7 samples were tested to failure.
Analytical calculation of fracture toughness
The purpose of the paper was to test the use of a single test method (STM) to determine both fatigue threshold and fracture toughness. Therefore, the fracture toughness was determined from experimental STM data obtained from the threshold testing (as detailed in Section 4.5) Using this data, a graph of Kmaxwas plotted against number of cycles. The parameter Kmaxwas obtained by using the following two equations: ∆K = Kmax-Kminand R = Kmin/Kmax= 0.1; therefore, ∆K = (0.9) Kmax. A power law-based curve fit was then performed to develop a relationship between Kmaxand the number of cycles. Using this relationship, the value of KICwas obtained by extrapolating the number of cycles to zero.
Results and Discussions
Microstructure
The microstructure of the 4140-steel alloy in the as-received condition showed a mixed ferrite + pearlite structure; very fine needles of pearlite were observed in the matrix (Figure 3a).
The microstructure of the austempered 4140 samples is shown in the Figure 3b. The austempered microstructure shows the presence of lower bainite (blue-colored phase) and a limited number of isolated pockets of martensite (brown-colored phase) in the microstructure. X-Ray Diffraction (XRD) confirmed the presence of the bainite and martensite in the austempered material.
The presence of the martensitic was not expected since the samples were austempered at a temperature above the Ms (Martensite start) temperature of the 4140 steel. This was attributed to segregation effects from the alloying elements present in the steel. The carbides of alloying elements like Cr, Mo, and Mn tend to segregate to the intercellular regions. In these segregated regions, the bainitic reaction associated with the austenite decomposing into ferrite and carbide becomes sluggish; therefore, complete transformation does not take place during the processing time. Upon cooling, these untransformed regions can form martensitic structures.
Optically, a very small amount (< 1%) of retained austenite (white phase) was also observed in the austempered 4140 alloy; however, no retained austenite was detected from the XRD study.
Mechanical properties
The results from the tensile tests of the samples austenitized at 950 ℃ for 2 hours and austempered at 322 ℃ for 2 hours are presented in Table 2 [14-16]. In general, the variation associated with the results are typical and normal for tensile tests. Table 2 also shows a comparison of these results to the annealed condition. In general, the austempering process has increased both the ultimate and yield strengths compared to the annealed condition; as expected, the ductility of the austempered 4140 is significantly decreased compared to the annealed condition.
Table 2 also presents a comparison of the mechanical properties as a function of austempering heat-treatment for samples taken from the same heat of 4140 steel as that used in this study. As this tensile data shows, increasing the austempering temperature from 885 ℃ for 1 hour [15] to 950 ℃ for 2 hours will significantly decrease the tensile strengths of the austempered 4140 steel; in addition, the elongation is not significantly improved. This is thought to be a result of the increase in prior austenite grain size associated with the higher temperature/longer time treatment. Upon cooling, the larger grain size will result in a coarser bainitic microstructure that, in turn, lowers the mechanical properties.
Additionally, Table 2 presents data comparing the mechanical properties from the current study to those of a 4140 steel that had undergone a conventional quench and temper heat-treatment process [16]. As this comparison shows, the conventional quench and temper process yields tensile strength and elongation values significantly greater than those from the austempering process. However, it should be noted that the austempering process can result in much lower levels of distortion. Thus, in certain applications, austempering may be a more optimum process for achieving high strengths.
Fatigue threshold
The results from the fatigue thresholding tests performed on the austempered 4140 samples for the proposed STM are presented in Figure 4. The threshold value for the tested samples was determined by first plotting ∆K against da/dN. From this plot, standard curve-fitting techniques were applied to determine the best-fit relationship; from this, the following equation was obtained:
∆K (MPa√m) = 1724(da/dN)0.2451 (1)
The relationship was observed to have a coefficient of determination (R2) value of 0.9970, indicating that a power law relationship was an excellent fit to the data. By extrapolating this relationship to da/dN = 10-10m/cycle, the value of ∆Kthfor the proposed STM has been calculated and found to be 6.10 MPa√m (Figure 4). As Table 3 shows, this value was very close (10%) to the fatigue threshold value of 5.5 +/- 2.9 MPa√m obtained from the standard ASTM E-647 test method. Statistical analysis found that there is no statistically significant difference between the two fatigue threshold values (the conventional and the proposed STM).
Therefore, since there is no difference between the two fatigue threshold values, this indicates that the proposed single sample test method is a reasonable approach for determining the value of ∆Kthin austempered 4140 steel.
The Paris constants were also determined by plotting the graph of da/dN against ∆K. The constants were found to be C = 2.765 × 10⁻¹³and m = 3.65. These results are reasonable when compared with those reported in [14].
Fracture toughness
The results from the fracture toughness tests performed on the austempered 4140 samples for the proposed STM are presented in Figure 5. From this plot, standard curve-fitting techniques were again applied to determine the best-fit relationship; from this, the following equation was obtained:
Kmax(MPa√m) = 29.04 e-5.883e-05*N+ 28.53 e-1.41e-06*N (2)
This relationship was observed to have a coefficient of determination (R2) value of 0.9993, indicating that the double-parameter exponential decay relationship was an excellent fit to the data. Thus, by extrapolating the number of cycles ("N") to zero, Equation (1) yields a fracture toughness ("KIC") equal to 57.6 MPa√m. As mentioned earlier, for comparison purposes, the fracture toughness of the austempered AISI 4140 steel was also evaluated by the conventional ASTM E-399 test [2]. Using this method, the fracture toughness of the austempered AISI 4140 steel was determined to be 62.4 +/- 6.6 MPa√m.
Again, statistical analysis was conducted on the data from the conventional ASTM tests and the proposed STM. This analysis found that there is no statistically significant difference between the two KICvalues. Thus, since there is no difference between the two, this indicates that the proposed single sample test method is a reasonable approach for determining the KICvalue for austempered 4140 steel.
Proposed Analytical Model
The fracture toughness of a material strongly depends on the microstructure present. In a study on austempered ductile iron, the width of the ferrite (which affects the yield strength, σy), the carbon content of the retained austenite (), and the volume fraction of the retained austenite () were quantified and compared with the fracture toughness [3]. A plot of KIC2vs. the parameter σy*(Cg*Xg)1/2was found to be well-modeled by a linear line, indicating that a relationship between microstructure and fracture does exist in an austempered ductile iron.
There was a desire to see if the fracture toughness of the austempered 4140 steel could also be modeled as a function of measurable microstructural parameters as well. Given that the volume fraction of the retained austenite (Xg) in the austempered 4140 steel was essentially zero, the model based upon KIC2α σy*(Cg*Xg)1/2was no longer valid, and a new approach needed to be developed.
Principles
Crack propagation requires a force with sufficient amount of energy to cause a crack to grow and have an incremental increase in area. Following Irwin's correction to the LEFM approach to crack growth for a through-thickness crack growing in an infinite plate, this can be represented by the following equation:
G = dU/dA = dU/(B *da) (3)
where Gis the crack extension force or energy release rate (units of N/m), dUis the change in energy per unit volume to propagate a crack (J), dAis the incremental increase in crack area (m2), Bis the material thickness (m), and dais the incremental increase in crack length (m).
In ductile materials (like 4140 steel alloys), the majority of the crack extension force that drives crack growth is dissipated in extending the plastic zone in a given material. Since the energy required to deform a unit volume of the given material is represented by the area under the stress-strain curve, the critical energy (or work) to deform a unit volume of material to fracture can be written as:
Wc= σy*εf (4)
where Wcis the critical work of deformation to fracture per unit volume (N/m2), σyis the yield stress of the given material (N/m2), and εfis the plastic component of the true strain at fracture (dimensionless).
The critical crack extension force can be determined by calculating the critical volume of deformed metal associated with the extension of a crack by da. This can be written as:
Vc= 2 *COD *B *da (5)
where CODis the crack tip opening displacement (units of m).
To calculate the critical crack extension force, let us assume that dUc can be approximated by the product (Wc *Vc); therefore:
GIC= dUc/(B*da) = (Vc*Wc)/(B *da) (6)
Substituting Equations (4) and (5) into (6) yields:
GIC= 2 *COD *σy*εf (7)
Under plane strain conditions, the yield strength will be elevated due to triaxiality at the crack tip; therefore:
GIC= 2 *COD *m *σy*εf (8)
where mis the yield strength elevation factor (usually between 1.6 and 2.0 for metallic materials).
From experience, it is known that structural steels can be poorly modeled by LEFM alone; this is due to the blunting of the initially-sharp cracks during propagation. In the case of small-scale yielding in front of the crack under plain strain conditions, the following relationship between GICand KICwas developed:
GIC= KIC2(1-ν2)/E (9)
where Kis stress intensity factor, Eis the modulus of elasticity and νis Poisson's ratio. Substituting Equation (8) into (9) and rearranging yields:
KIC2= (GIC*E) /(1-ν2) = (2 *COD *m *σy*εf*E) / (1-ν2) (10)
where the units are in MPa2m.
There have been a large number of detailed investigations focusing on the relationship between fracture toughness, crack opening displacement, and the mechanical properties in a large number of metallic alloy systems [17-20]. From these studies, it has been found that the critical value for the term (2 *COD) = (C" *η2)1/2, where C" is a material-dependent constant, η is the strain hardening exponent, and the units are in meters. Assuming this relationship is valid for the 4140-steel examined in this study, substituting it into Equation (10) will yield:
KIC2= (2 *(C'' *η2)1/2 *m *σy*εf*E)/(1-ν2) (11)
This is very similar to the relationship developed in [21], in which the relationship was found to be within ± 30% of the measured KICvalue. Gathering the terms that will remain constant for the given material will result in the following relationship:
KIC2= C' *η *σyor KIC= C *(η *σy)1/2 (12)
This equation indicates that the fracture toughness should be proportional to the square root of the product of the strain hardening exponent and the yield strength.
Experimental correlation
As part of the present study, the validity of the model in the austempered 4140 steel was also examined. Figure 6 is a plot of the experimentally-determined values of KICagainst the parameter (η *σy)1/2, where η = 0.15; Table 4 shows the individual values. As Figure 6 illustrates, a linear relationship with a coefficient of determination (R2) of 0.9331 can be fit to the data. This yields a value for the constant "C" (in Equation 12) of 6.1.
To assess the predictive value of the mathematical relationship KIC= 3.1 *(0.15σy)1/2, the yield strength values shown in Table 4 were placed into the equation. From this, a calculated value of KICwas obtained which could be compared to the experimentally-determined KICvalue. As the data in Table 4 shows, the experimental and calculated values averaged only a 3.3% difference; for all of the samples, the difference was less than 10.4%.
This strongly indicates that the microstructural parameters affecting the strain hardening rate and yield strength also affect the fracture toughness; thus, the model has validity in providing a first-order approximation of the fracture toughness. Further, the current test results indicate that a combination of both very high strength and moderate fracture toughness is obtainable by improving both strain hardening exponent and yield strength of the material. However, it should be stressed that additional correlations need to be performed, as this paper only examined a single material with a constant microstructure in one heat-treated condition.
Conclusions
In this investigation, the viability of a novel single test method for determination of both fatigue threshold and fracture toughness was explored in austempered AISI 4140 steel. This new proposed test method is simpler, less time consuming, and uses fewer samples. In brief, the proposed test method is based upon samples where a crack is grown approximately 2 mm in length in a pre-cracked CT specimen; then, these samples are tested in tension until failure as per ASTM E-399. By extrapolating the crack growth data from the fatigue threshold tests to a crack growth rate of 10-10m/cycle, the fatigue threshold (∆Kth) is determined. Similarly, by extrapolating the crack growth data from the fatigue threshold tests to the value at zero cycles, the plane-strain fracture toughness (KIC) is determined.
The fatigue threshold and fracture toughness data obtained by this novel test process was found to be statistically the same as those results obtained by the conventional ASTM E-647 and ASTM E-399 standard test methods. This indicates that the proposed single sample test method is a reasonable approach for determining both the ∆Kthand KICvalues for austempered 4140 steel. In addition, the single test method has the advantage of reducing the testing time involved from up to several days to several hours in length.
The applicability of a previously developed model relating fracture toughness with microstructural features was also examined in this study. Reasonable agreement was observed between the experimentally determined data and the analytical model. The results indicate that a proportionality of form: KICα (η*σy)1/2yields a linear relationship with a high degree of correlation for the austempered 4140 steel alloy examined in this study. It is noted that additional correlations need to be performed, as this paper only examined a single material with a constant microstructure in one heat-treated condition. However, the model yields an estimate that is a reasonable first-order approximation of the fracture toughness for use with preliminary design studies or test-level settings.
It is the recommendation of the authors that other researchers try the technique proposed herein for other materials, so that the degree of applicability and validity of the method can be determined.
It is the recommendation of the authors that other researchers try the technique proposed herein for other materials, so that the degree of applicability and validity of the method can be determined.In addition, the mechanical properties generated during the course of this study show that austempering of AISI 4140 steel can result in a material with increased tensile and yield strengths while, at the same time, maintaining reasonable elongation, fracture toughness, and fatigue threshold values compared to conventional heat-treatment processes. This is a significant result; generally, in high-strength steels, as the tensile strengths increase, a decrease is observed in the elongation, fracture toughness, and fatigue threshold. Thus, austempering is a process by which it is possible to obtain both high strengths and fracture resistance at the same time.

