
International Journal of Metallurgy and Metal Physics
(ISSN: 2631-5076)
Volume 4, Issue 1
Research Article
DOI: 10.35840/2631-5076/9229
Effects of Laser Hardening Treatment on the Wear Properties of the Vanadis 4 Extra and Vanadis 10 Tool Steels
Tarik Baykara1* and Nazan Keskin2
Table of Content
Figures
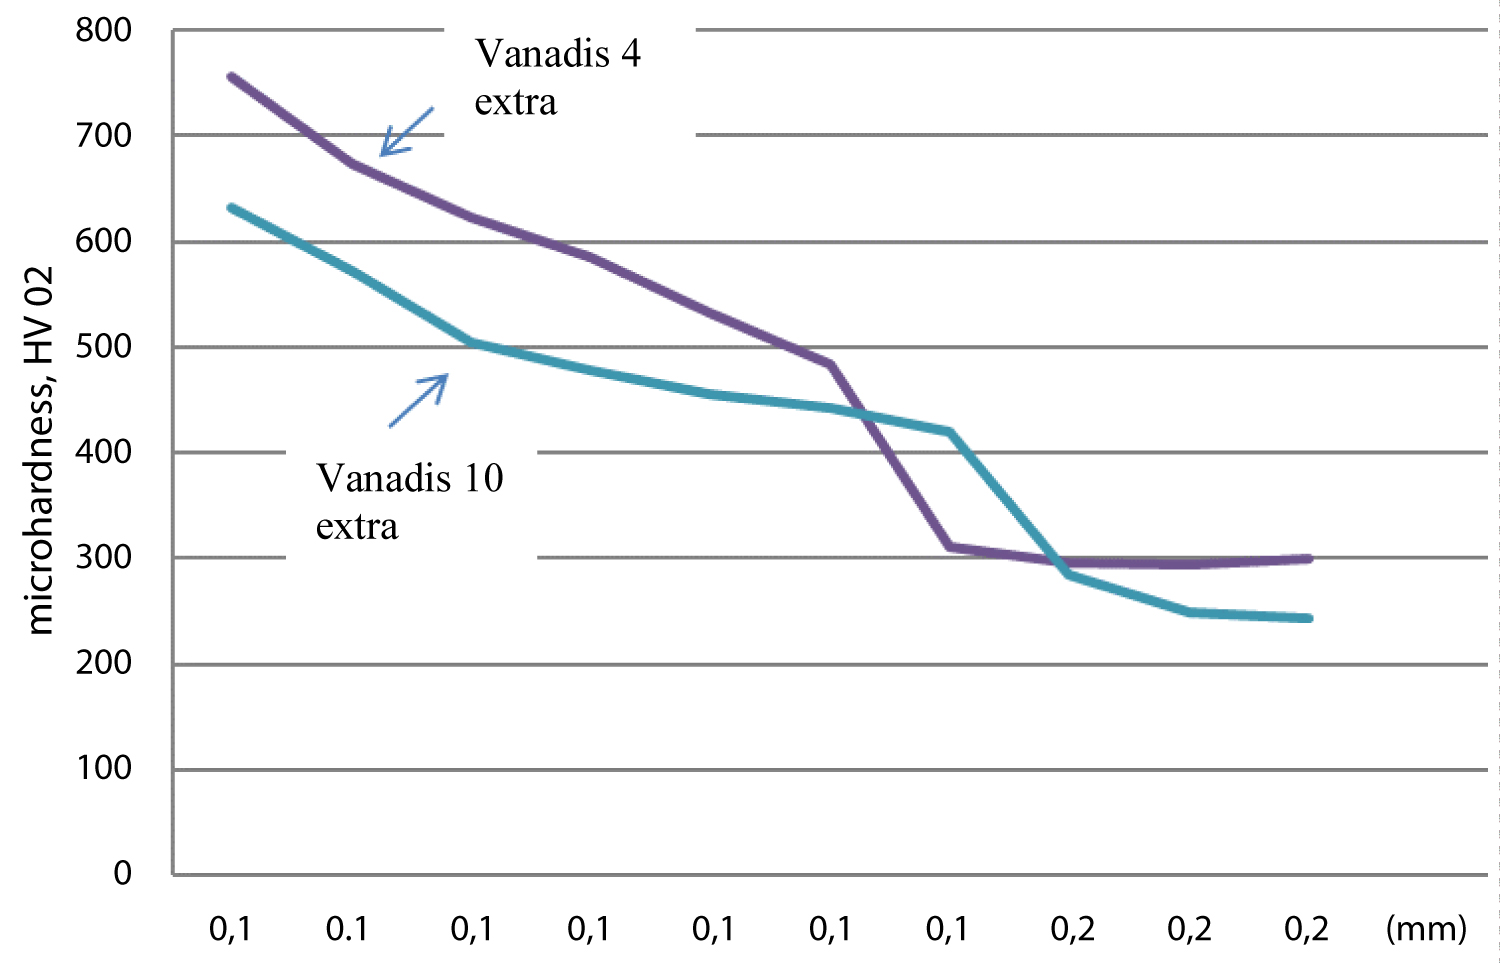
Figure 1: Depth of microhardness measurements...
Depth of microhardness measurements from the top surface towards the center.
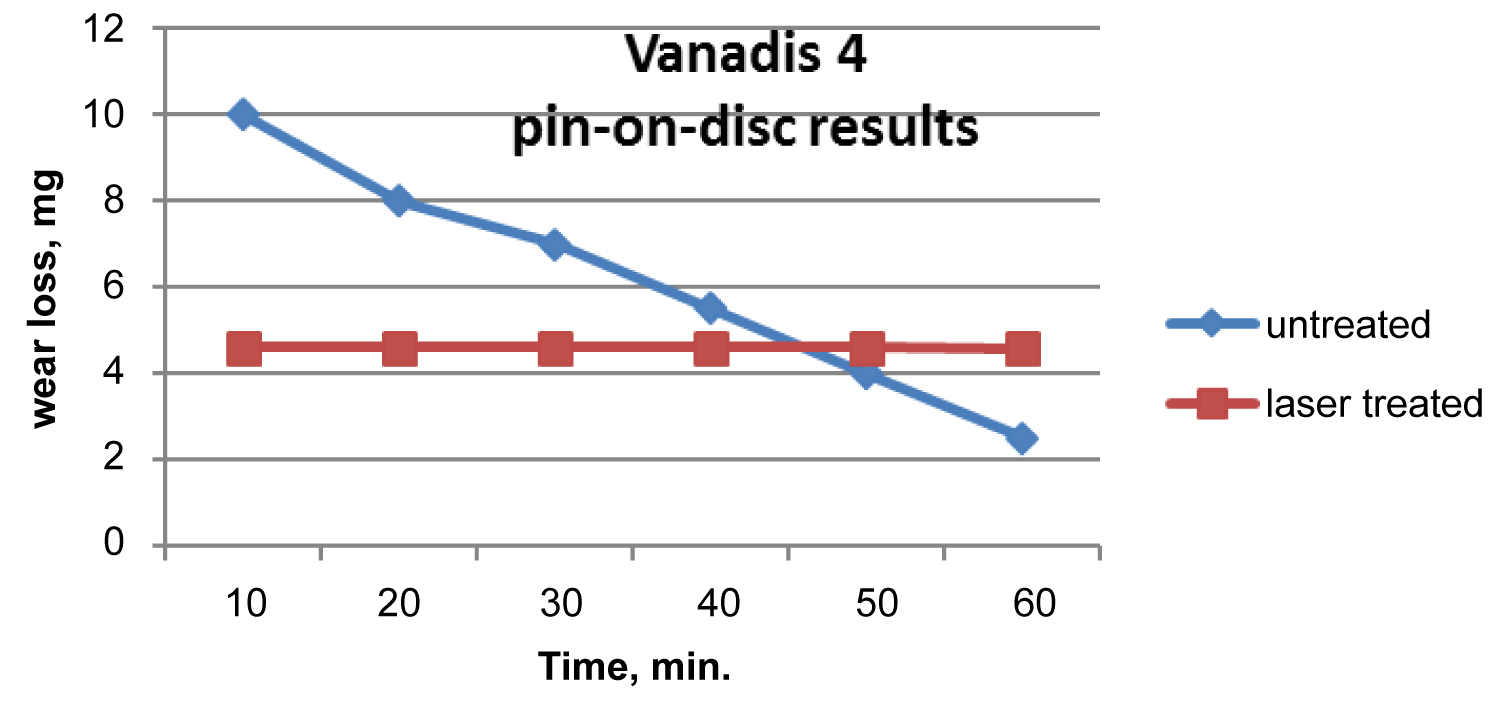
Figure 2: Pin-on-Disc wear test results for...
Pin-on-Disc wear test results for untreated and laser treated Vanadis 4 extra samples.
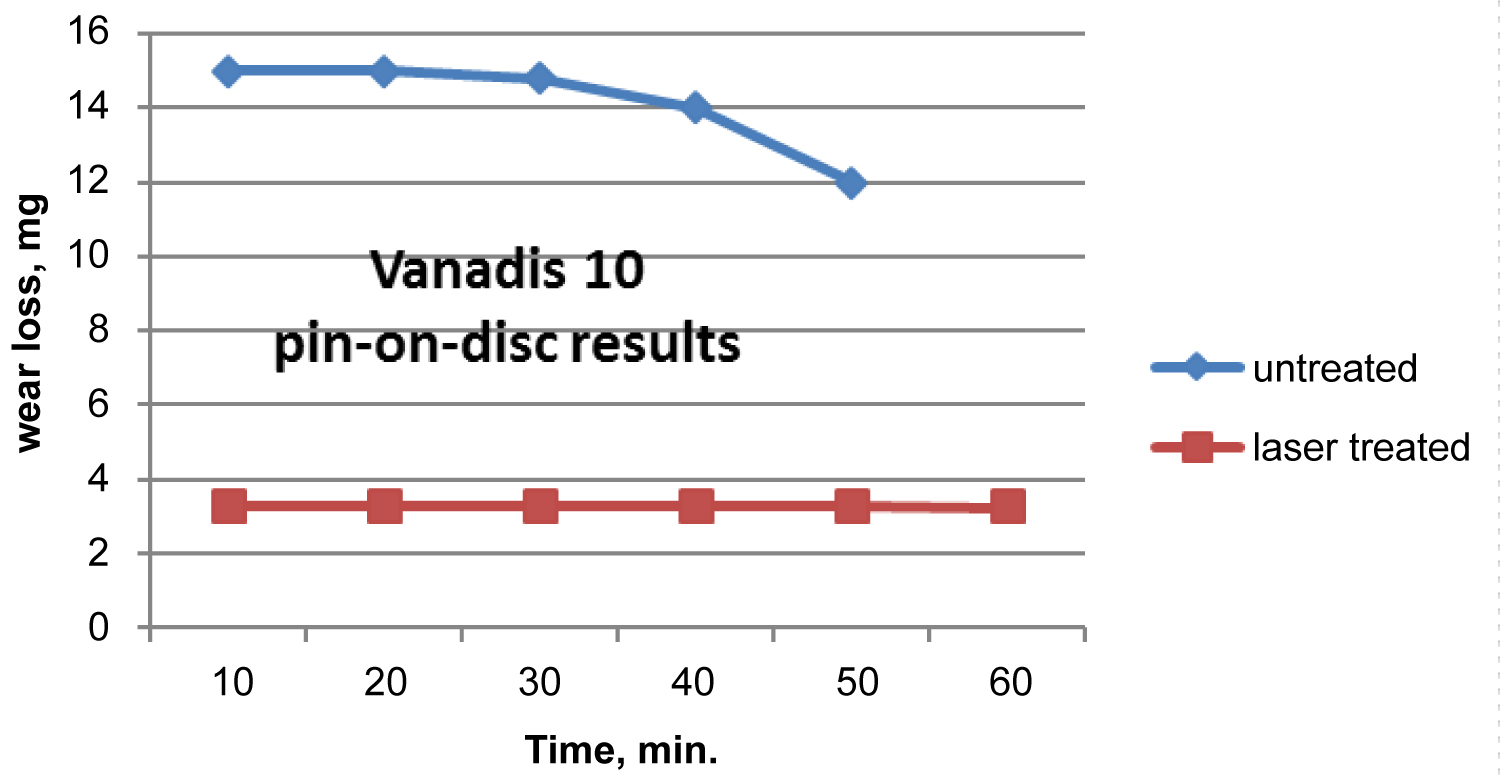
Figure 3: Pin-on-Disc wear test results for...
Pin-on-Disc wear test results for untreated and laser treated Vanadis 10 samples.
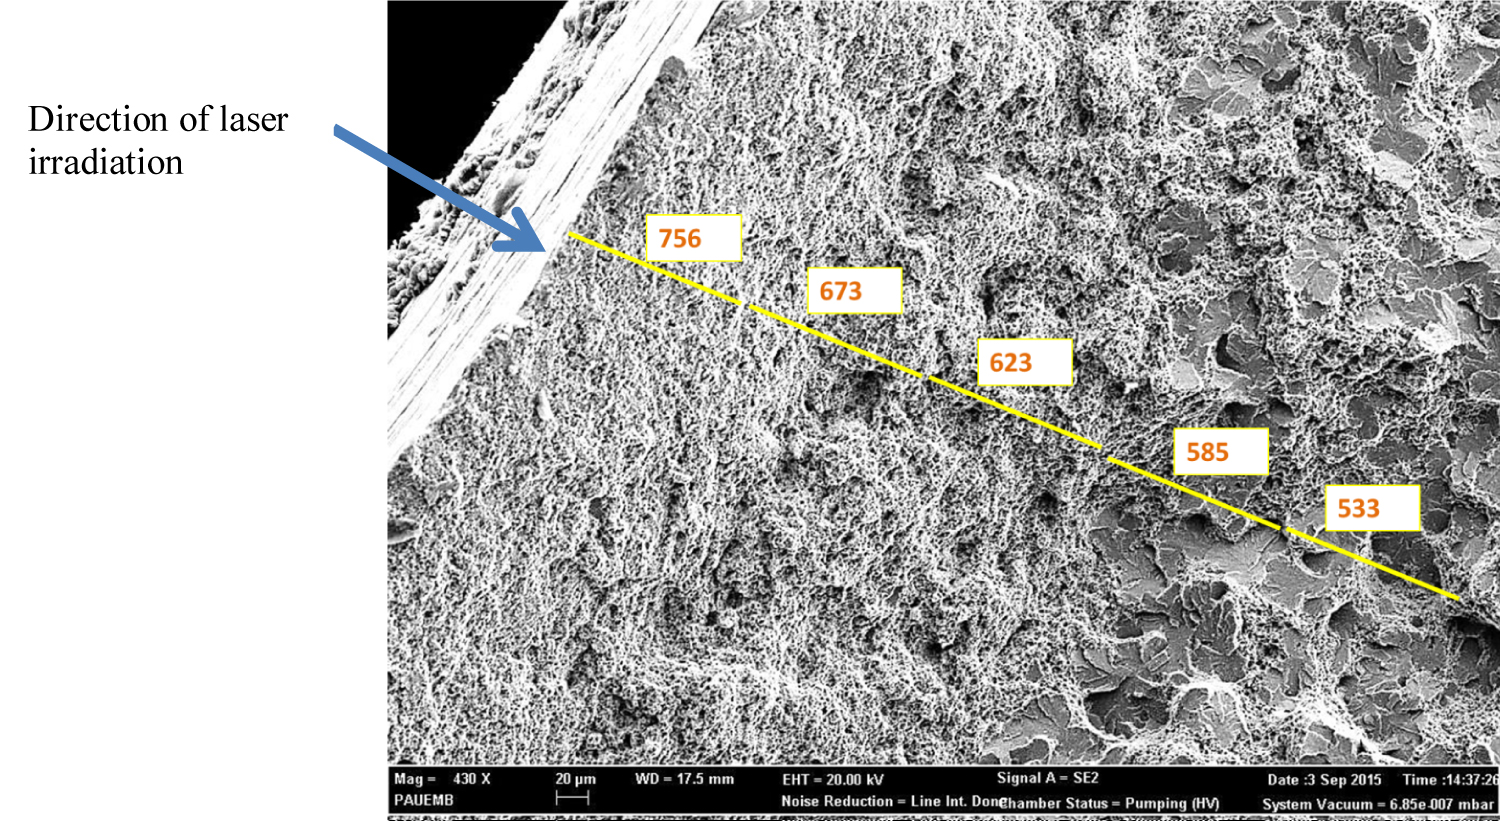
Figure 4A: Changing microhardness values...
Changing microhardness values for the Vanadis 10 with the depth of measurements.
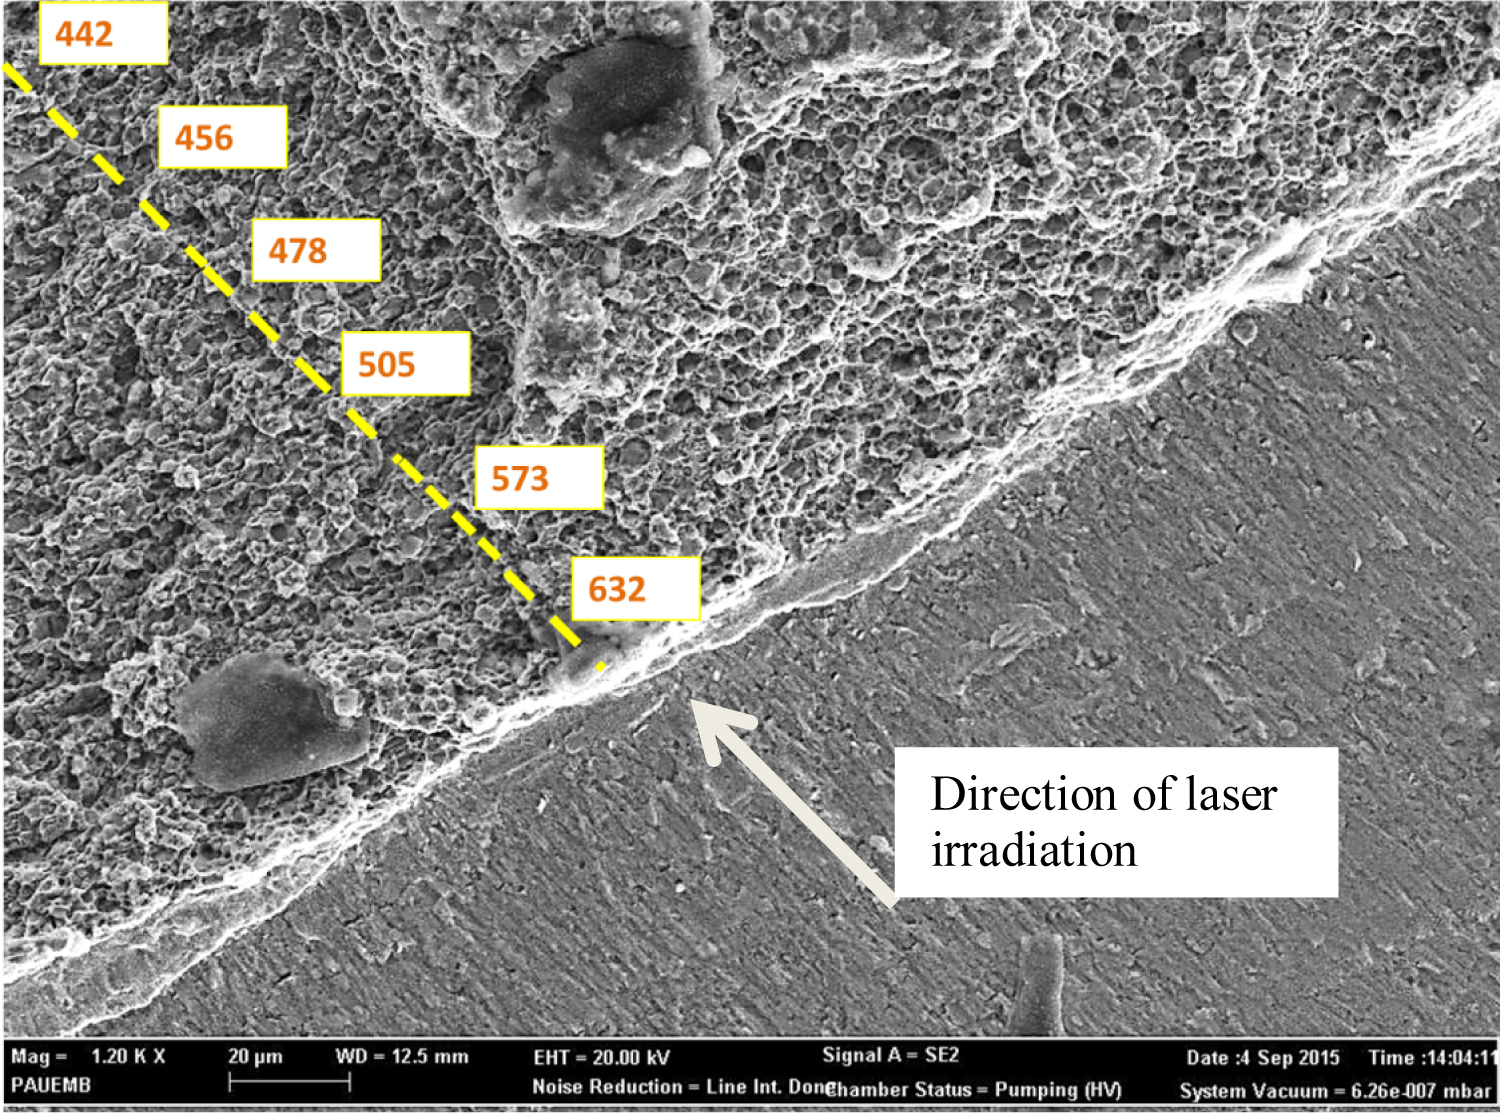
Figure 4B: Changing microhardness values for...
Changing microhardness values for the Vanadis 10 with the depth of measurements.
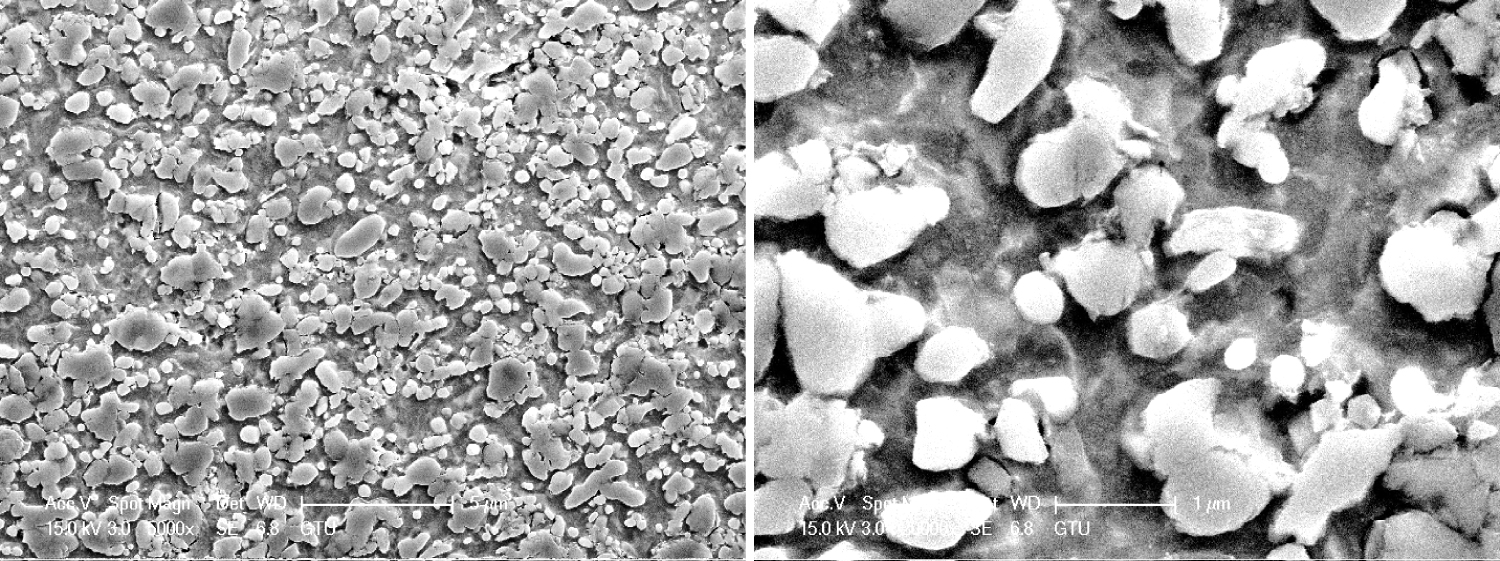
Figure 5: SEM Micrographs. a) As-received the Vanadis...
SEM Micrographs. a) As-received the Vanadis 4 extra sample (x5000 mag); b) As-received Vanadis 4 extra sample (x20000 mag).
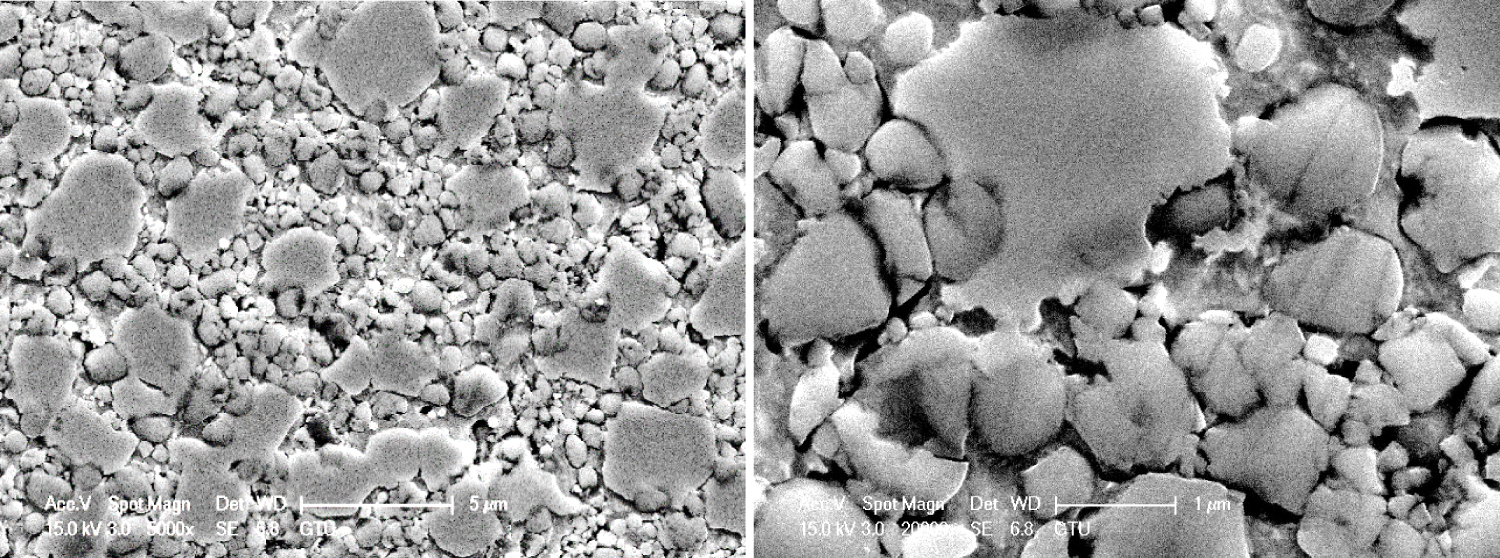
Figure 6: SEM Micrographs. a) As-received...
SEM Micrographs. a) As-received the Vanadis 10 sample (x5000 mag); b) As-received Vanadis 10 sample (x20000 mag).
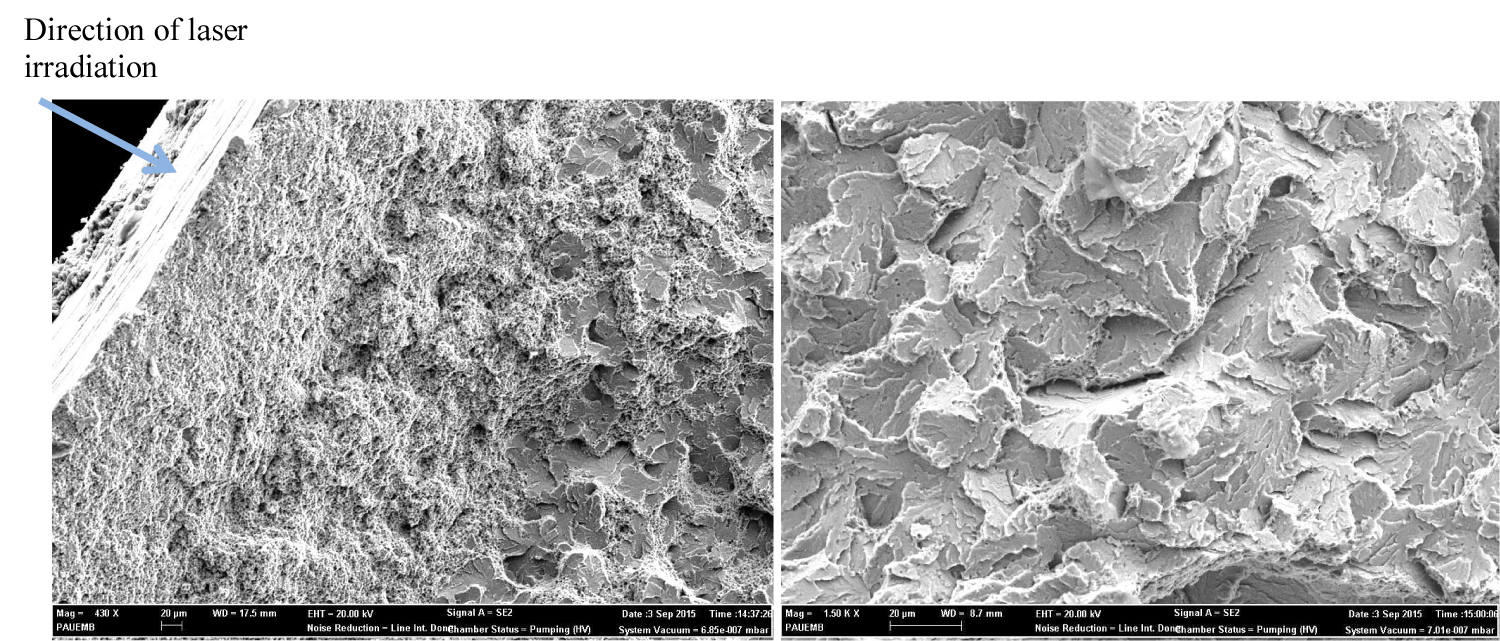
Figure 7: SEM Micrographs. a) Laser treated the...
SEM Micrographs. a) Laser treated the Vanadis 4 extra sample (x430 mag); b) Laser treated Vanadis 4 extra sample (x1500 mag).
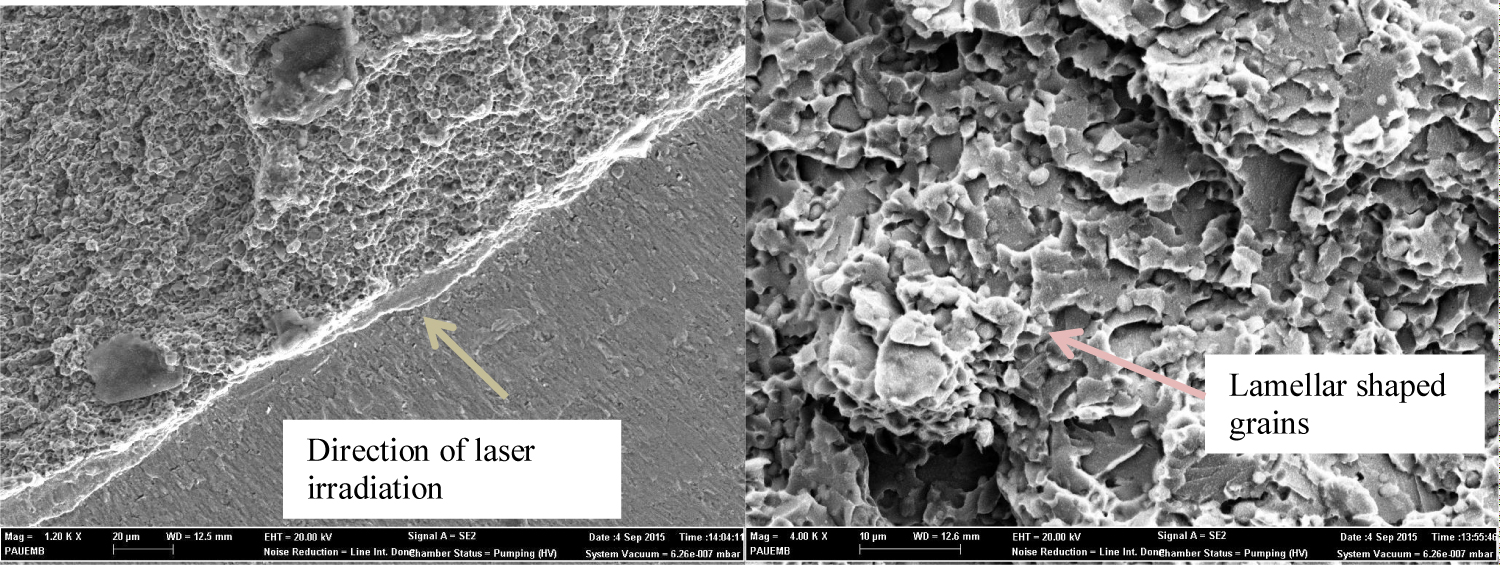
Figure 8: SEM Micrographs. a) Laser treated the...
SEM Micrographs. a) Laser treated the Vanadis 10 sample (x20000 mag); b) Laser treated Vanadis 10 sample (x4000 mag).
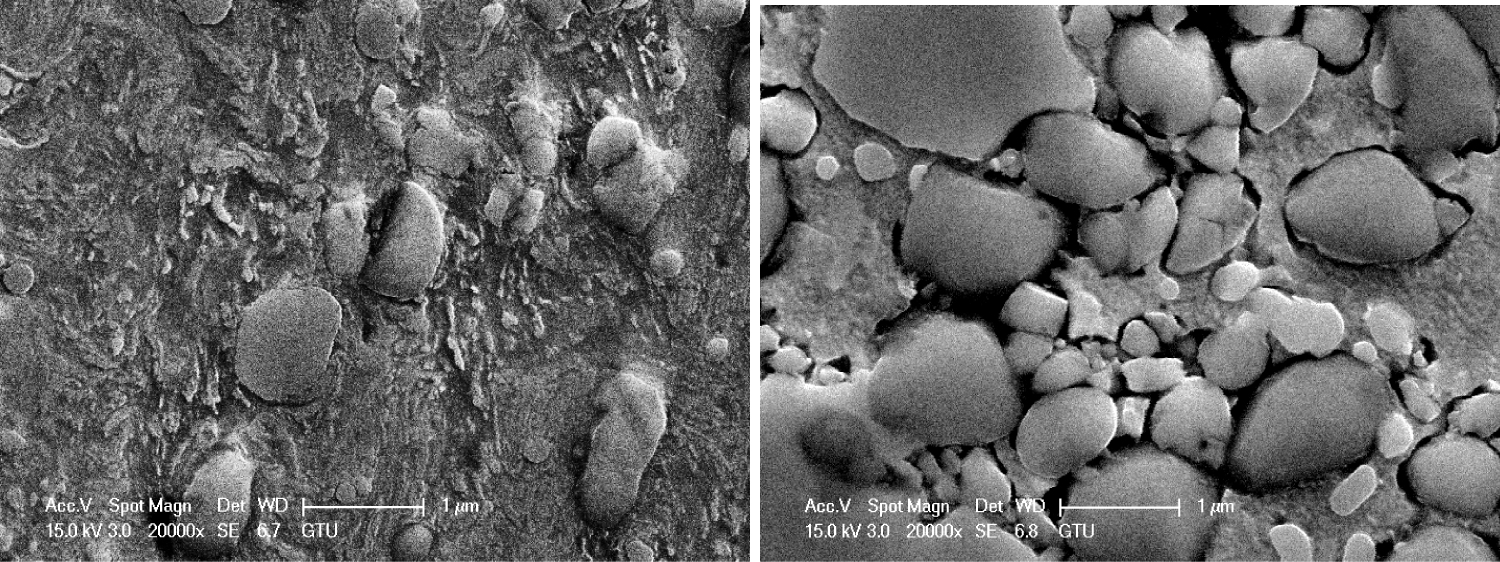
Figure 9: a) SEM Micrographs of the heat treated Vanadis...
a) SEM Micrographs of the heat treated Vanadis 4 extra samples (x20000 mag); b) Heat treated Vanadis 10 samples (x20000 mag).
Tables
Table 1: Chemical composition of the samples in mass fractions (wt %).
Table 2: The results of hardness measurements, HRC.
Table 3: The results of microhardness measurements, HV 0.2.
References
- Baykara T, Bedir HF (2017) Effects of heat treatment on the mechanical properties of the Vanadis 4 extra and Vanadis 10 tool steels. J Material Sci Eng 6: 330.
- Sobotova J, Jurci P, Adámek J, Salabová P, Prikner O, et al. (2013) Diagnostics of the microstructural changes in sub-zero-processed Vanadis 6 P/M ledeburitic tool steel. MTAEC9 47: 93.
- Colac R, Gordo E, Ruiz-Navas EM, Otasevic M, Vilar R (2006) A comparative study of the wear behaviour of sintered and laser surface melted AISI M42 high speed steel diluted with iron. Wear 260: 949-956.
- Surzhenkov A, Kulu P, Viljus M, Vallikivi A, Latokartano J (2010) Microstructure and wear resistance of the laser hardened pm tool steel Vanadis 6. 7th International DAAAM Baltic Conference: Industrial Engineering, Estonia.
- Jurči P, Dománková M, Ptačinová J, Hudáková M (2015) Phase constitution of sub-zero treated Vanadis 6 tool steel. Metal 2015.
- Ocak M (1999) Investigation of mechanical and microstructural features of vanadis 4 coldworking tool steels produced by powder metallurgical routes in different heat treatment temperatures. Technical University, İstanbul, Turkey.
- Sangwoo So, Hyungson Ki (2013) Effect of specimen thickness on heat treatability in laser transformation hardening. International Journal of Heat and Mass Transfer 61: 266-276.
- Orazi L, Fortunato A, Cuccolini G, Tani G (2010) An efficient model for laser surface hardening of hypo-eutectoid steels. Applied Surface Science 256: 1913-1919.
- Pellizzari M, De Flora MG (2011) Influence of laser hardening on the tribological properties of forged steel for hot rolls. Wear 271: 2402-2411.
- Soriano C, Leunda J, Lambarri J, García Navas V, Sanz C (2011) Effect of laser surface hardening on the microstructure, hardness and residual stresses of austempered ductile iron grades. Applied Surface Science 257: 7101-7106.
- Chin-Cheng Chen, Chun-Ju Tao, Lih-Tyan Shyu (1996) Eutectoid temperature of carbon steel during laser surface hardening. J Mater Res 11: 458-468.
- (2000) Standard test method for wear testing with a pin-on-disk apparatus. ASTM G 99-95a, United States.
Author Details
Tarik Baykara1* and Nazan Keskin2
1Faculty of Engineering, Department of Mechanical Engineering, The MIT Laboratory, Doğuş University, Turkey
2Electron Microscopy Unit, Pamukkale University, Turkey
Corresponding author
Prof. Dr. Tarik Baykara, Faculty of Engineering, Department of Mechanical Engineering, The MIT Laboratory, Doğuş University, Acibadem, Kadikoy, Istanbul, Turkey, Tel: +90-536-544-6830.
Accepted: March 14, 2019 | Published Online: March 16, 2019
Citation: Baykara T, Keskin N (2019) Effects of Laser Hardening Treatment on the Wear Properties of the Vanadis 4 Extra and Vanadis 10 Tool Steels. Int J Metall Met Phys 4:029.
Copyright: © 2019 Baykara T, et al. This is an open-access article distributed under the terms of the Creative Commons Attribution License, which permits unrestricted use, distribution, and reproduction in any medium, provided the original author and source are credited.
Abstract
Vanadis tool steels which are trademarks of the Uddeholm AB Company are high vanadium content (along with chromium and molybdenum) steels with unique mechanical properties such as very high wear resistance along with a good machinability, dimensional stability and grindability. They are widely used in blanking operations, stamping, deep drawing, cutting and slitting blades. Microstructural features of Vanadis steels are directly depended upon the distribution of different carbide phases. In this study, the effects of laser hardening on the Vanadis 4 extra and Vanadis 10 grade tool steels are investigated. Following the laser hardening route on the samples, abrasive wear behaviour, microstructural changes and microhardness values were determined. Wear test results and microhardness data are correlated with the resulting microstructural features. It was found that the increase in microhardness and thus wear resistance is attributed to the finer grain size for both of the Vanadis 4 extra and Vanadis 10 grades. The results were also compared with the same Vanadis grade samples which were hardened using heat treatment processes. It is found that there is a considerable increase in the microhardness values for the Vanadis 10 samples. The data shows 100.6% increase in the laser treated samples compared to the heat treated Vanadis 10 samples. Only a very slight increase (about 4%) of the microhardness value for the laser treated Vanadis 4 extra was recorded.
Keywords
Laser hardening treatment, Tool steels, Vanadis, Powder metallurgy, Wear resistance
Introduction
Vanadis tool steels are high vanadium content (along with chromium and molybdenum) steels with unique mechanical properties such as very high wear resistance along with good machinability, dimensional stability and grindability. Vanadis steels are manufactured using powder metallurgical routes (starting from the alloy powders to the sintering) and they also offer a combination of high hardness and good toughness [1]. Vanadis tool steels have a very homogeneous microstructural features and highly refined grain size distribution compared to other conventional tool steels and given such distinctive characteristics, they are widely used in blanking operations, stamping, deep drawing, cutting and slitting blades [1,2].
Research suggest that there are two major types of carbides in Vanadis steels following austenitizing, i.e., M7C3 secondary carbides (dissolved in the austenite) and eutectic MC carbides (stable up to 1150 ℃) along with small spherical carbides as alloyed cementite [2-5]. Laser hardening method is another technique to improve the properties such as hardness and wear resistance for these tool steels [4].
Such superior mechanical and wear properties are due to the type of carbides and the matrix phase. Homogeneous microstructure, controlled and uniform size distribution of carbides as eutectic and secondary carbides due to powder metallurgical process, effect the tool performance and tool life [3,6]. In this regard, various heat treatment techniques could improve desired features for specific properties to enhance tool performance. Laser hardening technique has also the advantage of self-quenching i.e., the quenching step during heat treatment is not required at all [4,7-10].
Laser hardening technique requires careful choice of the workpiece laser scanning velocity to ensure that the absorbed surface energy is enough for the right transformation without surface melting and consequent distortion. Other parameters, such as the power, size, and shape of the laser beam are also critical for the proper treatment of the surface with a good depth in the microstructure [11].
This study aimed to determine the effects of laser hardening on the Vanadis 4 extra and Vanadis 10 grade tool steels. Following the laser hardening route on the samples, abrasive wear behaviour, microstructural changes and microhardness values were tested and determined. Wear test results and microhardness values are correlated with the resulting microstructural features. In the previous study, the effect of heat treatment on the Vanadis 4 extra and Vanadis 10 grade tool steels were investigated. Following the annealing and quenching cycles on the same Vanadis steel samples, abrasive wear behaviour, microstructural changes and microhardness were presented and discussed in this work [1]. Findings and research results of microhardness measurements and wear tests of laser hardening and heat treatment are also presented and compared with the resulting microstructural features.
Material and Method
The sample materials used in the experiment were Vanadis 4 extra and Vanadis 10, both provided by a local company supplying tool materials (Rukosen Abkant). Analysis and testing of samples were carried out by careful preparation of cross-sections for measuring and determining the properties. This involved processing of materials into rectangular shapes using the punch pressing machine. The surfaces of each specimen were ground and polished for a smooth appearance. Chemical compositions of the samples of Vanadis 4 extra and Vanadis 10 manufactured via powder metallurgical routes are shown in Table 1.
Laser hardening process
The selected surfaces were irradiated with a REIS P.203 model high power diode laser (HPDL). 3 kw laser power was applied and the laser beam velocity was set at 4 mm/sec. The temperature varied between 1100-1300 ℃.
Hardness and microhardness measurements
Surface hardness measurements were conducted using Hardy Test UCI 300 instrument, the results of which are given in Table 2. The Vickers microhardness testing method (HV 0.2) was also completed to determine the microhardness data of both as-received and laser treated samples. Five measurements were taken and the average values were used and tabulated. For the as-received samples, the average microhardness values of the Vanadis 4 extra and Vanadis 10 were found to be 278 ± 15.5 and 313.6 ± 6.5, respectively. For the laser-treated samples, further measurements were conducted to determine the depth of hardness. Ten measurements were taken, starting from surface towards the center with a uniform distance of 0.1 mm in each measurement. The results are presented in Figure 1 illustrating the microhardness profile with the depth of measurement from the surface.
Pin-on-disc wear testing
Wear tests were conducted on the as-received and laser treated samples using the Pin-On Disk (POD) wear test rigs. ASTM G 99-95a was used to perform the tests [12]. Test samples were cut into cylindirical shape using wire erosion technique. D-2 Çold-working tool steel disc was used as the sliding platform for wearing under dry conditions. The steel disc has the hardness value of 62 Rockwell HRC. 10 N load was applied to both Vanadis 4 extra and Vanadis 10 samples.
In all the tests, the sliding rate was fixed at 310 rev/min. For each 1000 m wear travel distance, 3092 revolutions were recorded. The number of revolutions increased with the increasing travel distance: For each 2000 m, 3000 m, 4000 m and 5000 m, the number of revolutions recorded were 6184, 9276, 12 368 and 15 460, respectively. The weight after each 1000 m wear travel and the weight loss was calculated from the difference in weight of the specimens measured before and after the wear test using an electronic balance at a sensitivity of 0.1 mg. The results are presented in Figure 2 and Figure 3.
Weight loss (in mg) vs. time (in min.) graphs are shown in Figure 1 and Figure 2 demonstrating the effect of laser treatment on the wear resistance which shows no wear loss for the laser treated Vanadis 4 extra and Vanadis 10 samples respectively.
Microstructural investigation
Microstructural analysis of both as-received and laser treated samples was examined using a scanning electron microscope, SEM Philips XL 30 SFEG with resolution 1.5 nm at 10 kV and the Field Emission Scanning Electron Microscope (Zeiss supra 40 VP) at 20 kV. Standard metallographical sample preparation route (grinding, polishing, fine polishing and etching) was used to prepare the as received samples for SEM analysis. On the other hand, fractured surfaces of laser treated samples started from the surface towards to the center were also investigated using similar SEM analysis technique. In the case of heat treated samples, microstructural analysis for both untreated and heat treated were conducted using a scanning electron microscope, SEM Philips XL 30 SFEG with resolution 1.5 nm at 10 kV [1].
Results and Discussion
Microhardness and the depth of microhardness results
Results of microhardness measurements indicate a considerable increase in the microhardness values of both Vanadis 4 extra and Vanadis 10 samples. The data shows 161% increase for the Vanadis 4 extra and 101% for the Vanadis 10 following the laser treatment. There is a direct correlation between microhardness and the depth of measurements. Evidence for this interpretation can be seen in the fact that microhardness values vary with the depth from the surface (see Figure 4a and Figure 4b) toward the center.
In Figure 4a, measurements with 100 micron interval shown on the SEM micrograph reveal a gradual decrease of microhardness values with changing microstructures of the Vanadis 4 extra. A fine grained and high hardness zone down to 300 micron depth depicts a complete phase transformation of hard martensites, while at 400 micron depth, larger size carbide grains of 35-50 micron show partial dissolution and grain growth.
In Figure 4b, the microhardness and microstructure profile of Vanadis 10 sample within the depth of 600 micron is quite different than Vanadis 4 extra. Fine martensitic lamelles are homogeneously distributed within the depth of laser hardened layers and some secondary carbides can be observed.
Pin-on-disc wear testing results
Weight (mg) vs. travel time (min) presented in Figure 2 and Figure 3 demonstrating the effect of laser treatment on the wear resistance. No significant weight loss results were measured for Vanadis 4 extra and Vanadis 10, not even at 3000-5000 m travel distances under given condition. High wear resistance of the laser hardened microstructure can be attributed to increasing microhardness and finer grained microstructure within the hardened zone.
Microstructural investigation results
SEM micrographs of as-received Vanadis 4 extra and Vanadis 10 samples are shown in Figure 5 and Figure 6 with different magnifications (x5000 mag. and x20000 mag.). Figure 7 and Figure 8 illustrate the microstructures of the laser treated Vanadis 4 extra and Vanadis 10 with different magnifications. As can be seen in Figure 5 and Figure 6, the as-received structures of Vanadis 4 extra and Vanadis 10 consist of carbide grains (both eutectic carbides, MC and secondary carbides, M7C3 and other finer grain size carbides) embedded in a ferrite matrix. MC type carbides appear darker since they contain higher amount of carbon while other carbides reveal brighter appearance due to less amount of carbon and more iron and chromium [6]. The Vanadis 4 extra microstructure has very few porosity while the Vanadis 10 microstructures reveal more porosities along grain boundaries and in triple junctions. These porosities are the results of the powder metallurgical route starting with the powders, pressing them into appropriate shapes, sintering and densification.
As can be seen in Figure 5 and Figure 6, for the Vanadis 4 extra and Vanadis 10 grades, untreated microstructure reveals of carbides embedded in a ferrite matrix. Following the laser treatment of relatively high power of 3 kW and a slow scanning rate of 240 mm/min, extensive carbide disolution can be observed for both samples. For both of the samples, the microstructure within the hardened layer can be characterized as martensitic. In case of the Vanadis 4 extra, starting from the top of the surface, small carbide particles have dissolved in the metallic matrix, whereas in about 0.04 mm depth, larger carbide particles of 35-50 micron size are embedded in the matrix. Since the temperature range was measured in between 1100-1300 ℃, secondary carbides were not detected within the microstructure (Figure 7). It should be noted that the microstructures are free of any porosity meaning that an efficient pore closure and pore filling occured during the laser irradiation via instant high temperature.
In case of the Vanadis 10 grade sample, lamellar shaped carbide grains resulted from carbide dissolution lead to extensive finer grained martensitic structure (less than 10 micron) (Figure 8). Some secondary carbide precipitates and austenite seem to be retained within the microstructure resulting lower microhardness values compared to Vanadis 4 extra.
Comparisons of the results and findings with the heat treated Vanadis 4 extra and Vanadis 10
It was reported in the previous study, the Vanadis 4 extra samples were annealed at 1000 ℃ for 9 mins and Vanadis 10 at 800 ℃ for 5 minutes and quenched into water at room temperature (heat treatment procedure was selected according to Uddeholm AB Materials Safety Data Sheet) [1].
Vickers microhardness values for both as-received and heat treated samples were determined using the same Vickers microhardness parameters. Table 3 shows all the microhardness measurement results including laser hardened samples. Please note that the microhardness values are all measured on the surfaces of the samples. A distinct increase in the microhardness values (app. 161% increase following the heat treatment) is shown for the Vanadis 4 extra while there is no change in microhardness values for the Vanadis 10 revealing that these samples were not effected by the heat treatment.
It should be noted that the weight loss data for the heat treated Vanadis samples demonstrates significant decrease in weight (50% for Vanadis 4 extra; 75% for Vanadis 10) loss after 40 and 50 mins due to strain hardening effect in between the surfaces of the samples and the disc [1]. While, wear data for the laser treated samples for both of the Vanadis 4 extra and Vanadis 10 revealed almost no wear loss within the same wear travel distances.
As given in Figure 9a there can be seen considerable changes in the microstructures of the Vanadis 4 extra samples following the heat treatment process. In this microstructure, secondary carbides, M7C3 are dissolved in austenite while MC type carbide grains are still stably distributed in the matrix. Characteristic martensitic needle-like structure and retained austenite can be observed in this micrograph along with dissolved carbide grains in ferrite matrix. On the other hand, following the laser treatment of Vanadis 4 extra, small carbide particle that are fully dissolved in the metallic matrix can be seen, while in about 0.04 mm depth, larger carbide particles of 35-50 micron size are embedded in the matrix and the microstructures are free of any porosity due to higher temperature reached instantly during laser irradiation.
Figure 9b show no hardening effects in the microstructures and in microhardness data of the Vanadis 10 samples revealing no quenching structures in the meantime meaning that no carbide grains are dissolved. However, in case of the laser treatment, lamellar shaped carbide grains resulted from carbide dissolution lead to extensive finer grained martensitic structure (less than 10 micron) (Figure 8).
Results of microhardness measurements for heat treated and laser treated samples indicate a considerable increase in the microhardness values for the Vanadis 10 samples. The data shows 100.6% increase in the laser treated samples compared to the heat treated Vanadis 10 samples. Only a very slight increase (about 4%) of the microhardness value for the laser treated Vanadis 4 extra was recorded.
As for the comparison of the wear test results, it was shown that the effect of heat treatment on the wear resistance results in approximately average 54% and 76% decrease in weight loss in 40 mins for the heat treated Vanadis 4 extra and Vanadis 10 samples respectively [1]. However, wear loss data in this work shows no wear loss at all.
Conclusion
1. The homogeneous microstructure of the Vanadis 4 extra which consists of fine grained martensite starting from the surface through the laser hardened zone of approximately 400 micron depth following embedded carbide grains. A considerable increase in microhardness values and considerable increase in wear resistance would be the results of such microstructural reformation.
2. Considerable increase in microhardness and wear resistance of the laser treated Vanadis 10 is due to finely distributed martensite lamellear microstructure within the ferrite matrix.
3. For both of the Vanadis grade samples, the increase in microhardness and thus wear resistance is attributed to the finer grain size. Relatively high power of 3 kW and a slow scanning rate of 240 mm/min results in carbide dissolution but very limited diffusion of alloying elements and some retained austenite (for the Vanadis 10 sample).
4. The laser hardening technique applied in these Vanadis grade samples provides increasing surface hardness with a considerable depth and wear resistance in selective areas where it is critical for longer and efficient tool/die life.
5. Comparisons of the results in between the heat treated and laser treated samples demonstrate a considerable increase in the microhardness values for the Vanadis 10 samples. The data shows 100.6% increase in the laser treated samples compared to the heat treated Vanadis 10 samples. Only a very slight increase (about 4%) of the microhardness value for the laser treated Vanadis 4 extra was recorded.
Acknowledgement
Authors would like to thank Gizem Kose and Zeynep Mutlu for the wear test and microhardness measurements. Authors would also extend their appreciations to the Rukosen Abkant and Punch Press Tools Ind. Company for their support in the laser treatment works.
Declaration of Interest Statement
No potential conflict of interest was reported by the authors.

