International Journal of Metallurgy and Metal Physics
(ISSN: 2631-5076)
Volume 4, Issue 1
Research Article
DOI: 10.35840/2631-5076/9233
Effect of Shot Size in Surface Improvement via Shot Peening; Analytical, Modeling and Experimental Approaches
Y Prawoto1*, PG Mazein1, AV Kosterin1 and Z Ahmad2
Table of Content
Figures
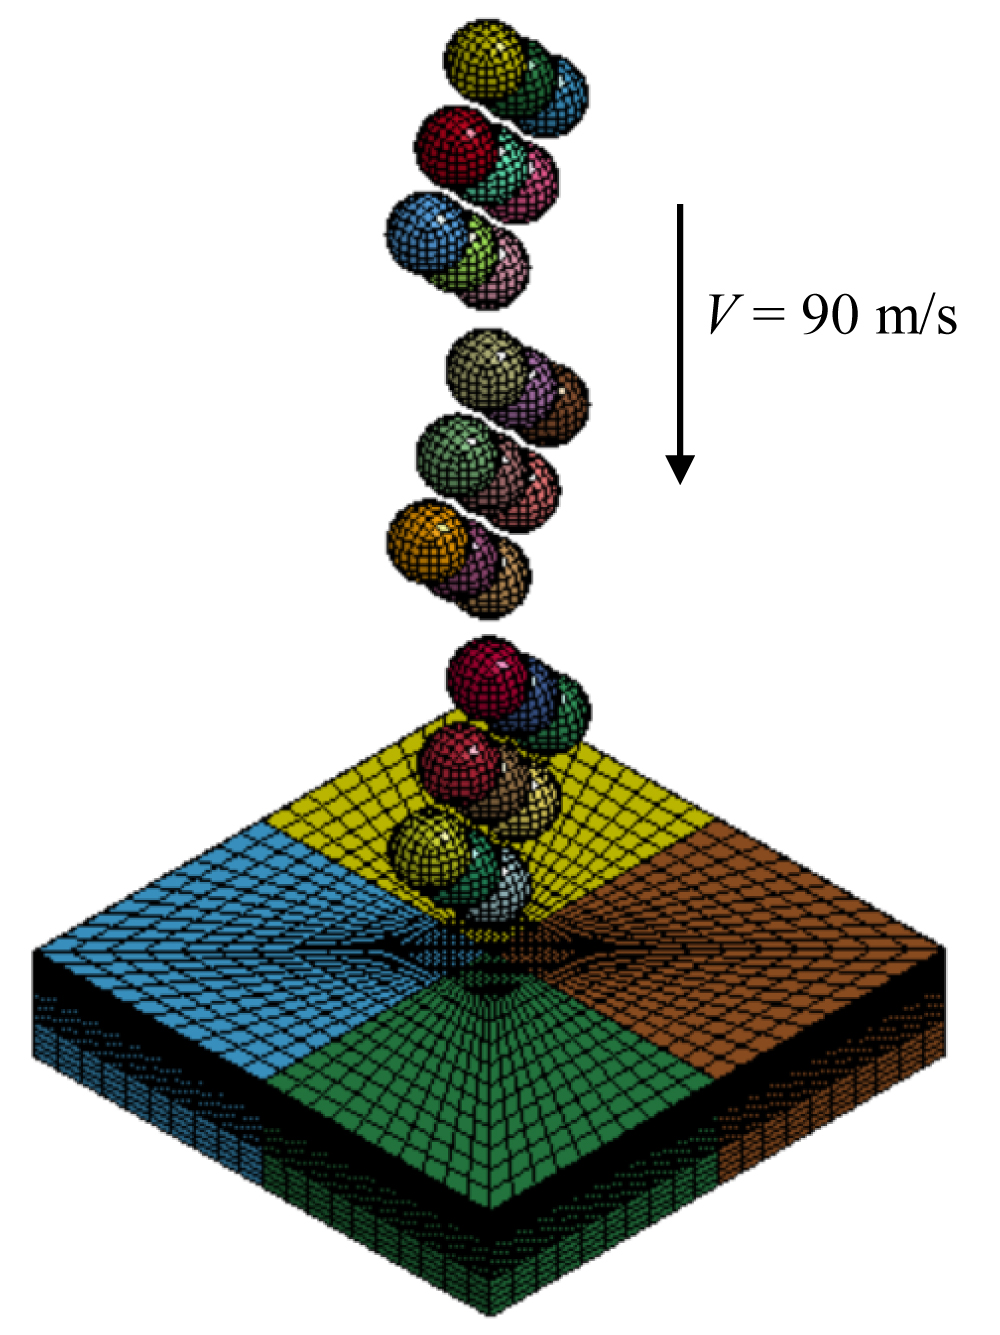
Figure 6: Finite element model...
Finite element model of shot peening simulation under several impact sequences.
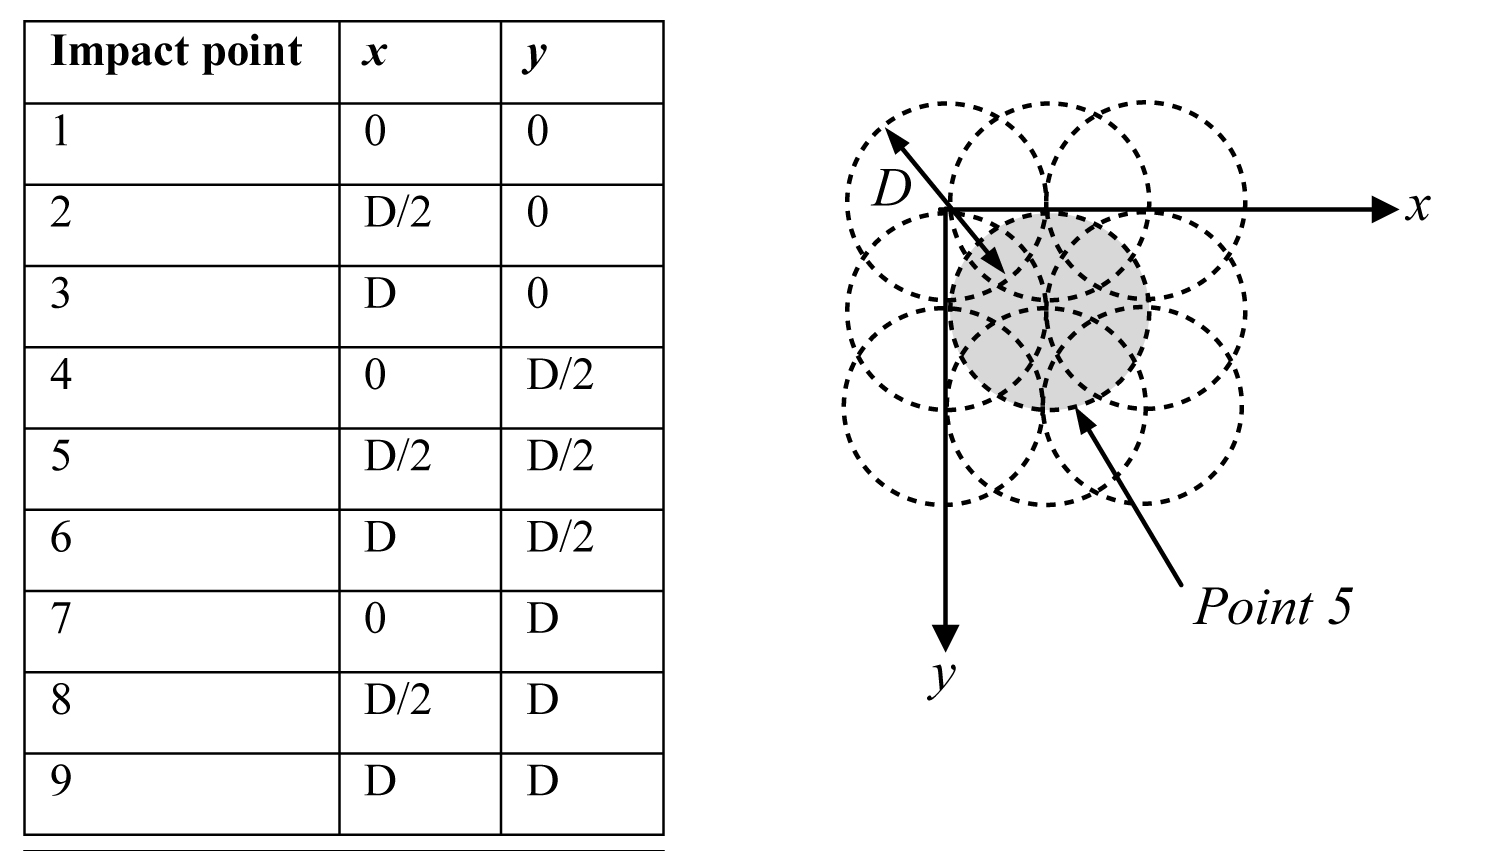
Figure 7: Schematic diagram of...
Schematic diagram of the impacting points and sequence on the workpiece model.
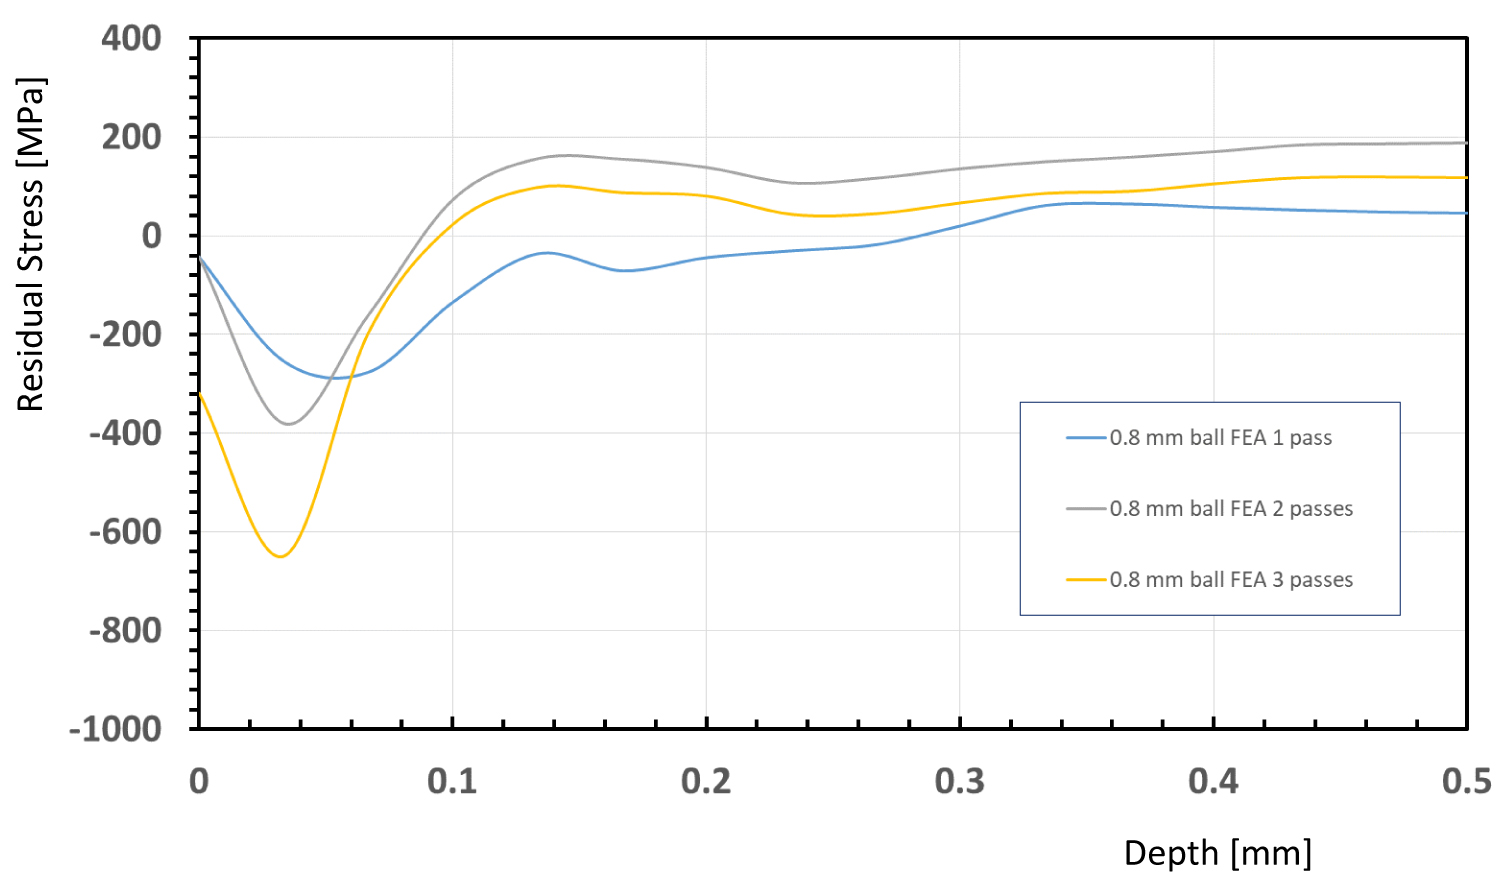
Figure 8: Residual stress computed...
Residual stress computed with finite element model with the ball diameter of 0.8 mm.
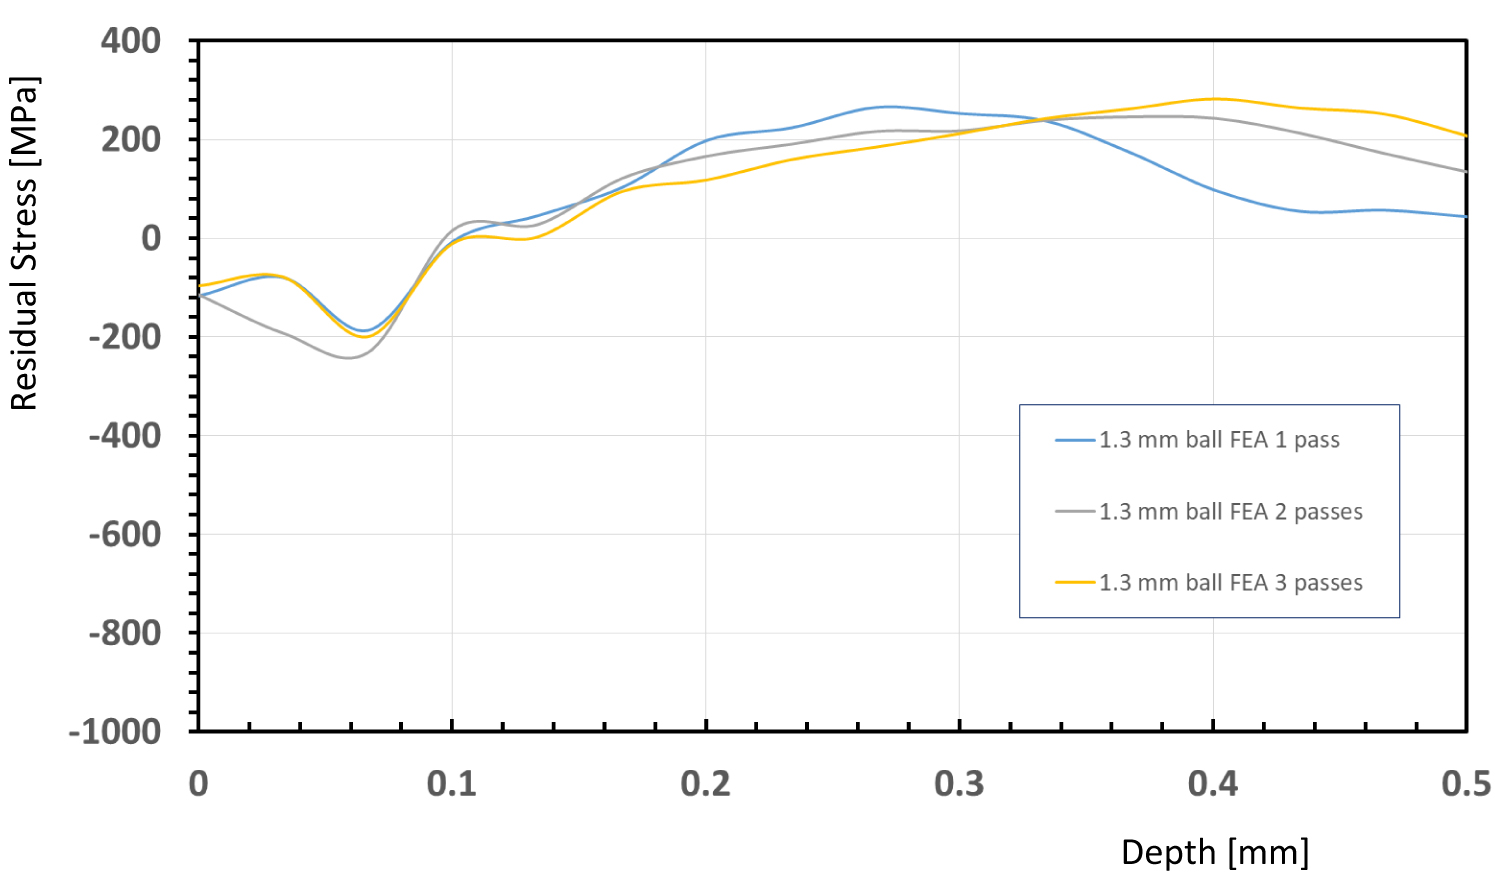
Figure 9: Residual stress computed...
Residual stress computed with finite element model with the ball diameter of 1.3 mm.
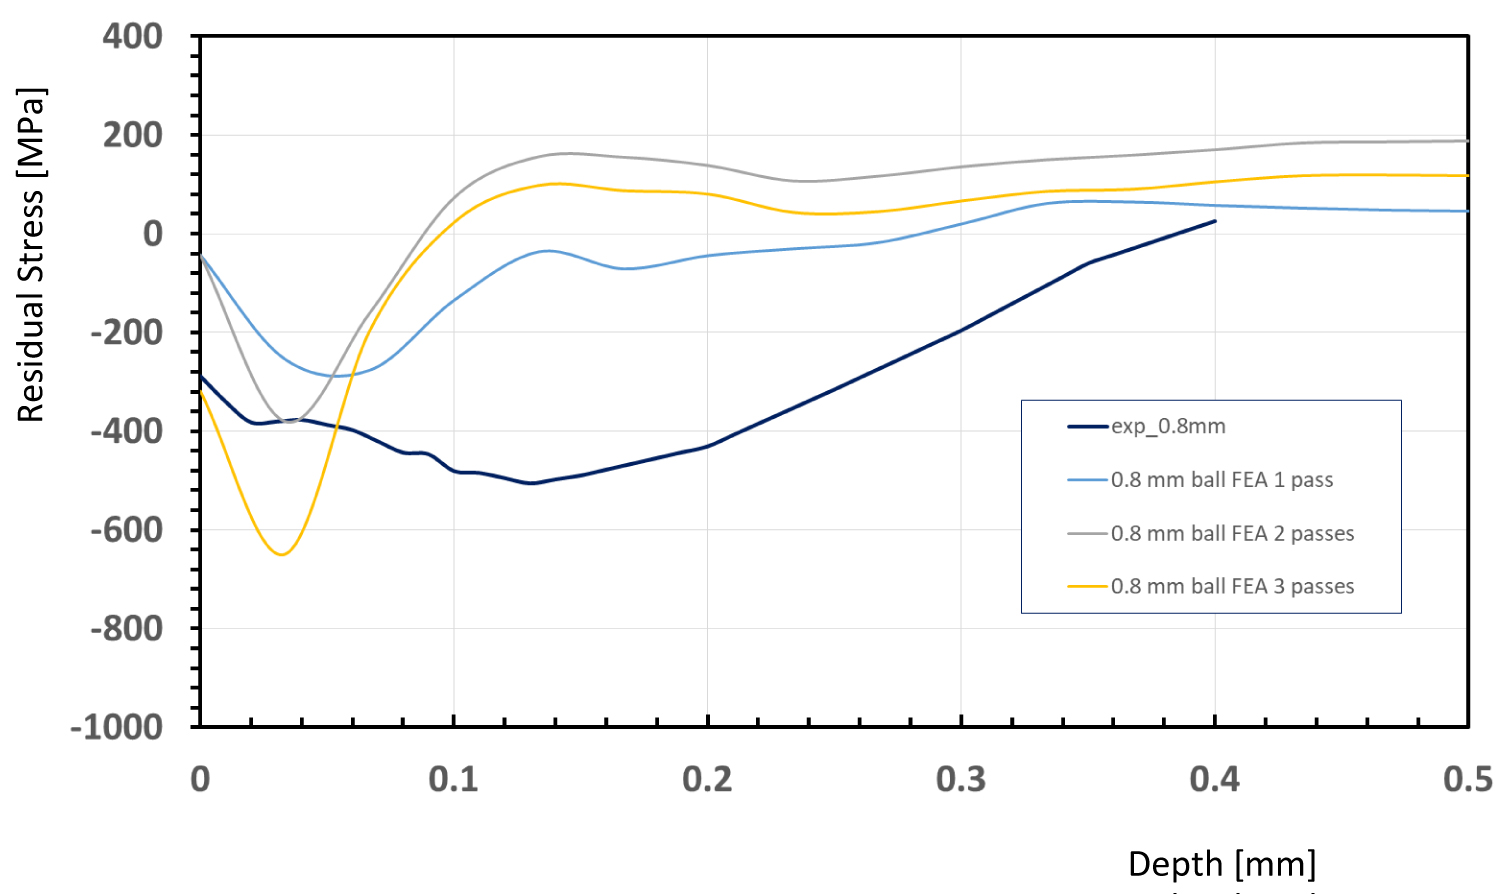
Figure 12: Comparison of FE modeling...
Comparison of FE modeling and experiment for shot ball size of 0.8 mm.
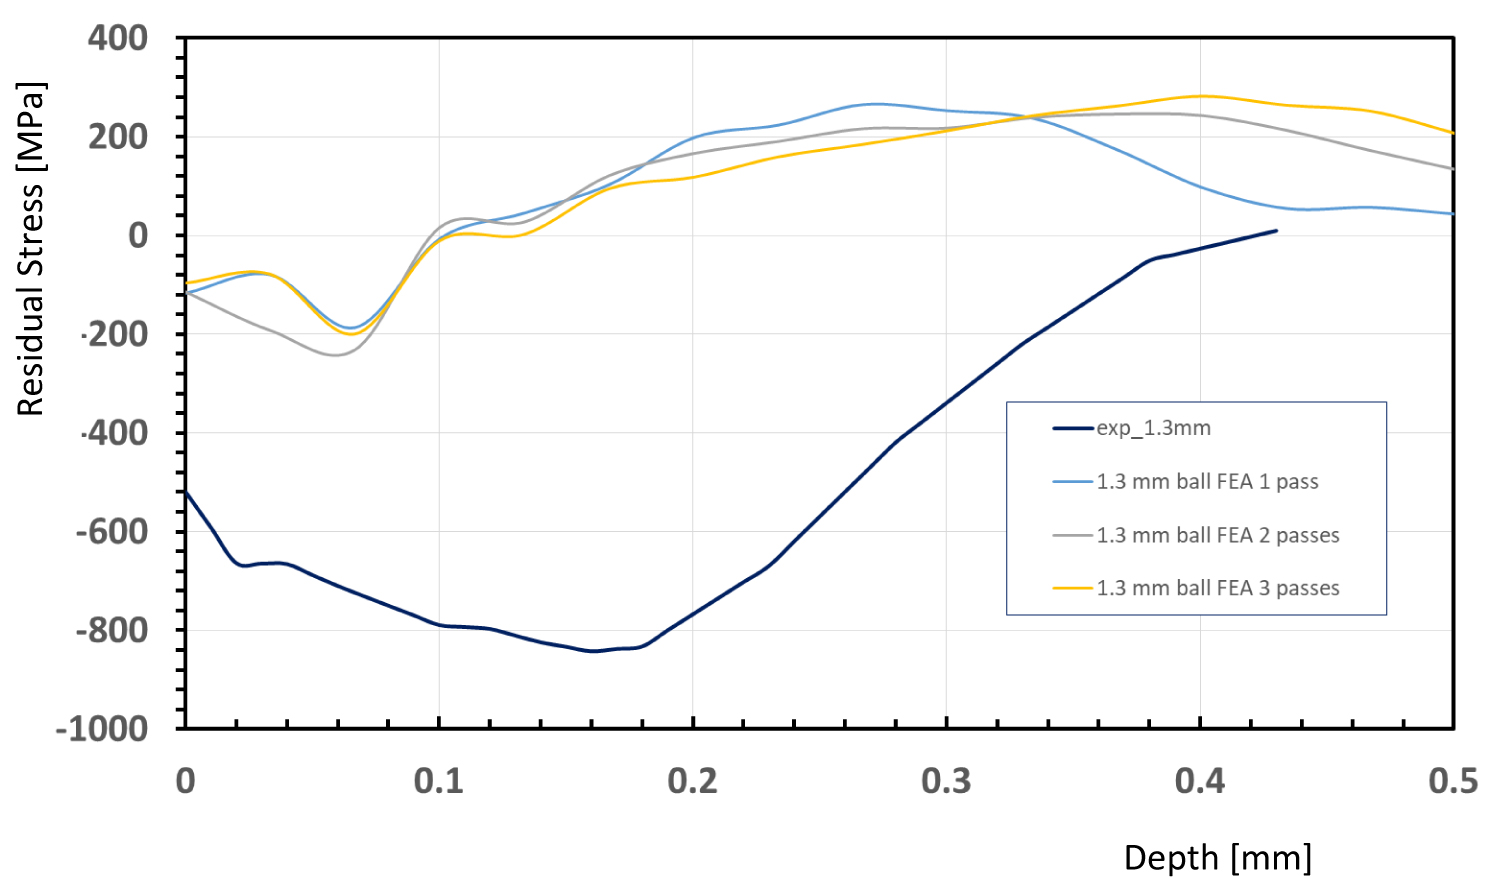
Figure 13: Comparison of FE...
Comparison of FE modeling and experiment for shot ball size of 1.3 mm.
References
- Dounde AA, Seemikeri CY, Tanpure PR (2015) Study of shot peening process and their effect on surface properties : A review. IJEBEA 12: 104-107.
- Higounenc O (2005) Correlation of shot peening parameters to surface characteristic. Icsp9 Shot Peen 28-35.
- (1958) Shot Peening - Designer's guide to the process, its applications. Mach Des 77: 116-125.
- Miftahov AA, Mazein PG (2006) Modelling of residual stresses at shot peening.
- Purohit R, Verma CS, Rana RS, Dwivedi R, Dwivedi S, et al. (2017) Optimization of process parameters of shot peening using ABQUS. Mater Today Proc 4: 2119-2128.
- Gariépy A, Miao HY, Lévesque M (2017) Simulation of the shot peening process with variable shot diameters and impacting velocities. Adv Eng Softw 114: 121-133.
- Bianchetti C, Delbergue D, Bocher P, Lévesque M, Brochu M (2019) Analytical fatigue life prediction of shot peened AA 7050-T7451. Int J Fatigue 118: 271-281.
- Chang SH, Lee SC, Tang TP (2008) Effect of shot peening treatment on forging die life. Mater Trans 49: 619-623.
- Dianyin HU, Ye Gao, Meng F, Song J, Wang Y, et al. (2017) A unifying approach in simulating the shot peening process using a 3D random representative volume finite element model. Chinese J Aeronaut 30: 1592-1602.
Author Details
Y Prawoto1*, PG Mazein1, AV Kosterin1 and Z Ahmad2
1Department of Mechanical Engineering, South Ural State University, Russia
2Department of Mechanical Engineering, Universiti Teknologi Malaysia, Malaysia
Corresponding author
Y Prawoto, Department of Mechanical Engineering, South Ural State University, 76, Lenin prospect, Chelyabinsk, 454080, Russia.
Accepted: June 24, 2019 | Published Online: June 26, 2019
Citation: Prawoto Y, Mazein PG, Kosterin AV, Ahmad Z (2019) Effect of Shot Size in Surface Improvement via Shot Peening; Analytical, Modeling and Experimental Approaches. Int J Metall Met Phys 4:033.
Copyright: © 2019 Prawoto Y, et al. This is an open-access article distributed under the terms of the Creative Commons Attribution License, which permits unrestricted use, distribution, and reproduction in any medium, provided the original author and source are credited.
Abstract
This paper discusses about the surface engineering improvement by means of shot peening. Shot peening improves the surface engineering quality by eliminating the tool marks, such as machining, grinding, stamping and other surface defects. Most importantly, the improvements of shot peening are produced by combination of compressive stress and cold work. Compressive stresses are beneficial in increasing resistances to fatigue failures, while the cold work effects of shot peening treatments can increase the surface hardness. It employs a steel shot media running at high speed to smash the material's surfaces systematically, which results in a compressed and condensed surface. Several factors influence the effectiveness of shot peening. They are namely shot nature, shot size, shot hardness, Almen intensity, shot angle and coverage. The focus of this research is finding the influence of the shot size. The approaches used are analytical, computational, and experimental studies. The center of the study is the influence of shot size in the generation of the compressive residual stress. Through analytical, computational and experimental approaches, it is confirmed that the shot size has influence on the depth of the peak residual stress rather than the surface residual stress. This research reaffirms the qualitative understanding with quantitative and comprehensive approaches that can also be used for further in depth research in surface engineering improvement especially via shot peening.
Keywords
Shot peening, Shot size, Residual stress, Surface engineering, Cold work
Introduction
Shot peening has been used for decades as a measure to overcome surface engineering problems in various industries. Its improvements are produced mainly by combinations of compressive residual stress and cold work. Compressive residual stresses are known to be beneficial in increasing resistances to fatigue failures and corrosion fatigue, while the cold work effects of shot peening treatments can increase the surface hardness of many materials [1]. It is believed to be the most economical and effective method of producing and making surface residual compressive stresses to increase the product life of treated metal parts. The increased strength of treated parts allows for lighter-weight parts that exhibit high wear and fatigue resistance.
The process can be defined as work hardening to the surface of components by propelling streams of spherical shots to the surface. The surface layer of material yields plastically to generate residual compressive stress. Among the practitioners, it has been known well that many parameters influence the efficiency of shot peening process. These are the peening coverage, saturation, shot material, shot size, speed, and peening time [2].
In this research, the focus is on the effect of the shot size. This topic is chosen due to the reason that fundamental understanding on this influence is low. For very long time, this subject has been regarded as a "black engineering" which the perceived of benefit using larger size is real but the reasons of those benefits were not disseminated by those who understand. In a way this paper is promoting to the academics for the science of shot peening, instead of keeping the "black art of shot peening" in the industry. This attempt is also on the line with the policy among the shot peeners [3] from long time ago.
Analytical Solution
The starting point for the construction of the shot peening model is the solution of the problem for a single impact of a ball on a half-space [4]. The initial data for the models are:
V - Speed of flying shot balls;
R - Radius of shot balls;
ρ - Density of the shot ball material;
E - Elastic modulus;
µ - Poisson's ratio;
- Material hardening curve.
A ball flying at a speed V hits the surface, contact forces develop in the contact zone, and the kinetic energy of the ball begins to be transformed into the elastic energy of the ball/half space and plastic deformation of the material to be shot peened. After the velocity of the ball becomes zero, the following condition is achieved:
Where
- Is half-space energy;
- Elastic energy of a ball;
- Correction factor, taking into account the influence of the roughness of the hydrodynamic film formed at the moment of impact.
Equation (1) is the starting point for the formation of boundary conditions for the contact problem with an inhomogeneous half-space. In order to calculate the work , it is necessary to find the stress distribution in the half-space. To do this, we solve a system of differential equations describing the elastoplastic behavior of the material. Taking into account the axial symmetry, the set of equations is most conveniently written in the cylindrical coordinate system (r,θ,Z), where r - radius, Z - axis, directed along the axis of symmetry, θ - polar angle.
It is assumed that the mass forces are absent after collision, so the equations of equilibrium are as follows:
In what follows, the following notations are used:
- Radial and axial stresses;
- Radial and axial deformations;
u, - Radial and axial movements;
- Tangential stresses;
- Shear strain;
- Bulk deformation.
This is done to make it easier to approximate the system being solved on the Z axis. Indeed, the system (3a,3b) can be correctly solved only under the condition that:
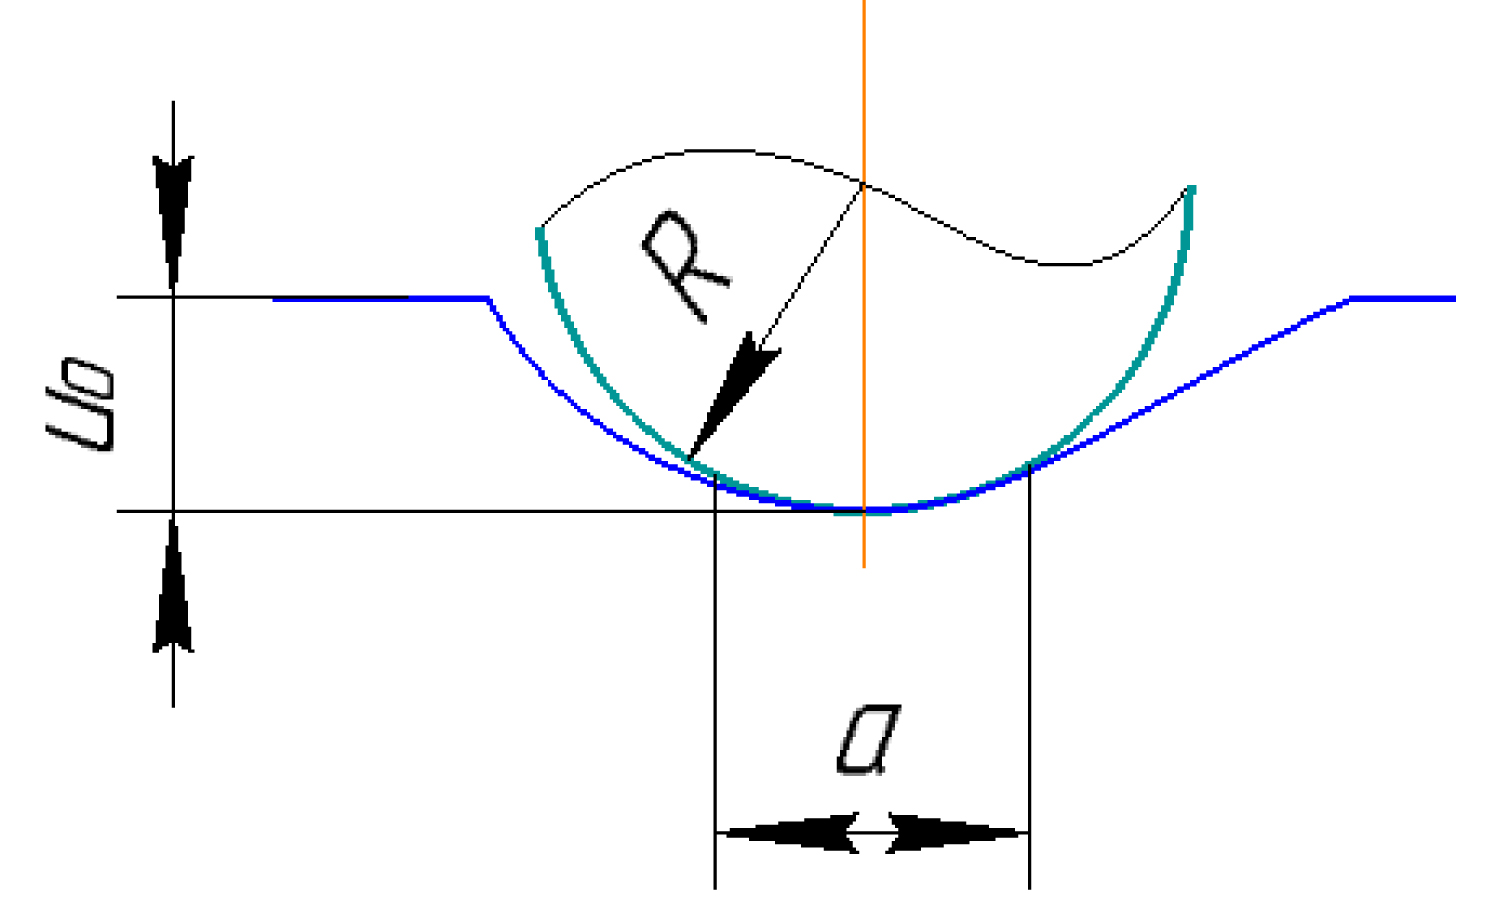
These limiting relations are also established when finite-difference formulas are realized. To solve the problem, the finite volume of the half-space in the form of a cylinder of radius R and height H are selected. On the upper base of the cylinder, the boundary conditions are given in the displacements (Figure 1), which are: a) Within the contact area u = u0, , where (u0, ) is the introduction of an indenter into a half-space at specified distances from the Z axis; b) Outside the contact area it is free, that is, at the corresponding nodes the system (Equation 4) is solved.
In addition, in connection with the lack of friction, the tangential stresses on the surface are zero . On the lateral face of the cylinder r = R and on the lower base Z = H the boundary conditions are given in the stresses, which are calculated from the formulas of the theory of elasticity, namely, on the lateral surface:
at the bottom:
Where are calculated from the formulas for solving the problem of indentation by a spherical indenter into an elastic half-space. In this case, the dimensions of the cylinder must be chosen so that the area of plastic deformation is inside the cylinder. On the axis of symmetry r = 0 as boundary values we take the following conditions: ur = 0, since on the axis of symmetry the radial displacement is zero; similarly, by virtue of symmetry.
To describe the plasticity processes, we use the equations of the theory of small elastoplastic deformations and the method of elastic solutions, which, after some transformations, can be written in the form of Hooke's law:
Where
Here - Stress intensity;
- Strain intensity.
Then the solution of the problem in the theory of plasticity is reduced into solving a problem of the contact theory of elasticity with variable elasticity parameters, determined by the formula described in Equations (6) and (7), and the relationship between the elasticity parameters:
The solution of contact tasks is organized as follows:
-The initial introduction of the ball into the half-space is specified and, with the given boundary conditions, the method of variable elasticity parameters determines the stresses and deformations in the material; the energy of the deformed half-space is then determined from the formulas:
Where W - Energy density.
Where - Bulk deformation energy; and
- Forming energy;
The verification of the fulfillment of the condition is by taking into account the assumption that the ball is perfectly rigid and Aш = 0. If the condition does not hold, then we continue to insert the ball into the half-space, until the condition is met.
The method of variable elasticity parameters is as follows. In the first approximation, solve the usual problem of the theory of elasticity, when the variable elasticity parameters are constant E* = E, V* = V since the system becomes ordinary Hooke's law. At the first stage, we use the analytical formulas. From the obtained value, we find the deformations and the stresses . According to the last values, at each point we determine the stress intensity and the strain intensity . From the deformation curve we find the stress intensity , which corresponds to the calculated value , then we set , and find the modules , according to Equations (7a, 7b).
In the second step we solve the problem of the theory of elasticity with the obtained elasticity parameters, we determine in the second approximation the displacement u(2) and ω(2), then , from them we find the intensities at each point of space, we calculate by the deformation curve, we assume etc.
The calculations are continued until the obtained results of the approximation calculations are different from the results (n - 1) of approximations by a given amount with the required accuracy. As the main criterion in the program, the condition, , which means virtually invariance of the elastic parameters, thus process converges.
The impact of a ball on a surface is a complex process, for the description of which it is necessary to use the equations of thermoelasticity, plasticity, impact theory, hydrodynamics. In addition, the presence of a complex surface profile, which is formed due to roughness, makes this task difficult to resolve. At the same time, as the analysis has shown, it is possible to identify the determining equations on which the behavior of the model depends and discard the remaining nonessential bonds. Since the speed of flying ball in the process of hydrobasting is not high, then we neglect the dynamic effects, and assume that the shock is quasistatic. It is quasistatic if:
• The deformations are considered to be concentrated in the vicinity of the contact area and are determined by the static theory, the wave motion in the bodies is neglected;
• Each body moves at any time with the velocity of its center of mass. The quasistatic conditions remain valid also in the case of plastic deformations, since the presence of plastic flow reduces the intensity of the contact pressure and, consequently, the energy going to the elastic wave motion. In the shot peening, the impact speed is known to be up to 70 m/s, it is possible to use the relations for inelastic contact stresses under static conditions with the yield stress is replaced by a dynamic yield strength. For this reason, we neglect the influence of thermal stresses, since even assuming that the entire energy of the ball is spent on heating, it still does not suffice to exert a significant influence on the distribution of residual stresses. In practice, we assume that the surface is perfectly smooth, and the expenditure of energy expended on the deformation of the scallops will be taken into account in formula (3a, 3b) by introducing corresponding corrections in the coefficient K.
Meanwhile, it is known from experiments and numerical calculations that the stress intensity is maximal on the axis of symmetry of the imprint and gradually decreases, tending to zero with increasing distance from the axis of symmetry of the print. With this in mind, for stress intensity, we can write the expression of:
Applying similar arguments for residual stresses and taking into account that they essentially depend on the yield strength of the material, we obtain the expression:
Where - Yield strength;
and - Co-efficients of sensitivity of residual stresses to the yield strength of the material.
The functions are arbitrary, but based on physical meaning it is necessary to demand that:
Figure 2 schematically shows the distribution of intensity of load and residual stresses in the area of prints, which are calculated from formulas (13) and (14). These formulas reflect the qualitative picture of the distribution of residual stresses.
We expand the function (13) into the Taylor series.
If the yield stress is subject to the condition
Then in Equation (16) we can drop all terms except the first with a small error, as a result we obtain:
Using the expression in Equation (18) we find the current radius of the hardening area:
Hence
Now, taking into account Equation (18), we obtain:
While taking into account Equation (19):
Further, we take the integrals for and
Obviously, in order to take this integral, it is necessary to specify the limits of integration. The radius of integration R will be found from the expression:
Hence:
Integrating (23) while taking into account (25), we obtain:
Obviously, by carrying out similar actions for we obtain:
We now substitute the obtained expression in Equations (22), (26), (27) into Equation (3).
We now consider in more detail the first differential equation, since it does not depend on , then it can be solved separately. For the convenience of the solution, we introduce the following coefficients:
Then the first Equation (28) is transformed as follows:
We shall seek a solution of (30) in the form of:
Where - Particular solution.
We assume that is a certain value that does not depend on the parameter t.
Then substituting Equation (32) into Equation (31) we obtain:
Solving this equation for Y we obtain two roots:
Now (30) it can be reduced to a linear differential equation:
Substituting here (34) and taking into account (28), (29), we obtain the equation:
Where
For simplicity, suppose that the material is ideally hardened, then and (37) is transformed as follows:
Integrating (38), we obtain the expression:
Then (31) takes the following form:
The constant is found from the boundary condition:
Hence is found:
Substituting (42) into (41), we obtain:
Study the solution obtained by us. If the hardening time increases, then: in the limit:
Now consider the relationship between residual stresses and deflection of control plates .
For simplicity, we take in (30) that then we obtain:
We substitute into the equation (45):
Then the equation takes the form:
Equation (40) is reduced to the form:
Taking into account (48), the equation (47) is becomes:
We make the substitution in the Equation (49):
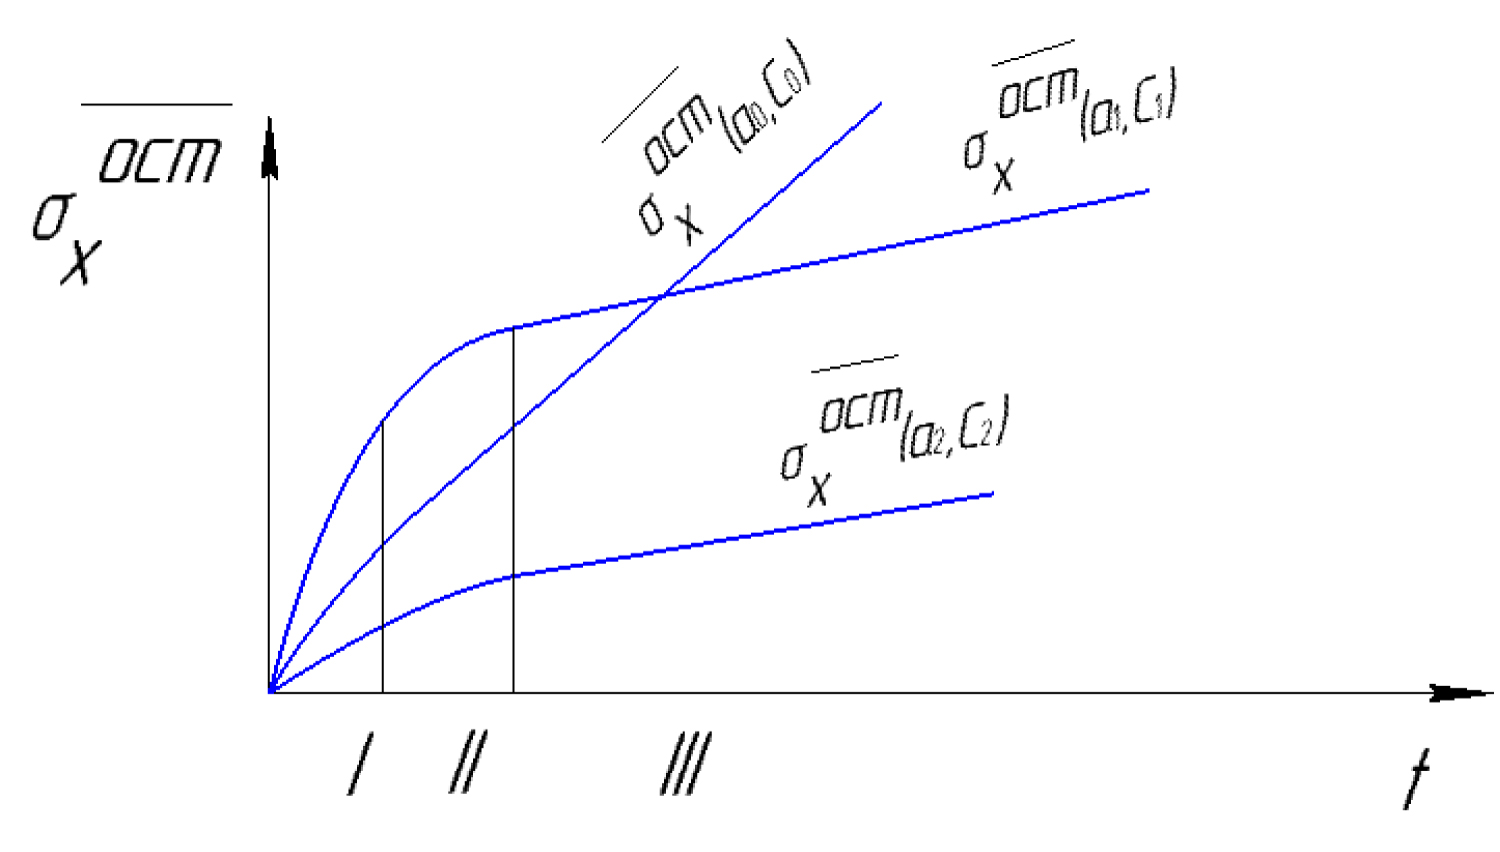
We shall carry out a qualitative analysis of Equation (50). At the initial time, the increment of residual stresses should be maximal, since there is no hardening, in the future it should decrease to a certain limit, which can be easily found from the relation in Equation (50) (Figure 3).
The presence of this limit is easily explained by the existence of a maximum hardening limit:
This limit exists in many materials and is explained by its physical properties. We integrate now to equate to (50).
The analysis shows that the calculated curve can be divided into 3 phases:
I. Fast initial growth phase;
II. Transitional period;
III. Saturation phase.
Since the solution of the adaptability equations at each i-th step of the integration requires the solution of the one-shot problem, it is most advantageous to apply the interactive solution methods, since the resolution of the equations at each new step begins with the previous solution, which increases the computational speed. In particular, here we have chosen a two-layer integration scheme for solving the problem. The main decision points listed below.
1) Based on the preset depth of ball penetration, determine the contact radius:
Where - Ball radius;
- Depth of implementation.
2) Determine the number of nodes N1 in the contact area and check whether it falls into the required range, if not, the calculation is terminated. This is done to ensure that the number of grid nodes does not exceed the specified range, and, on the other hand, that the accuracy of the solution is sufficient.
3) Determine the coordinates of the grid nodes X (1), Y (1).
4) Determine the force of the ball pressing:
Where - Initial shear modulus.
5) By the given force P and the radius of the print B determine the elastic stresses according to:
6) On the basis of (55) find the boundary conditions:
On the axis we obtain:
On the surface we have
7) Find the boundary conditions on the lateral face:
Where b, H - Height and width of the calculation area.
8) On the basis of (58), find the elastic displacements at the nodes.
9) To solve the interatomic problem, take the calculated elastic stresses as initial conditions, in addition, assume at the boundary that the boundary conditions correspond to the conditions found from the elastic solution (58) and (59).
10) Determine the intensity of stresses taking into account the residual stresses :
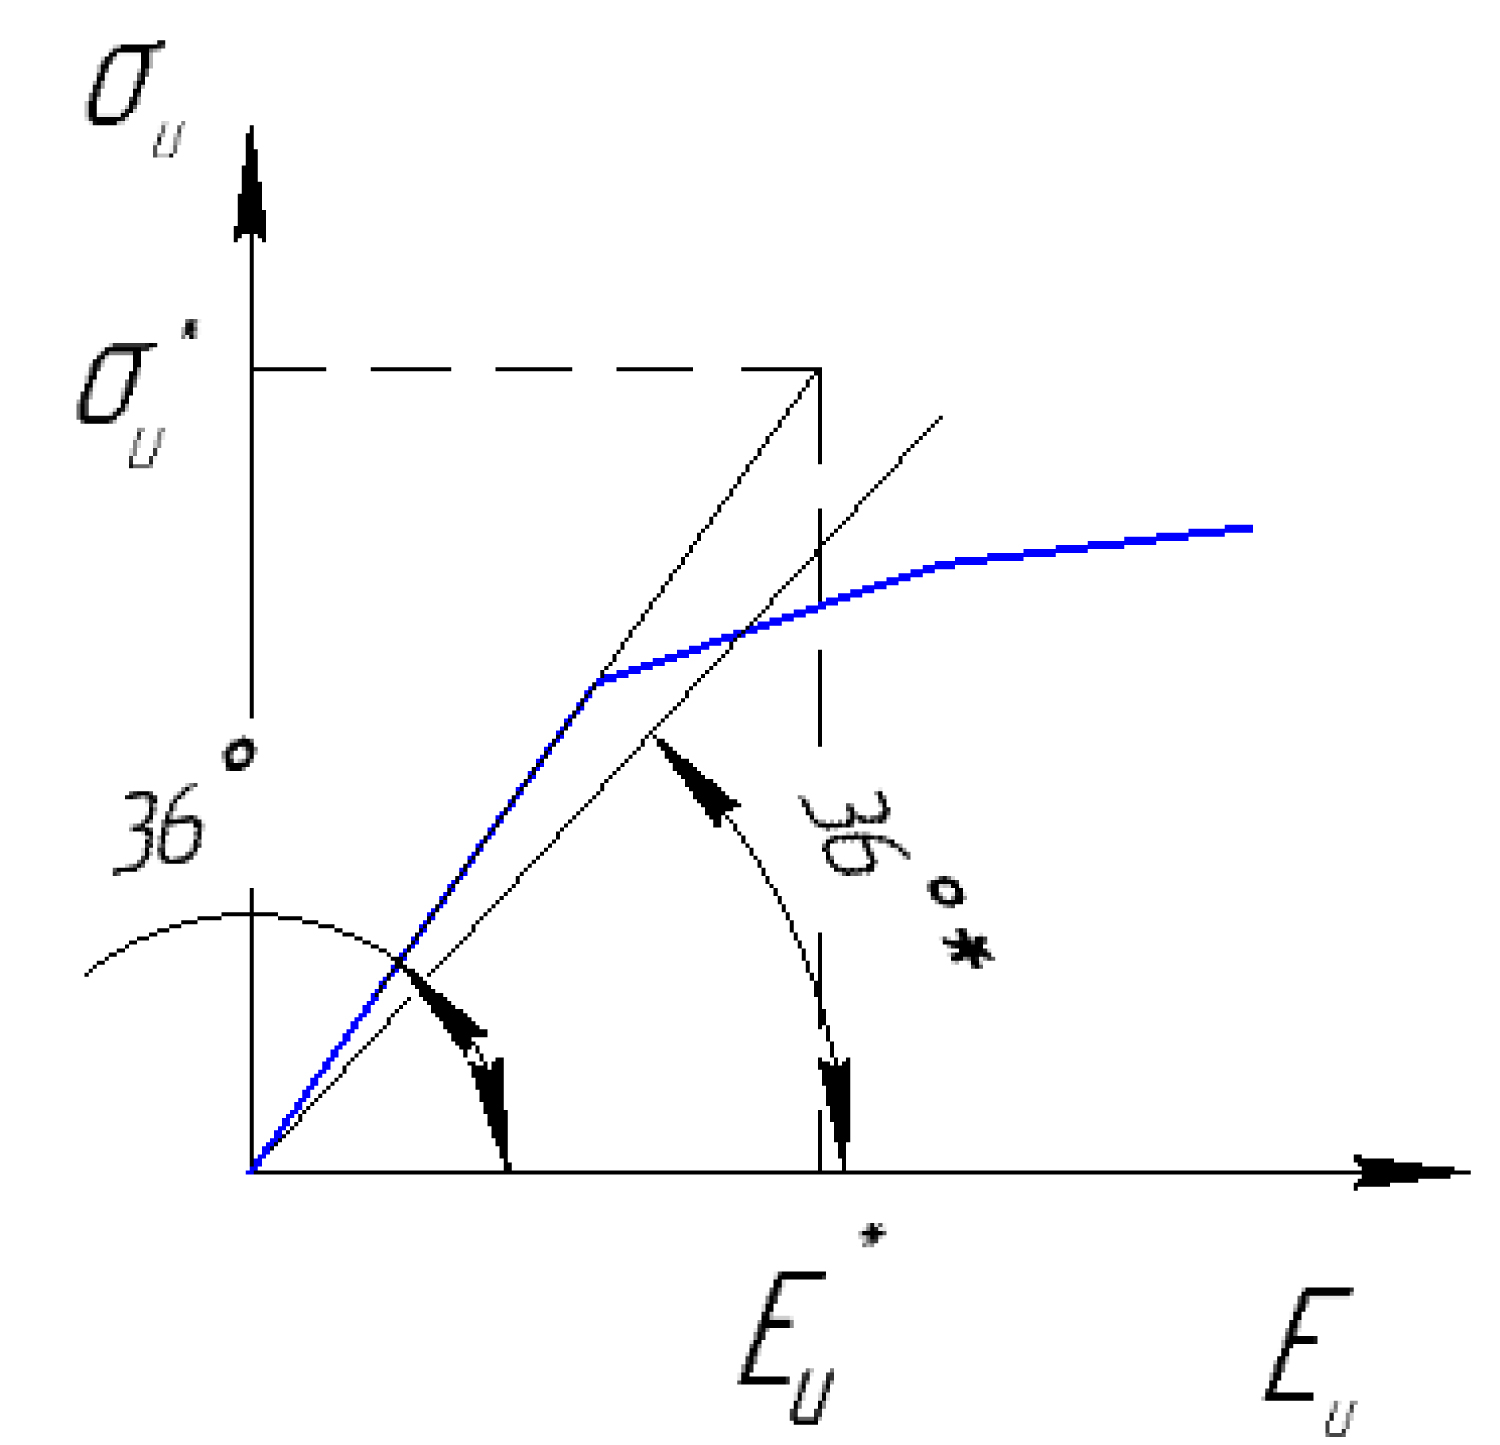
To calculate the stress state in the plastic region, we use the variable elasticity method. According to this, the shear modulus σ and Poisson's ratio V at each point of the area are calculated (Figure 4). By σ* and V* their values depending on the value σu are indicated. σ and V are the values from the previous iteration. Find the intensity of the deformations by the formula:
Further, we find the intensity along the deformation curve:
Where n - Number of the segment of the broken line, which approximates the curve, the deformation. After this, we determine the new value of the shear modulus by the formula.
11) Find the deformations from the displacements, then calculate the stresses at the nodes from the obtained elastic deformations and the recalculated elastic modulus.
12) To determine the displacements at the grid nodes, it is necessary to compile a system of linear equations with fixed elastic parameters:
Where Y - Array of radial and axial displacements;
F - Boundary conditions, which are determined from the equations (59)
a) In order to find the matrix A, it is necessary to express the equilibrium equations in the form of a displacement function. Substituting (64) into the equilibrium equations, we obtain a system of second-order differential equations:
The derivatives in (66) are found by three points:
Here H - Double grid spacing.
Substituting the expression (67) into the equilibrium equation (66) and representing it as the product of matrices (65), we define the matrix A.
b) To solve the equation (65), we use the three-layer iterative method. According to this method, it is necessary to calculate the remainder by the formula:
c) Calculate the vector column. for this we use the equations (65) and (66), but instead of displacement we substitute the remainder.
d) Calculate the coefficients A, Е, F and if , then calculate the coefficients B, C, D:
e) Calculate the new vector of the solution Y at the -th integration by the formulas:
Where
Since the contact task is being solved, it is necessary to fix the movement of the nodes in the contact area. In order for their values to remain unchanged in the iteration process, the discrepancy in these nodes is forcibly equated to zero, which leads to automatic fixation of displacements in these nodes.
The iterative process proceeds until the residual is sufficiently small, namely:
Where - Relative accuracy.
13) Calculate the new elastic modulus from formulas (61), (62), (63). Find the change in the elastic modulus at the (k + 1) iteration.
Further we check the condition: where - Maximum increment of the shear modulus; - Maximum increment error.
If the condition is not fulfilled, go to (10) and repeat the calculation again, otherwise go to the next step. This cycle limits the solution of the elastoplastic problem for a given depth of ball penetration.
14) Calculate the energy of the half-space;
Where - Bulk strain energy;
- Forming energy.
Check whether the kinetic energy of the ball is equal to the energy of the half-space. If not, go to step 17, otherwise go to the next step.
16) Define a new depth of the introduction of balls into a half-space, while:
Where h - Penetration depth of the ball;
- Increment of penetration depth.
To achieve the convergence, the step is calculated using the following the formula:
if and , then (75)
After recalculating the depth of implementation, go to step 1 of the algorithm.
17) Calculate the residual stresses by the formula:
Where - Load stresses;
- Stresses, discharges, obtained from the elastic solution.
The solutions obtained from the algorithm are based on the fact that at a sufficiently large distance from the contact zone the elastoplastic solution converges to the elastic solution. This assumption allows to limit the calculated area to a cylinder of the radius B and the height H, and at the nodes located on the outer boundary of the cylinder, the displacements obtained from the elastic solution.
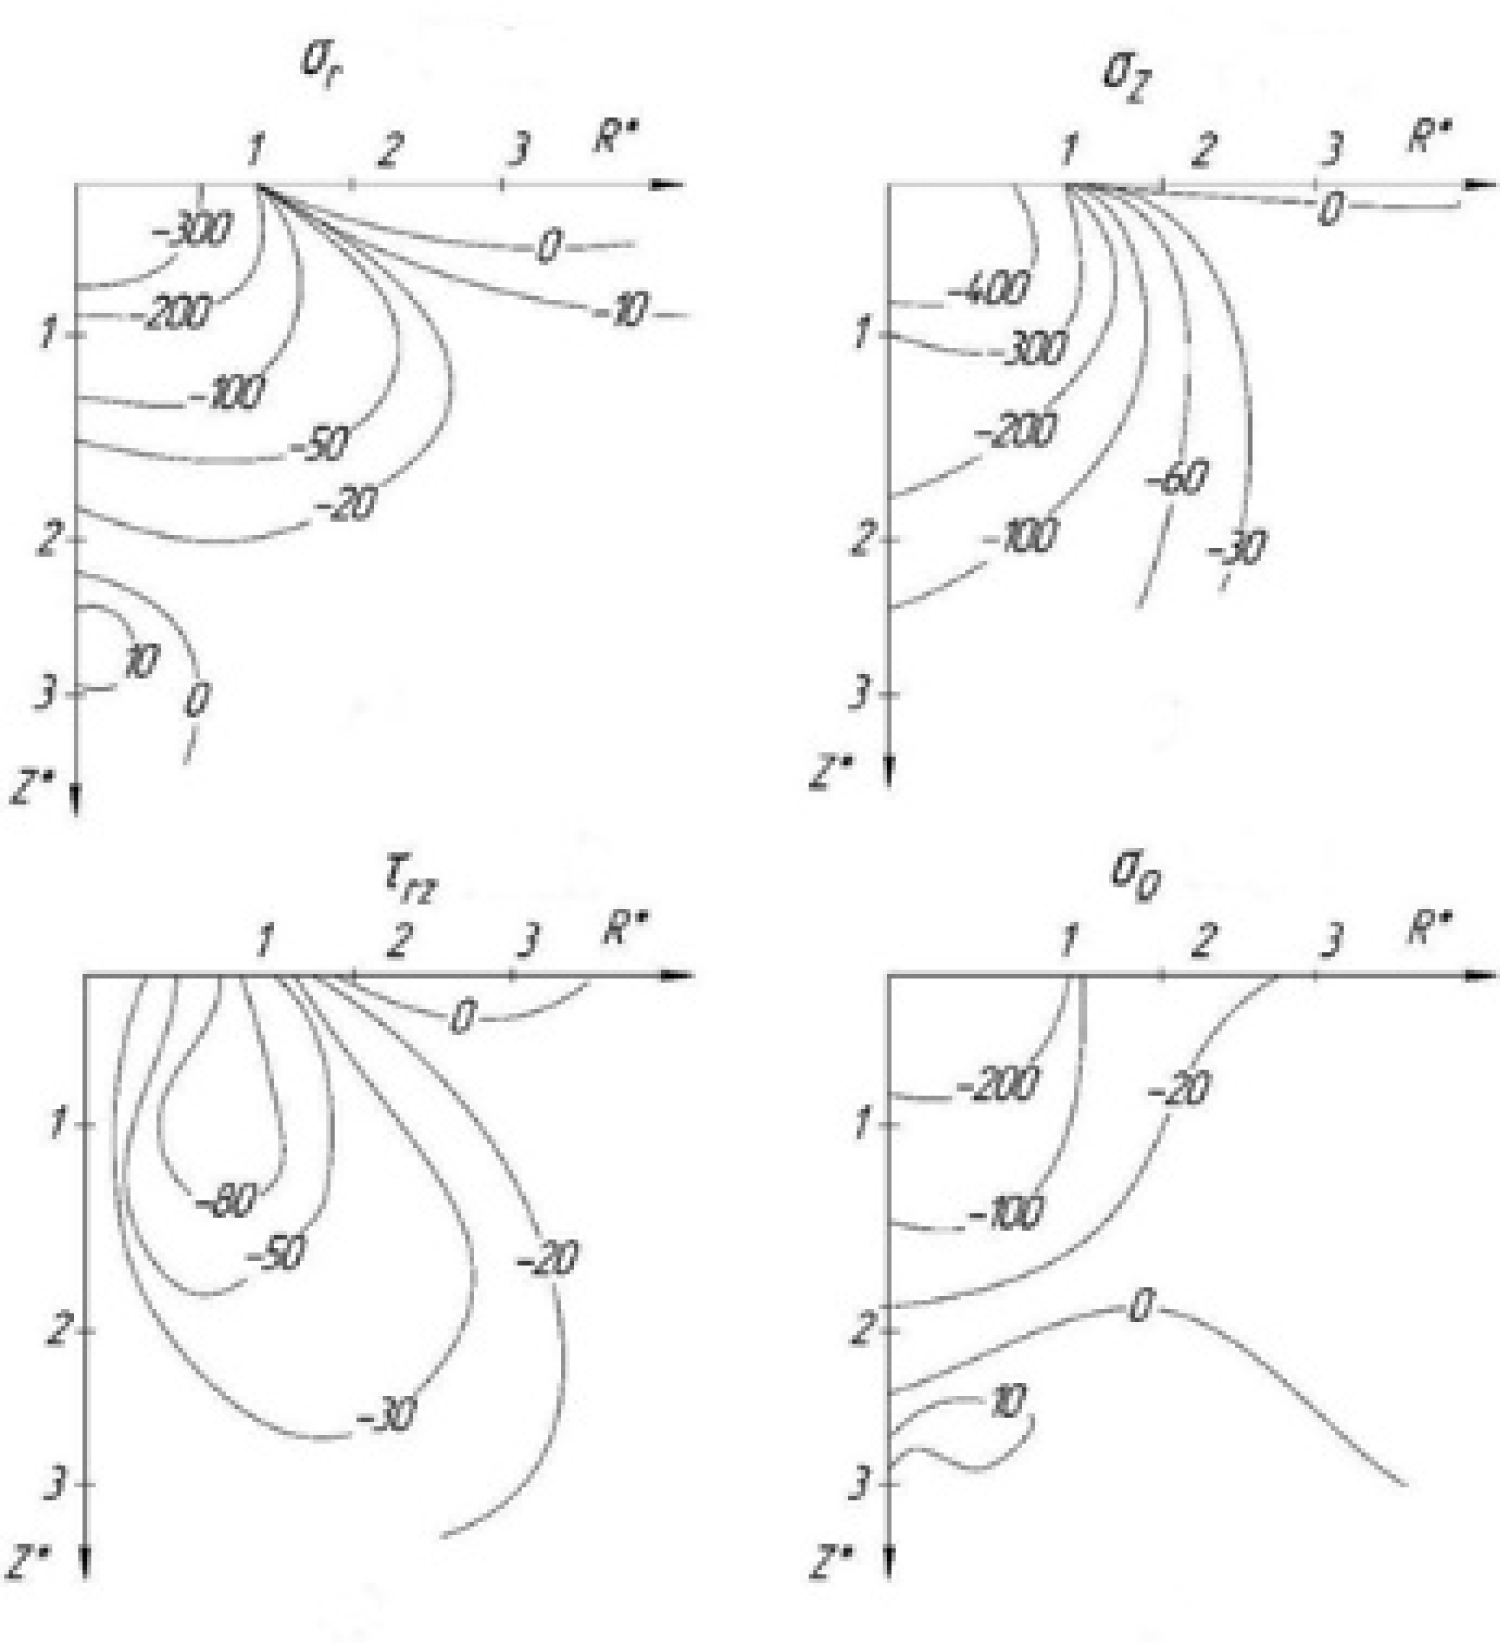
Figure 5 shows the distribution of stresses with the ball radius The figure shows the example of the residual stress distribution with a dummy mechanical property of the steel materials. For our experiment, the comparable stress would be the right bottom stress distribution.
Finite Element Modeling
All computer modeling in the present study was conducted using the nonlinear finite element (FE) code LS-DYNA 971. A model of the workpiece surfaces was developed using a constant stress solid element formulation which suitably model the impacted surface response of the workpiece. The impacting balls of two different sizes namely 0.8 mm and 1.3 mm were also modelled using solid elements with reduced integration techniques in combination with hourglass control. In a way it is similar to that of Purohit’s [5] with multiple shot balls. The workpiece is modelled with four geometrical parts with same nodes between the internal surfaces. The model was discretised using solid element with two mesh sizes to capture better simulation results. Stiffness-based hourglass control was employed to avoid spurious zero energy deformation modes and the use of reduced integration was to avoid volumetric locking. The elastic and elasto-plastic material models were used to model the impacting ball and the impacted surfaces, respectively. The material properties included for the impacted surface are the yield stress of 1433 MPa with a plastic hardening behavior. For the impacting ball, a very high value of stiffness has been assigned to represent high rigidity of the structure when contacting with other surfaces. The finite element discretization of the shot peening simulation is depicted in Figure 6. Shot peening loading was simulated by defining an impact velocity of 90 m/s to the impacting balls over a three repeated impact loading. Figure 7 shows the schematic diagram of the impacting points and sequence on the workpiece model. The evaluation of residual stress and impacting depth was carried out underneath of Point 5. The simulation was done in two separate phases namely explicit and implicit simulations. Explicate simulation was employed to simulate the impact loading on the workpiece. From this simulation, impact analysis may be carried out resulting in obtaining the initial stress field in the workpiece. Subsequently, the output obtained from explicit simulation was employed to simulate implicit simulation. Thereafter, the residual stress in material can be obtained from the implicit analysis on work piece stress after impact. The impacting ball was constrained to translate vertically only along the z axis, and the bottom and edges nodes of the workpiece surfaces were fully constrained as shown in Figure 7. A reliable contact modeling for the interaction between the impacting ball and workpiece is paramount and needs to be accurately established. Automatic surface to surface contact was defined for the contact interfaces of the impacting ball with the workpiece in order to avoid any penetration occurred. The friction coefficients associated with contact between the balls and workpiece were defined as 0.3 and 0.2 for the static and dynamic respectively.
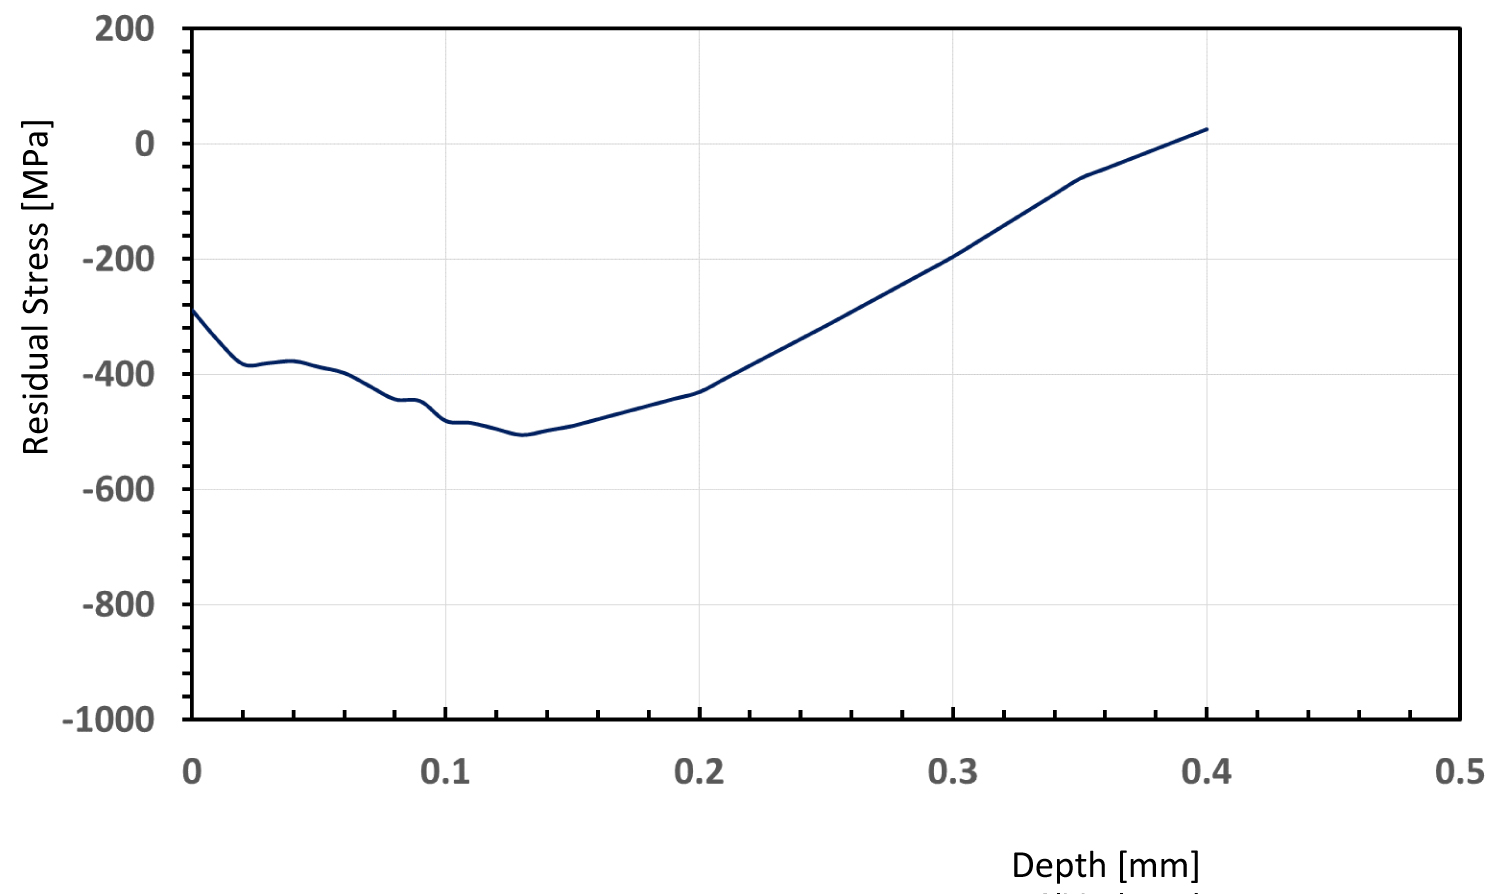
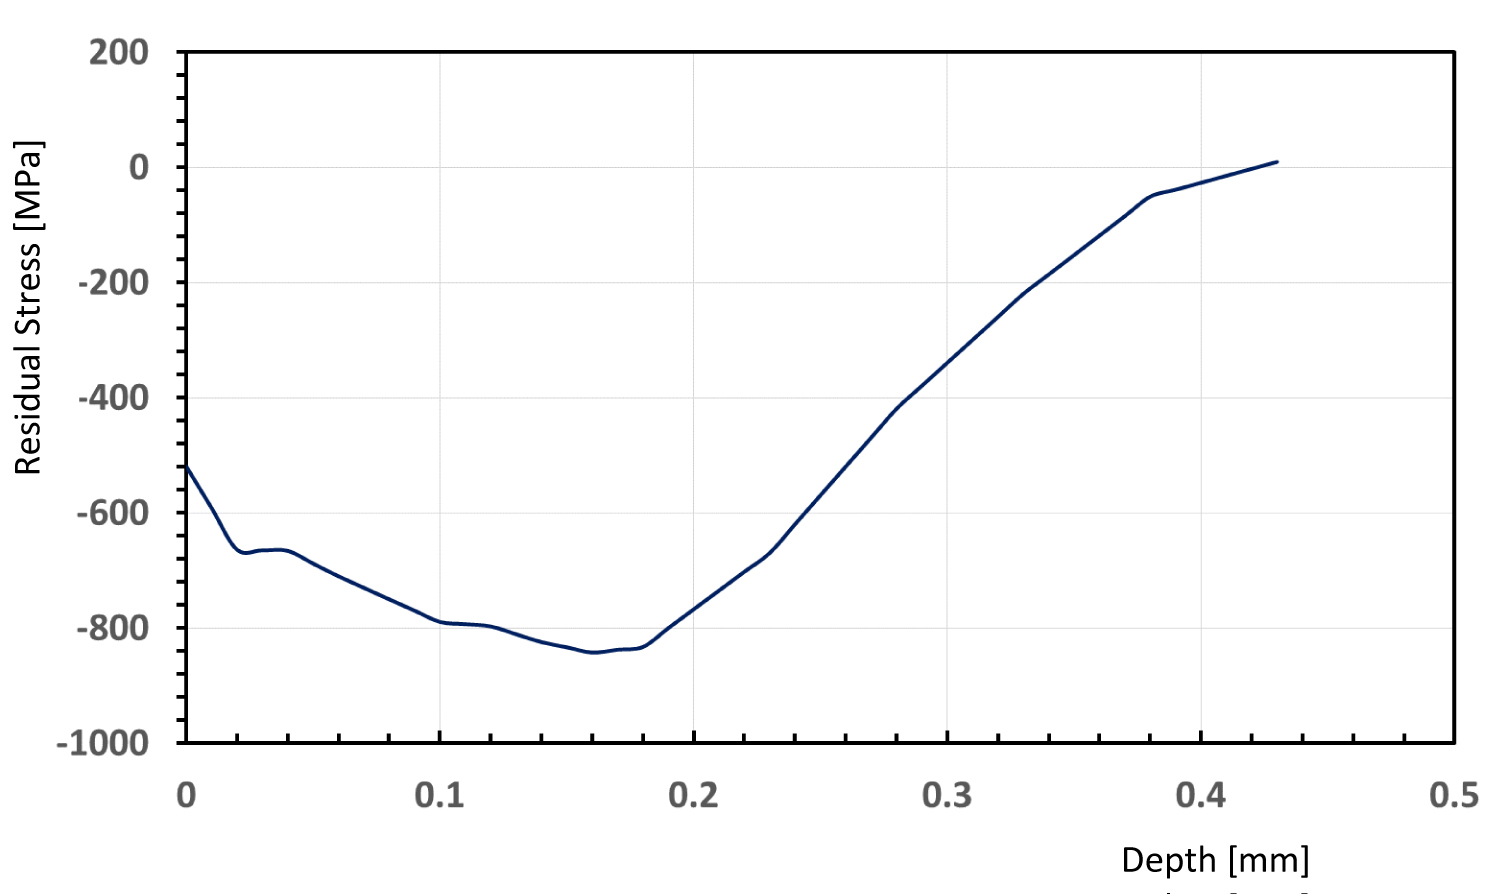
Figure 8 and Figure 9 show the result of the FE models. One can see that as the number of the pass increases, the maximum compressive residual stress also increases. At the same time, the depth of the peak also increases as the size of the ball increases. These were in agreement with both our analysis and experiment.
Experiment
The experiment was done by shot peening on two different plates, namely plate A and plate B. On the plate A, shot ball size was 0.8 mm and on plate B, the shot ball size 1.3 mm. The experiment was performed with the same machine with the parameters to match the analysis. The coverage of the shot peening was approximately 98%. This is to mimic what is usually called saturated shot peening. Beyond this coverage, more shot peening amount that is put into the system will not affect the residual stress significantly. The samples were than profiled with an x-ray diffraction device. Figure 10 and Figure 11 show the results. The 0.8 mm ball produces slightly less than 300 MPa at the surface, while the 1.3 mm ball produces more than 500 MPa. The peak for the shot ball size of 0.8 mm produces 0.1 mm maximum depth of compressive residual stress, while the 1.3 mm ball produces peak at 0.19 mm. This trend is similar with both the analytical and finite element results as well as the finding of other researchers [6].
Discussions
Figure 12 and Figure 13 are the direct comparison between the simulation and the experiment. One can see that while the direct comparison do not match in detail, but they are at the right tendency. The disagreement between the analysis, finite element model and the experiment was expected from the beginning. The computation limitation was also prevented us to do until saturation, in our case, 3 passes. However, since this is our first attempt to academically materialize the concept of the shot peening in calculation such discrepancy is highly anticipated. Other researchers also pursue similarly [2,7-9]. Among the practitioners, the saturated residual stress at the surface is usually predicted as:
At the surface, where Ah is the arc height and R is the radius of shot, while is the retain austenite. For the peak, usually it becomes
The unit is in MPa. The above empirical equations are quite famous in the industrial world although it is lack of scientific basis. Based on Equations (76) and (77), and our measurement that arc-height are 0.54 and 0.28 respectively, our prediction of surface residual stress would be -530 MPa and -512 MPa respectively. The peak residual stress would be 917 MPa and 906 MPa. Again, direct comparison of the prediction using these empirical equations with experiment and with computational results are still difficult. We can only say that the trend is similar.
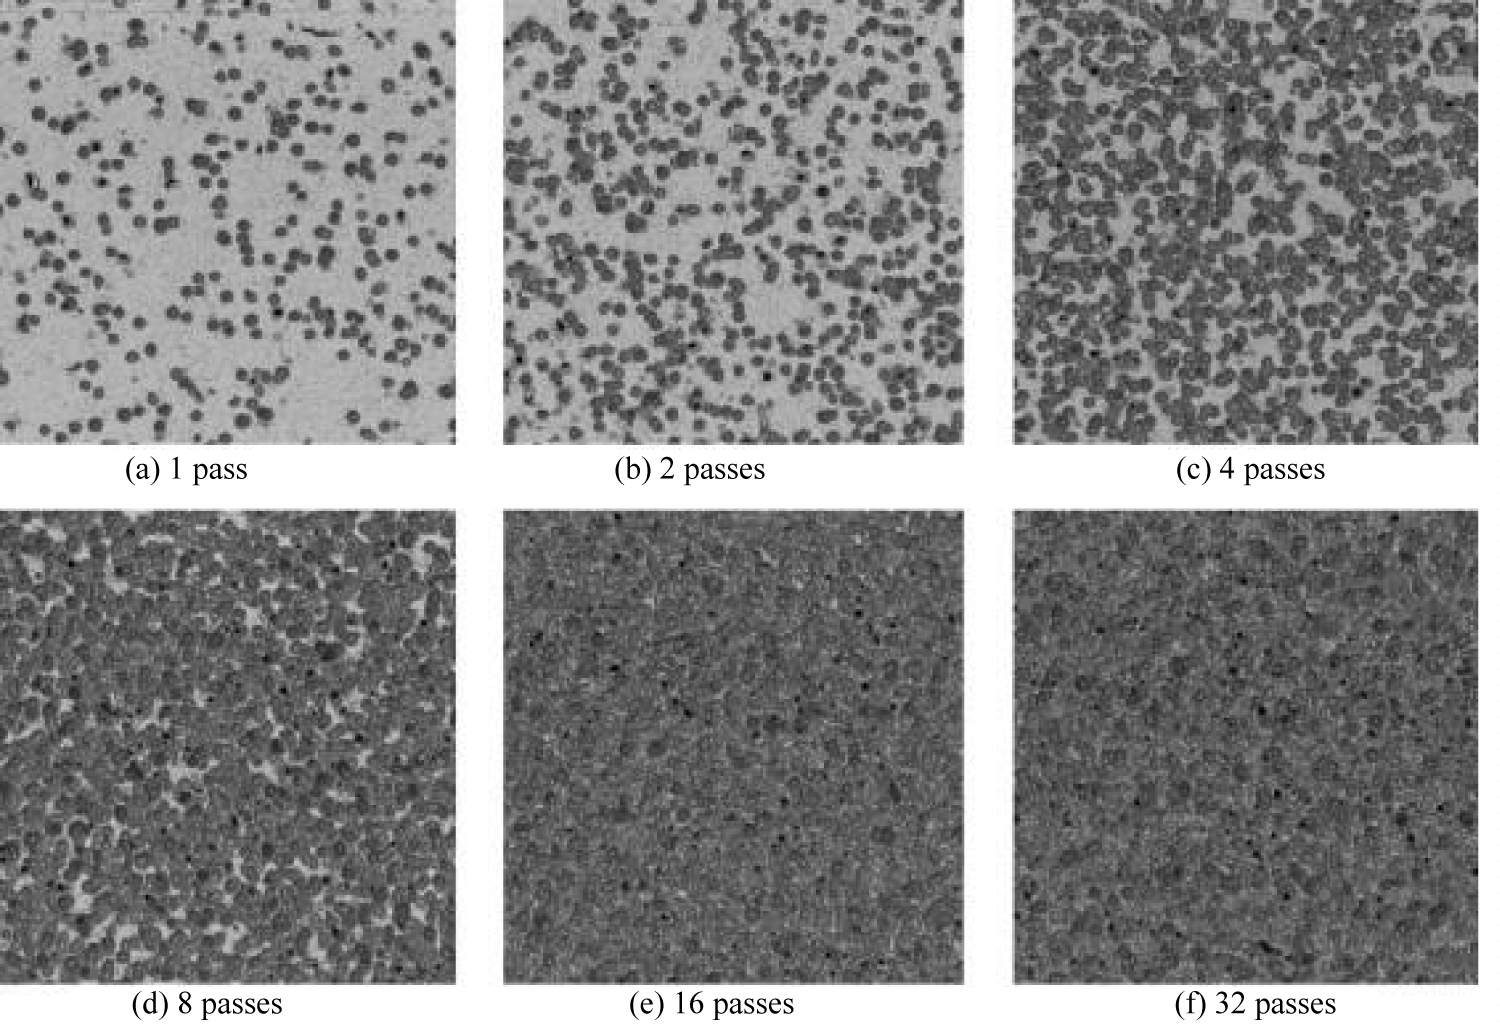
Figure 14 shows the coverages at different passes. It shows clearly that our first attempt in this computation is still an early stage and can be modified into broader area and more variation of the coverage.
In the fatigue based industrial application, it is very critical that a product has both sufficient surface residual stress and depth of peak to prolong the fatigue life. This trend explain why some products use double shot peenings, which are the first using large shot ball and followed by smaller shot ball. This is thought to guaranty delaying both the fatigue crack initiation and early stage of fatigue crack propagation.
Conclusions
Through analysis, finite element modeling and experiment, it is proved that shot ball size influences mainly on the depth of the peak residual stress. This conclusion is nothing new among the practitioners. However, this research proved that academically this field has so much promise and potential to develop further. It would be an interesting topics to incorporate the chaos theory, since while the number of individual impacts is linearly proportional to shot flow, exposure area, and exposure time, the shot peening coverage is not linearly proportional because of the random nature of the process.
Acknowledgment
Part of the work was performed during the first author’s stay as a visiting professor at the South Ural State University, Russia. The financial support and contribution from the International office of South Ural State University is highly appreciated.


