International Journal of Metallurgy and Metal Physics
(ISSN: 2631-5076)
Volume 5, Issue 1
Research Article
DOI: 10.35840/2631-5076/9250
Initial Observation of Grain Orientation Dependent Nanoindentation Hardness of Al 6061 Gas-atomized Powder
Bryer C Sousa1*, Caitlin E Walde2, Victor K Champagne Jr.3 and Danielle L Cote1
Table of Content
Figures
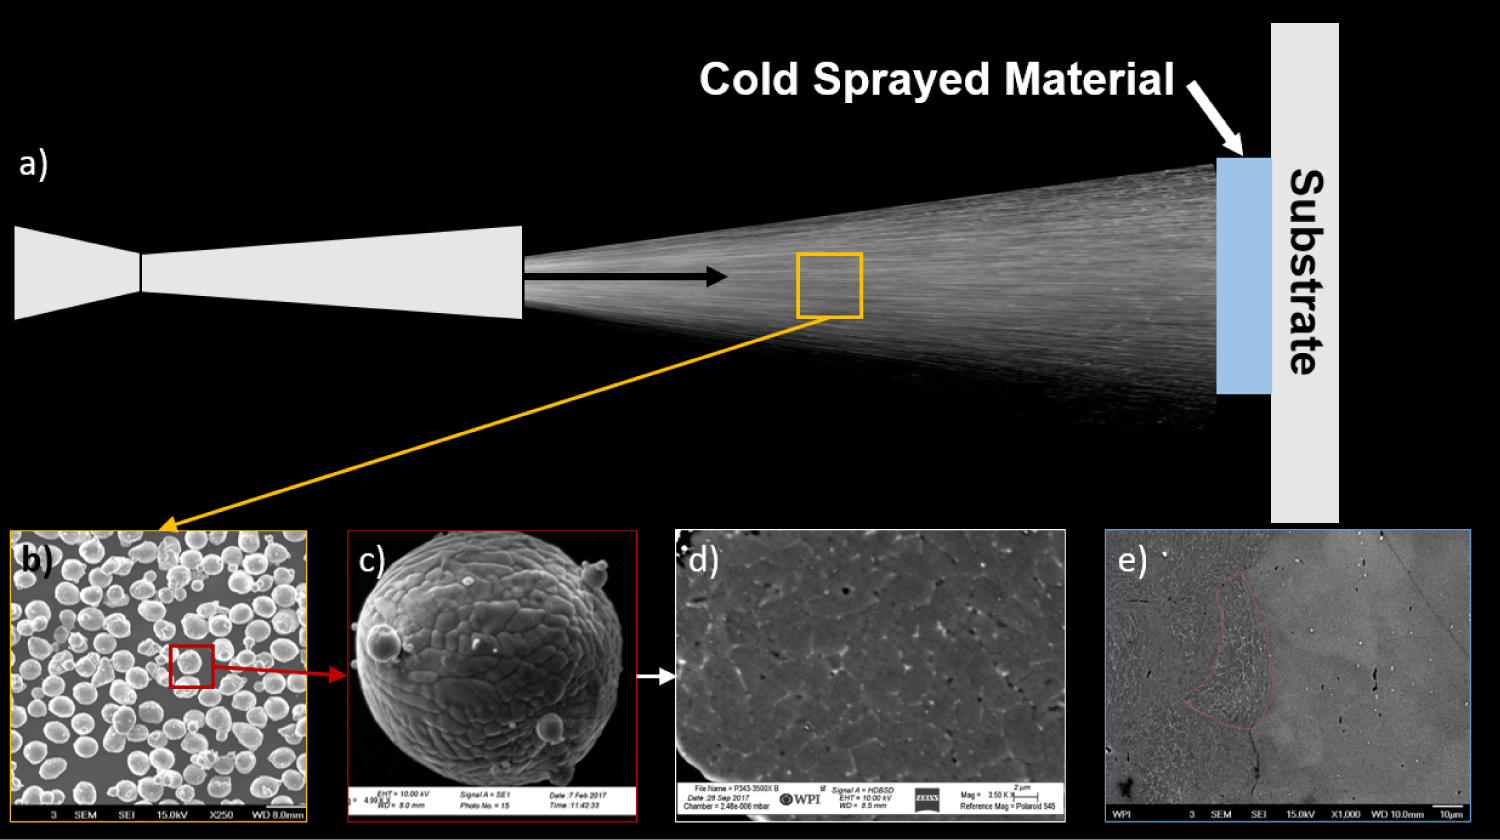
Figure 1: Cold spray process depiction with gas-atomized.....
Cold spray process depiction with gas-atomized Al 6061 feedstock. a) is a schematic overview of the cold spray process; b) presents SEM micrograph of powder; c) is an SEM micrograph of the surface of a single particle; d) illustrates a SEM micrograph showing the internal microstructure of a single particle; and e) captures a SEM micrograph showing the microstructure at the cold sprayed particle-substrate interface.
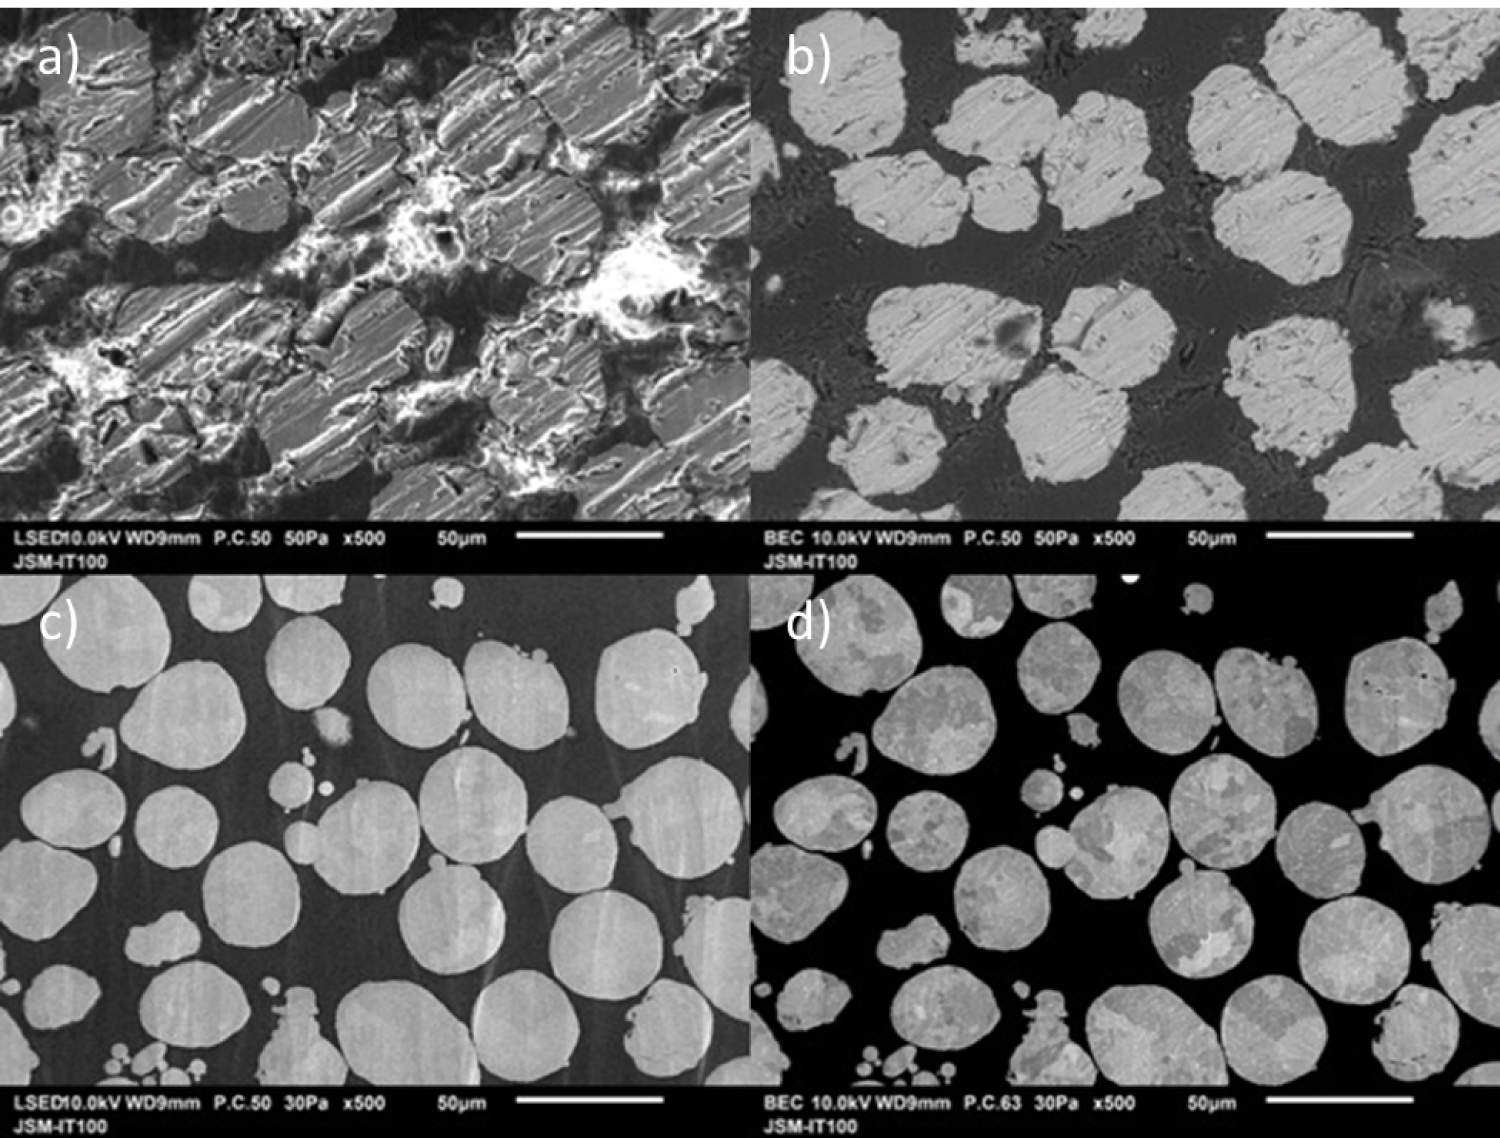
Figure 2: SEM micrographs of Al 6061 powder during.....
SEM micrographs of Al 6061 powder during and after cross-sectional argon ion beam polishing is presented herein. a) and b) depict secondary electron and backscatter electron SEM micrographs before achieving the final polish, respectively. c) and d) capture similar micrographs after polishing.
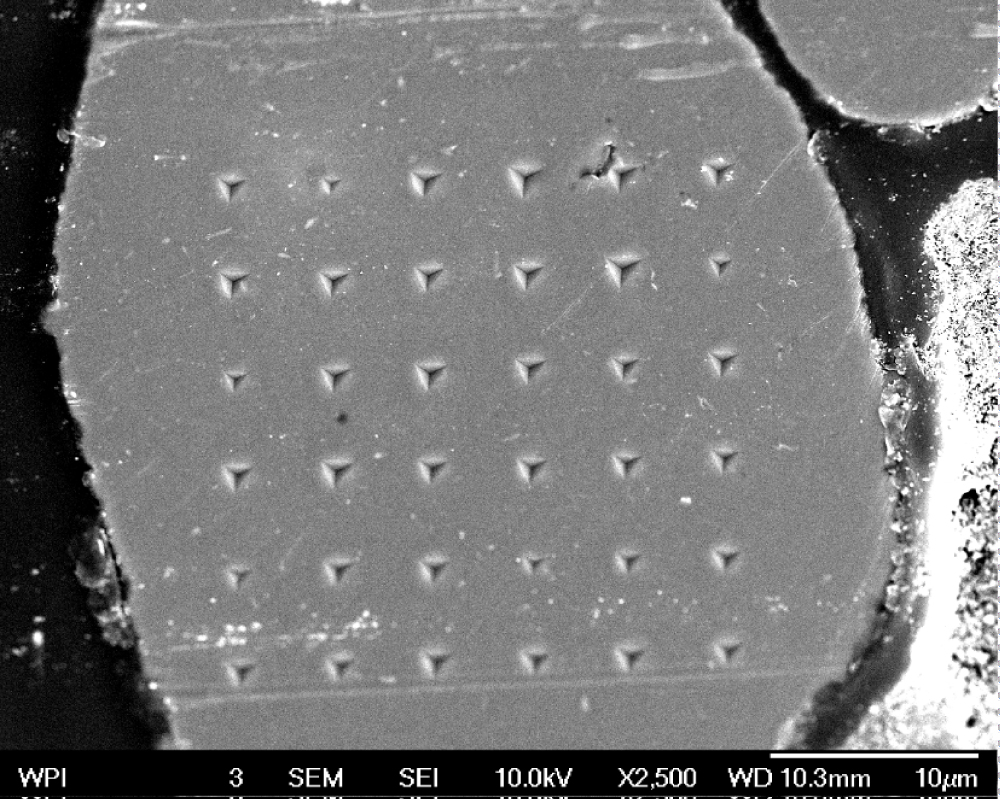
Figure 3: SEM micrograph showing indentation depth.....
SEM micrograph showing indentation depth and spacing on an Al powder particle.
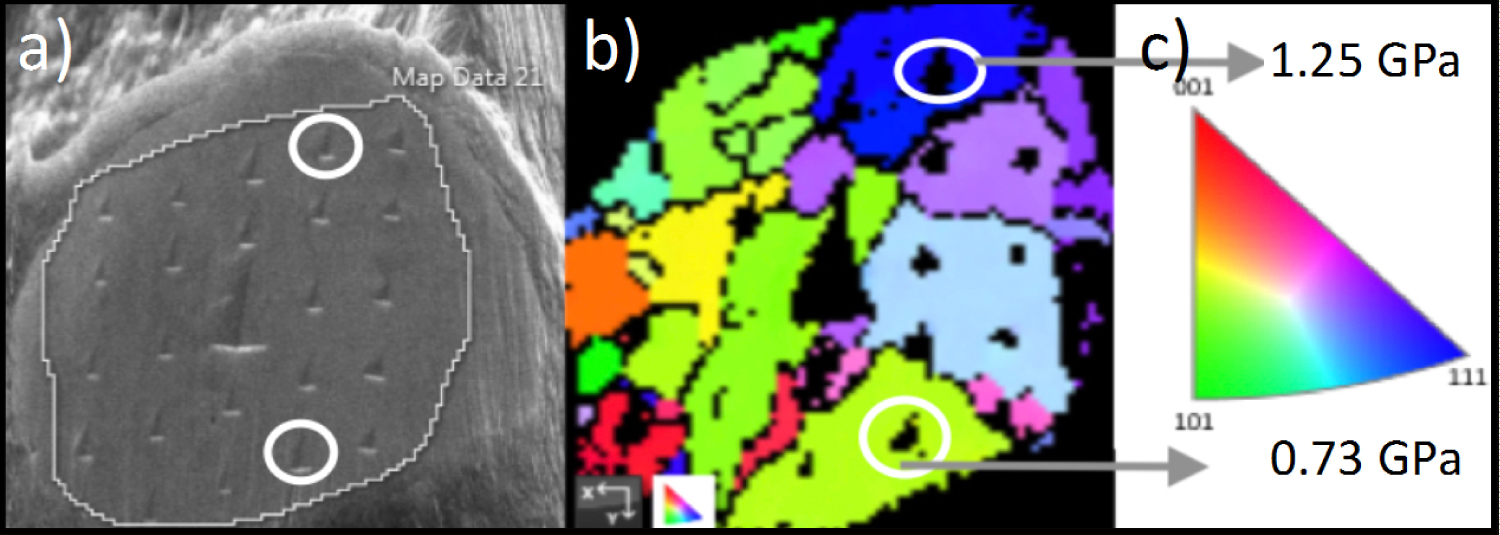
Figure 4: a) SEM micrograph of particle after indentation.....
a) SEM micrograph of particle after indentation, showing mapped region and indents of interest; b) EBSD image showing IPF X orientation; and c) Color map of Miller indices and measured nanohardness of selected indents.
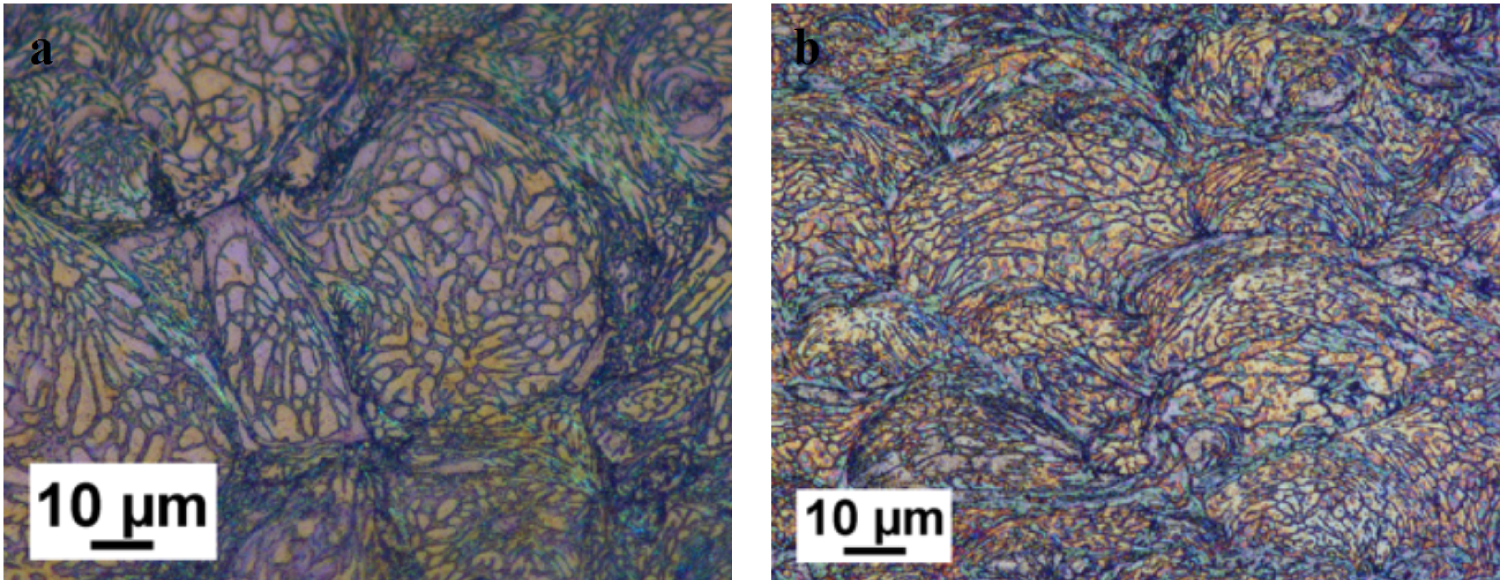
Figure 5: Optical image of cold spray Al 6061 etched.....
Optical image of cold spray Al 6061 etched using Weck's reagent and viewed under polarized light: a) Spray direction is parallel to the orientation shown, aspect ratio of particles is 1.41; b) Cross-section of cold spray sample where the spray direction is perpendicular.
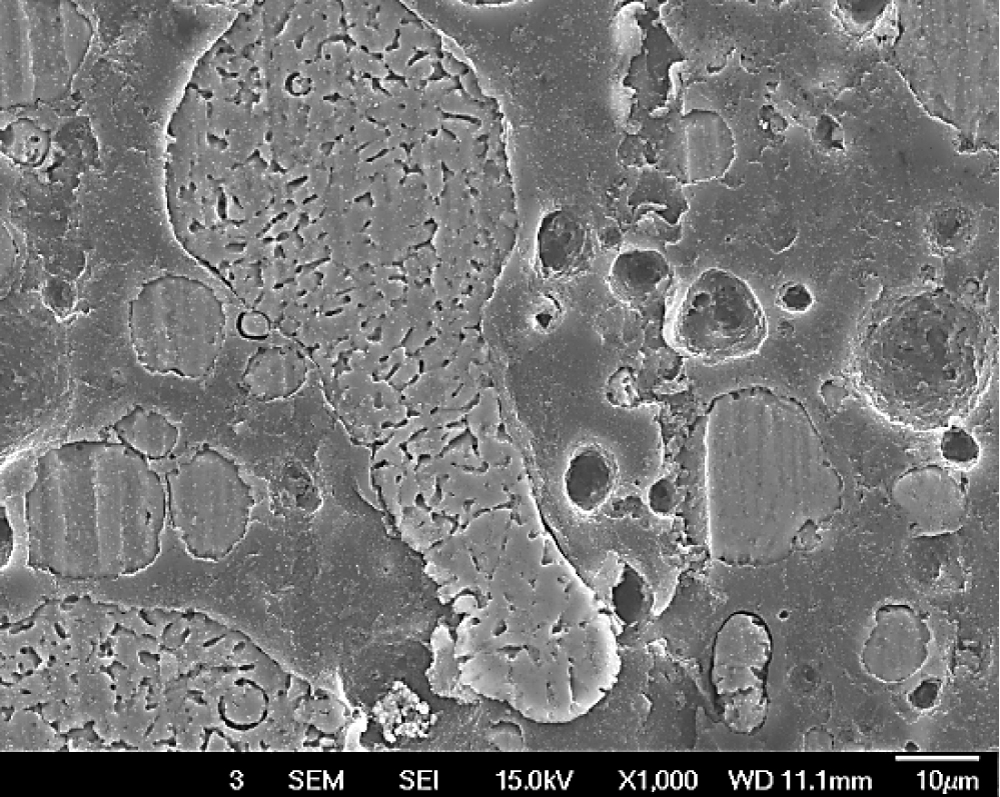
Figure 6: SEM micrograph of Al 6061 powder etched.....
SEM micrograph of Al 6061 powder etched in 0.5% HF for 90 seconds.
Tables
Table 1: Elemental composition of Al 6061 gas-atomized powder expressed in terms of weight percent. The elemental analysis was performed by way of inert gas fusion.
References
- WC Oliver, GM Pharr (1992) An improved technique for determining hardness and elastic modulus using load and displacement sensing indentation experiments. Journal of Materials Research 7: 1564-1583.
- AC Fischer-Cripps (2011) Nanoindentation. Springer, New York, USA.
- Y Liu, X Zhang (2017) Beyond indentation hardness and modulus: Recent advances in nanoindentation techniques: Part I. JOM 69: 2227-2228.
- VP Fardin, EA Bonfante, PG Coelho, et al. (2018) Residual stress of porcelain-fused to zirconia 3-unit fixed dental prostheses measured by nanoindentation. Dental Materials 34: 260-271.
- V Maier, K Durst, J Mueller, et al. (2011) Nanoindentation strain-rate jump tests for determining the local strain-rate sensitivity in nanocrystalline Ni and ultrafine-grained Al. Journal of Materials Research 26: 1421-1430.
- S Pathak, SR Kalidindi (2015) Spherical nanoindentation stress-strain curves. Materials Science and Engineering: R: Reports 91: 1-36.
- Z Khan, HM Faisal, R Tarefder (2017) Fracture toughness measurement of asphalt concrete by nanoindentation. International Mechanical Engineering Congress and Exposition, American Society of Mechanical Engineers Digital Collection, USA.
- B Bhushan (2017) Nanotribology and Nanomechanics. Springer.
- K Huang, HY Wu, XF Wei, et al. (2018) Effect of plasma surface tungstenising on the friction and wear of Ti2AlNb-based alloys. Transactions of the IMF 96: 27-33.
- X Xiao, Q Chen, H Yang, et al. (2017) A mechanistic model for depth-dependent hardness of ion irradiated metals. Journal of Nuclear Materials 485: 80-89.
- X Xiao, L Yu (2018) Comparison of linear and square superposition hardening models for the surface nanoindentation of ion-irradiated materials. Journal of Nuclear Materials 503: 110-115.
- AJ Bushby, SG Roberts, CD Hardie (2012) Nanoindentation investigation of ion-irradiated Fe-Cr alloys using spherical indenters. Journal of Materials Research 27: 85-90.
- C Walde, D Cote, V Champagne, et al. (2019) Characterizing the effect of thermal processing on feedstock Al alloy powder for additive manufacturing applications. Journal of Materials Engineering and Performance 28: 601-610.
- MR Rokni, CA Widener, VR Champagne (2014) Microstructural evolution of 6061 aluminum gas-atomized powder and high-pressure cold-sprayed deposition. Journal of Thermal Spray Technology 23: 514-524.
- MR Rokni, CA Widener, GA Crawford (2014) Microstructural evolution of 7075 Al gas atomized powder and high-pressure cold sprayed deposition. Surface and Coatings Technology 251: 254-263.
- Y Zou, D Goldbaum, JA Szpunar, et al. (2010) Microstructure and nanohardness of cold-sprayed coatings: Electron backscattered diffraction and nanoindentation studies. Scripta Materialia 62: 395-398.
- M Sharma, J Schreiber, T Eden, et al. (2019) Stress corrosion cracking resistance of cold-sprayed Al 6061 deposits using a newly developed test fixture. Coatings 9: 445.
- V Champagne, D Helfritch (2015) Critical assessment 11: Structural repairs by cold spray. Materials Science and Technology 31: 627-634.
- SC Lee, KT Kim (2002) Densification behavior of aluminum alloy powder under cold compaction. International Journal of Mechanical Sciences 44: 1295-1308.
- K Matsuki, T Aida, T Takeuchi, et al. (2000) Microstructural characteristics and superplastic-like behavior in aluminum powder alloy consolidated by equal-channel angular pressing. Acta Materialia 48: 2625-2632.
- V Champagne, A Nardi, D Cote (2015) Materials characterization of advanced cold-spray aluminum alloys. International Journal of Powder Metallurgy 51: 37-47.
- (2017) Standard specification for woven wire test sieve cloth and test sieves. ASTM International, West Conshohocken, USA.
- (2007) Standard specification for aluminum and aluminum-alloy sheet and plate. ASTM International, West Conshohocken, USA.
- Y Xia, M Bigerelle, J Marteau, et al. (2014) Effect of surface roughness in the determination of the mechanical properties of material using nanoindentation test. Scanning 36: 134-149.
- KO Kese, ZC Li, B Bergman (2004) Influence of residual stress on elastic modulus and hardness of soda-lime glass measured by nanoindentation. Journal of Materials Research 19: 3109-3119.
- H Li, JJ Vlassak (2009) Determining the elastic modulus and hardness of an ultra-thin film on a substrate using nanoindentation. Journal of Materials Research 24: 1114-1126.
- A Bolshakov, GM Pharr (1996) Inaccuracies in sneddon's solution for elastic indentation by a rigid cone and their implications for nanoindentation data analysis. MRS Online Proceedings Library Archive, 436.
- PS Phani, WC Oliver (2019) A critical assessment of the effect of indentation spacing on the measurement of hardness and modulus using instrumented indentation testing. Materials & Design 164: 107563.
- DG Tsaknopoulos, BC Sousa, VK Champagne, et al. (2018) Nanomechanically supported computational modeling for thermo-mechanical property design and optimization in small-scale powder metallurgy. MS&T Conference.
- D Belsito (2013) Materials Science and Technology (MS&T).
- P Jakupi, PG Keech, I Barker, et al. (2015) Characterization of commercially cold sprayed copper coatings and determination of the effects of impacting copper powder velocities. Journal of Nuclear Materials 466: 1-11.
- A Chaudhuri, Y Raghupathy, D Srinivasan, et al. (2017) Microstructural evolution of cold-sprayed inconel 625 superalloy coatings on low alloy steel substrate. Acta Materialia 129: 11-25.
- Y Zhang, N Brodusch, S Descartes, et al. (2014) Microstructure refinement of cold-sprayed copper investigated by electron channeling contrast imaging. Microscopy and Microanalysis 20: 1499-1506.
- Y Zou, W Qin, E Irissou, et al. (2009) Dynamic recrystallization in the particle/particle interfacial region of cold-sprayed nickel coating: Electron backscatter diffraction characterization. Scripta Materialia 61: 899-902.
- T Ishibashi, S Shimoda (1988) The correlation between hardness (Mean contact pressure by a spherical indenter) and flow stress. JSME International Journal 31: 117-125.
- J Villafuerte (2015) Modern cold spray: Materials, process, and applications. Springer.
- D Goldbaum (2012) Micromechanical testing of cold sprayed Ti splats and coatings. Materials Science.
- A Mishra, BK Kad, F Gregori, et al. (2007) Microstructural evolution in copper subjected to severe plastic deformation: Experiments and analysis. Acta Materialia 55: 13-28.
- MA Meyers, YB Xu, Q Xue, et al. (2003) Microstructural evolution in adiabatic shear localization in stainless steel. Acta Materialia 51: 1307-1325.
- PM Kelly, HP Ren, D Qiu, et al. (2010) Identifying close-packed planes in complex crystal structures. Acta Materialia 58: 3091-3095.
- W Soboyejo (2002) Mechanical properties of engineered materials. CRC Press, 152.
- T Csanadi, M Bl'anda, NQ Chinh, et al. (2015) Orientation-dependent hardness and nanoindentation-induced deformation mechanisms of WC crystals. Acta Materialia 83: 397-407.
- S Pathak, J Michler, K Wasmer, et al. (2012) Studying grain boundary regions in polycrystalline materials using spherical nano-indentation and orientation imaging microscopy. Journal of Materials Science 47: 815-823.
- SJ Vachani, RD Doherty, SR Kalidindi (2016) Studies of grain boundary regions in deformed polycrystalline aluminum using spherical nanoindentation. International Journal of Plasticity 81: 87-101.
- SJ Vachani, SR Kalidindi (2015) Grain-scale measurement of slip resistances in aluminum polycrystals using spherical nanoindentation. Acta Materialia 90: 27-36.
Author Details
Bryer C Sousa1*, Caitlin E Walde2, Victor K Champagne Jr.3 and Danielle L Cote1
1Materials Science and Engineering Program, Department of Mechanical Engineering, Worcester Polytechnic Institute, USA
2Solvus Global LLC, USA
3Weapons and Materials Research Directorate, U.S. Army Research Laboratory, USA
Corresponding author
Bryer C Sousa, Materials Science and Engineering Program, Department of Mechanical Engineering, Worcester Polytechnic Institute, 100 Institute Road, Worcester, MA 01609, USA.
Accepted: March 24, 2020 | Published Online: March 26, 2020
Citation: Sousa BC, Walde CE, Champagne VK, Cote DL (2020) Initial Observation of Grain Orientation Dependent Nanoindentation Hardness of Al 6061 Gas-atomized Powder. Int J Metall Met Phys 5:050.
Copyright: © 2020 Sousa BC, et al. This is an open-access article distributed under the terms of the Creative Commons Attribution License, which permits unrestricted use, distribution, and reproduction in any medium, provided the original author and source are credited.
Abstract
The dependence-based relationship between the hardness of a small volume of polycrystalline metallic material and the material's crystallographic orientations has been established for systems. Typically, these systems are comprised of hexagonal close packed orientation, such as β-Ti alloys, dual-phase steels, and FeCrAl alloys. Recently, advances in nanoscale-instrumented indentation testing of materials via nanoindentation have shown that the grain orientation dependence of a measured hardness also holds for cubic structured polycrystalline metal systems. In order to contribute to this debate, this work takes a precursory look at the effect of grain orientation on nanoindentation hardness in gas-atomized metallic powders. Grain orientation was measured using electron backscatter diffraction and hardness using nanoindentation. These powders offer the unique challenge of having much smaller grains than those typically researched. It was found that even in face centered cubic gas-atomized Al 6061 powder there is a noteworthy difference in hardness as a function of grain orientation. Though this work demonstrates the influence of grain orientation upon measured nanomechanical properties for a gas-atomized alloyed aluminum powder, additional work will be required to explore and develop an explicit relation between grain orientation and cold spray processing. However, discussion surrounding potential implications for cold spray materials consolidation were provided herein.
Introduction
Nanoindentation emerged in the late twentieth and early twenty-first centuries as a repeatable, consistent, and economically viable mode of probing the mechanical behavior of small material volumes at the submicron and nanometer length scales [1,2].
Since that time, major advancements in both the academic arena as well as the industrial sector have amplified nanoindentation's impact [3]. The nanoindentation community has shown the technology's potential with respect to extracting the following nanomechanical properties: residual stress [4], strain-rate sensitivity [5], indentation-based stress-strain curves [6], fracture toughness [7], and tribological properties as well as wear characteristics [8,9], among others, such as irradiation-induced hardening [10,11].
In addition to these methodologically minded efforts, an equally important subset of nanoindentation-centric research has captured the imagination of materials scientists and engineers; more specifically, how the structure, processing, and properties of a sample influences the nanoindentation results. For the present purpose, the relationship between a sample's nano/microstructure, more specifically its' crystallographic orientation of individual grains within a polycrystalline material, and the resultant hardness is explored in greater detail hereafter. However, it is worth noting that prior work has focused upon the nanoindentation response as a function of processing conditions experienced by a material, as noted in [11,12]. The same can be said with regard to one sample's properties in relation to nanoindentation data.
The current objective of this work is to build upon the noteworthy set of prior papers that have shown a relationship between the grain-orientation informed nanomechanical response observed for polycrystalline materials during depth-sensing nanoindentation. We do this by looking at a metal alloyed powder with smaller grains relative to those already researched and is composed of fundamentally face-centered cubic (FCC) structured crystals rather than some combination of cubic components and hexagonal crystals.
In other words, electron backscatter diffraction (EBSD) coupled with scanning electron microscopy (SEM) can be used to quantify grain orientations over a large area. EBSD of gas-atomized metallic powders show a grain size of 1-5 μm that is highly variable from particle to particle [13-16]. In this study, EBSD and nanoindentation are used to evaluate the effects of grain orientation on the response to nanoindentation of gas-atomized Al 6061 powder.
Al 6061 was selected for this work because it is an age-hardenable alloy that is widely used for wrought components, coatings, and repair applications in the aerospace and aircraft industries [17]. It is also widely used and accepted in military applications [18]. For coatings and repair applications, additive manufacturing processes such as cold spray, additive friction stir, equal-channel angular pressing, and cold isostatic pressing are frequently used [18,20]. Figure 1 shows a schematic overview of the cold spray process. The feedstock for these processes is typically spherical gas-atomized powders (Figure 1b and Figure 1c) [21]. During gas atomization, molten metal is atomized and undergoes rapid solidification; producing powders that have a cellular dendritic microstructure that contains networked phases at the grain boundaries (Figure 1d). The aforementioned processes take place in the solid-state, so the microstructure of the powder is retained, though deformed, after consolidation (Figure 1e).
Experimental Methods and Materials
Gas-atomized Powder
The powder used for this study was gas-atomized Al 6061 (Valimet, Inc., Stockton, CA, USA). The received powder particles were mechanically sieved using laboratory test sieves (Humboldt Mfg. Co., Elgin, IL, USA) compliant with ASTM E 11 [21] into seven classifications in order to aid in the repeatability of selecting similarly sized particles for analysis. The size classifications are < 25 μm, 25-32 μm, 32-38 μm, 38-45 μm, 45-53 μm, 53-63 μm, and > 63 μm. The 45-53 μm category was chosen for this analysis, as it was the most abundant of the larger categories. Furthermore, the larger powder particles have slightly larger grains, making it more likely that an indent would occur in the middle of a single grain. The 45-53 μm category had a D10 of 32.0 μm, D50 of 41.0 μm, and D90 of 54.5 μm. The chemical composition of the powder was determined via inert gas fusion (Luvak, Inc., Boylston, MA, USA) and is shown in Table 1. When compared to the ASTM standard [23], the chemical composition recorded in Table 1 falls within acceptable ranges for Al 6061.
Mounting and Polishing
The powder was embedded in a concentrated conductive carbon paint composed of colloidal graphite in isopropanol with 20% solid components (SPI Supplies Division of Structure Probe, Inc., Westchester, PA, USA), on a 5 mm × 5 mm precut chip from a 4-inch silicon wafer (Ted Pella, Inc., Redding, CA, USA). The mounted powder was then polished with an argon ion beam cross-sectional polisher (JEOL IB-19530CP, JEOL, Ltd., Akishima, Tokyo, Japan) at 6 kV for 2 hours. Figure 2 shows secondary electron and backscatter electron micrographs of the powder before achieving the final surface finish and after polishing was completed. Since surface roughness is known to play a significant role in determining meaningful nanoindentation responses [24], the polished powder was inspected with an optical microscope (Olympus GX71, Olympus Corporation, Shinjuku City, Tokyo, Japan) to qualitatively verify that the ion beam polish was satisfactory.
Residual stresses are also known to influence nanoindentation data [25]. The argon ion beam cross-sectional polisher allowed for the powders to be prepared without the introduction of residual stresses from mechanical polishing methods. Though chemo-vibratory polishing could have also resulted in the achievement of polished surfaces with minimal residual stresses, the use of the argon ion beam cross-sectional polisher eliminated the risk of chemical modification of the surface from prolonged exposure to colloidal silica. Alternatively, residual stress accumulation can be avoided by way of using electrochemical polishing as well. Unfortunately, since powders are not fully connected nor in complete contact with one another, the necessary electrical conductivity is unable to be achieved for proper sample preparation using an electrochemical approach. A viable alternative to argon ion beam cross-sectional polishing for this research or similar research efforts would be that of focused ion beam milling. That being said, focused ion beam milling can also introduce damage and Ga ion accumulation, which is known to influence the strength of Al materials subjected to micropillar compression and nanoindentation.
Electron Backscatter Diffraction
EBSD was performed on the selected powder particles before and after indentation in (JEOL JSM-7000F) field emission gun SEM with an Oxford NordlysMax2 detector (Oxford Instruments, Abingdon, United Kingdom). This was done to measure the grain sizes and orientations, and to observe any orientation changes due to nanoindentation. The accelerating voltage used was 20 kV with a step-size of 0.5 μm.
Nanoindentation
Nanoindentation was carried out using a Keysight G200 (Keysight Technologies, Santa Rosa, CA, USA) with a newly manufactured Berkovich sharp-pyramidal diamond tip (Micro Star Technologies, Inc., Huntsville, TX, USA) and the "Express Test for Thin Films Large Table - Batch" method at room temperature. This method allows a correction factor to be included for the influence of the substrate. Though a hemispherical powder particle mounted in a material is not the same as a planar thin film on top of a substrate, the approximation from the thin film method was appropriate for the given task. The tip contact area and the frame stiffness were calibrated by analytically fitting the load versus depth data for the Corning 7980 (fused silica) and Borofloat (reference standards provided by Keysight with the indenter) to Equation 1 [26]. The fitted coefficients were of 23.9921, of 2904.4464, of -52079.7033, of 123972.6661, and of -38147.0738.
Where follows from the inversion of "Sneddon's solution for the indentation of an elastic half-space by a rigid axisymmetric indenter" [27]; S is the contact stiffness; is the reduced indentation modulus; and is the contact depth.
Arrays of 5 × 5 indents were made on three powder particles, with a prescribed indentation depth of 250 nm. The indents were spaced 5.2 μm apart, to comply with the recommendation that spacing between indents is 20-30 times greater than the indentation depth (Figure 3). While recent work has started to demonstrate that spacing can be less than the currently accepted rule-of-thumb [28], 5.2 um spacing was utilized to minimize the risk of zones of plastic deformation from prior indents would artificially increasing the subsequently recorded hardness values.
From coupling the EBSD data with the nanoindentation data, the data that corresponded with an indent that was clearly within a grain of a given orientation were considered herein. In total, 75 indents were performed with 25 indents associated with each of three powder particles. Since grain boundaries or grain boundary regions can result in varied local mechanical properties, data points that were associated with grain boundaries were filtered from consideration for the purpose of this study. By way of only considering nanoindentation data that were distinctly and directly correlated with a given grain orientation, comparisons between grain orientation-induced effects were more observable.
Results and Discussion
When comparing the EBSD micrographs from before and after indentation, there were no observed changes in orientation, as one would expect for this material. The orientation aligned with the [111] direction had a nanoindentation hardness of 1.25 GPa while the grain orientation aligned with the [101] direction had a nanoindentation hardness of 0.73 GPa (Figure 4). The average hardness was determined to be 1.17 GPa. Given the unique method of mounting as well as polishing that had to be entertained in order to satisfy the constraints of jumping between the EBSD device and the nanoindentation tester, the recorded average compliments [29] as well as [30], where [29] reports an as-atomized average hardness of 1.15 GPa for the same material.
With respect to the theoretically ideal case of Berkovich pyramidal indenter tip geometry, Equation 1 can be expressed in purely algebraic terms without the need to analytically fit a reference standard load vs. displacement data to derive the constants given in Equation 1. However, at depths below 3 μm and greater than a few nm's, imperfections in the actual tip's geometry (such as rounding at the apex) dis-proportionately influence the resultant hardness in particular. This influence follows from the fact that,
Where H is the indentation hardness, P is the load, and is the contact area. To accommodate for said imperfections, the analytical fit has been designed to hold from 0-3 μm, while losing physical meaning at depths beyond that upper bound. Indents in this study are carried out at a depth of 0.25 μm, so the definition of contact area used herein holds.
Additionally, the indentation modulus of the powder as a function of crystallographic orientation was measured. The grain aligned with the [111] direction had a modulus of 74.12 GPa while the grain aligned with the [101] direction had an elastic modulus of 65.34 GPa.
Relating the influence of the distribution of grain orientations within a given feedstock powder to the grain orientation distribution observed within a cold sprayed consolidation using the same powder particles is a difficult task and as such has yet to garner much attention within the academic literature. An additional challenge that hasn't received deliberate study is the effect of grain orientation as well as grain orientation dependent mechanical properties within a feedstock particle as it relates to the cold spray process. Specifically, little has been reported with respect to grain orientation informed mechanics of grains and sub-grains within a powder particle as it concerns the immediate occurrence of impact induced particle deformation and dynamic rotational recrystallization of the initial polycrystalline microstructure. Rather, when grain orientations are considered in literature for feedstock powder as well as the resultant cold spray material consolidations, qualitative and semi-quantitative analysis has generally been limited to the presence of heterogenous and seemingly random distribution of grain orientations as a result of severe plastic deformation [31-33]. In turn, such a lack of prior work related to this area of study served as motivation for this research.
With respect to the effect of grain orientation upon high-strain rate powder particle impact deformation, one could hypothesize that the grains with orientations that yield lower hardness's would be more susceptible to the onset of dynamic rotational recrystallization. While the mean pressure during particle impact [34] would readily exceed the mean contact pressure [35], i.e., hardness, associated with each of the grain orientations, the gradient of mechanical properties as a function of grain orientation could cause more pronounced grain refinement where [101] orientated grains are found.
Alternatively, the accumulation of a greater concentration of severe plastic deformation induced dislocations could also be more readily generated via the grains that have a [111] orientation regardless of their hardness or strength. Since dislocation accumulation at the prior grain boundaries is thought to drive the dynamic rotational recrystallization [34,36], the hardness or strength of a grain may not fully speak to the tendency of a grain to undergo more or less prevalent grain refinement. Rather, when dislocation motion is considered, as is discussed in this section of the paper hereafter, the [111] orientation is comprised of the closed packed planes within an FCC structure. Therefore, it stands to reason that pronounced grain refinement could be driven by the ability to move dislocations as they accumulate, and cause recrystallization rather than the hardness of a given grain. Future work will be required to properly consider the role of dislocation motion versus grain orientation hardness upon the tendency to recrystallize during impact.
By way of considering the dynamic rotational recrystallization of the powder's polycrystalline microstructure during cold spray processing, in comparison with that of the immediate occurrence of impact induced particle deformation, an additional hypothesis can be formulated. That is to say, in light of the observations made by [36] and [37,38] suggests that certain orientations are favored during recrystallization as a result of severe plastic deformation. Therefore, additional work should be pursued that builds upon this study in an attempt to explore prospective orientation favoritism as a result of high strain rate supersonic particle deposition and deformation experienced during cold spray processing. Figure 5 illustrates how the grains within deposited particles deform and become refined at particle-particle interfaces in particular.
In an FCC structure like that of the Al 6061 system studied herein, the [111] orientation accounts for 100% of the closed packed planes [40]. At the same time, prior work has established the fact that the motion of dislocations within a cubic crystal system generally occur along closed packed planes since the Burgers vectors are minimized along such planes. Stated otherwise, dislocation motion tends to occur along the closed packed plane due to the fact that Pierl's lattice friction stresses are minimal given the minimization of the Burgers vectors and maximization of vertical lattice spacing [41]. With this in mind, the ability to accumulate dislocation generation and motion within the [111] orientation may serve as a mechanistic framework for understanding why the nanoindentation hardness along the [111] orientation is greater than that of the [101] and [001] grain orientations. In other words, the dislocation hardening within the [111] orientation due to the plastic deformation associated with nanoindentation testing may serve as a means of understanding the orientation dependence of hardness. The prohibition of dislocation motion along the [101] orientation therefore corresponds with the lower hardness in the [101] orientation versus that of the [111] orientation. Further extrapolation of motion dislocations along closed packed planes in cubic crystal systems could also introduce slip systems into a more comprehensive understanding of the mechanisms responsible for orientation dependence of hardness as some have reported upon elsewhere [41].
When compared with previous studies that have considered similar relations between orientation and mechanical properties, the findings unveiled herein are in good agreement with the literature. Although Pathak, et al. studied as-cast and deformed polycrystalline Fe-3%Si steel, and not an aluminum alloy, they also observed higher hardness within grains with [111] orientation [43]. When Vachani, et al. considered a deformed polycrystalline aluminum sample they also found high hardness's associated with the [111] orientation [44], which agrees with this research as well as another report that considered slip resistances at the grain scale within aluminum polycrystals [45]. Even though previous work has been shown to have already considered polycrystalline aluminum, this paper reports the first attempt to explore hardness dependence upon orientation for a gas-atomized powder that has much finer grains than the materials considered elsewhere. To better appreciate the scale of the grain diameters, Figure 6 presents an SEM micrograph of Al 6061 powder that has been etched in 0.5% HF acid for 90 seconds to reveal grain boundaries. As such, the grain size is shown to be in agreement with the 1-5 um range specified in the Introduction section.
Final Remarks
The initial findings described in this paper shine favorably upon the hypothesis that even in FCC gas-atomized Al 6061 powder there is a noteworthy difference in nanoindentation hardness as a function of grain orientation. The nanoindentation test coupled with the microstructural characterization using EBSD show a distinct difference between the [101] and [111] directions.
The general user and/or industrial technician can account for the orientation dependence of nanoindentation hardness measured with a nanoindentation system by ensuring the number of indents measured is sufficiently large enough to be both representative and quantitative. This enables the effect of grain orientation to be overshadowed by the number of tests. Analogously, powder X-ray diffraction is another system that accounts for the effect of crystal orientation on the data. They ensure that the sample size is sufficiently large and representative.
While a large sample size is a solution for those looking for an average nanoindentation hardness value, it is still important to understand the nanoscale phenomenon of the grain orientation dependence. In situations where only, a limited number of indents is possible - such as when doing stress-strain measurements, deeper measurements, or more time-consuming measurements - it is important to account for the effect of the grain orientation. An additional challenge with these situations is that with nanoindentation alone it is not possible to know the grain orientation and grain boundary locations when placing indents.
The findings of this study raise some interesting points worth further investigation:
- A statistically significant study utilizing a representative number of particles to expand upon this case scenario.
- A similar study utilizing a conical sphere tip to explore applications to elastic-response behavior.
- A study coupling transmission electron microscopy with nanoindentation to evaluate what deformation mechanisms occur as a function of grain orientation. This nanoscale data has applications in mesoscale and integrated computational materials engineering and research.
- A study evaluating the effects of grain size and indent proximity to grain boundaries.
- A similar analysis of other types of feedstock powders used for metal-additive manufacturing. A "round robin" approach with multiple institutions may be the best approach to this, due to the sheer number of options for metal-additive manufacturing feedstock.
- A similar analysis of metal-additive manufacturing consolidated parts. While it is widely known that metal-additive manufacturing parts have anisotropic properties, no study has been done to date analyzing the effect of the consolidation process on the grain orientation and nanoindentation relationship, especially with respect to cold spray.
All future work will be carried out with the iMicro Pro's dynamic nanoindentation capabilities as well as the in-SEM NanoFlip nanoindentation system produced by Nanomechanics, Inc., A KLA-Tencor Company, http://nanomechanicsinc.com/ (Oak Ridge, TN, USA).
Additional Information
The authors would like to thank the United States Army Research Laboratory for funding. The authors declare that they have no conflict of interest.

