International Journal of Metallurgy and Metal Physics
(ISSN: 2631-5076)
Volume 5, Issue 2
Research Article
DOI: 10.35840/2631-5076/9254
Quantitative Fracture Mechanics Approach to Fatigue Life Improvement by Shot Peening Application
Yunan Prawoto1*, Zaini Ahmad2 and H Agus Suhartono3
Table of Content
Figures
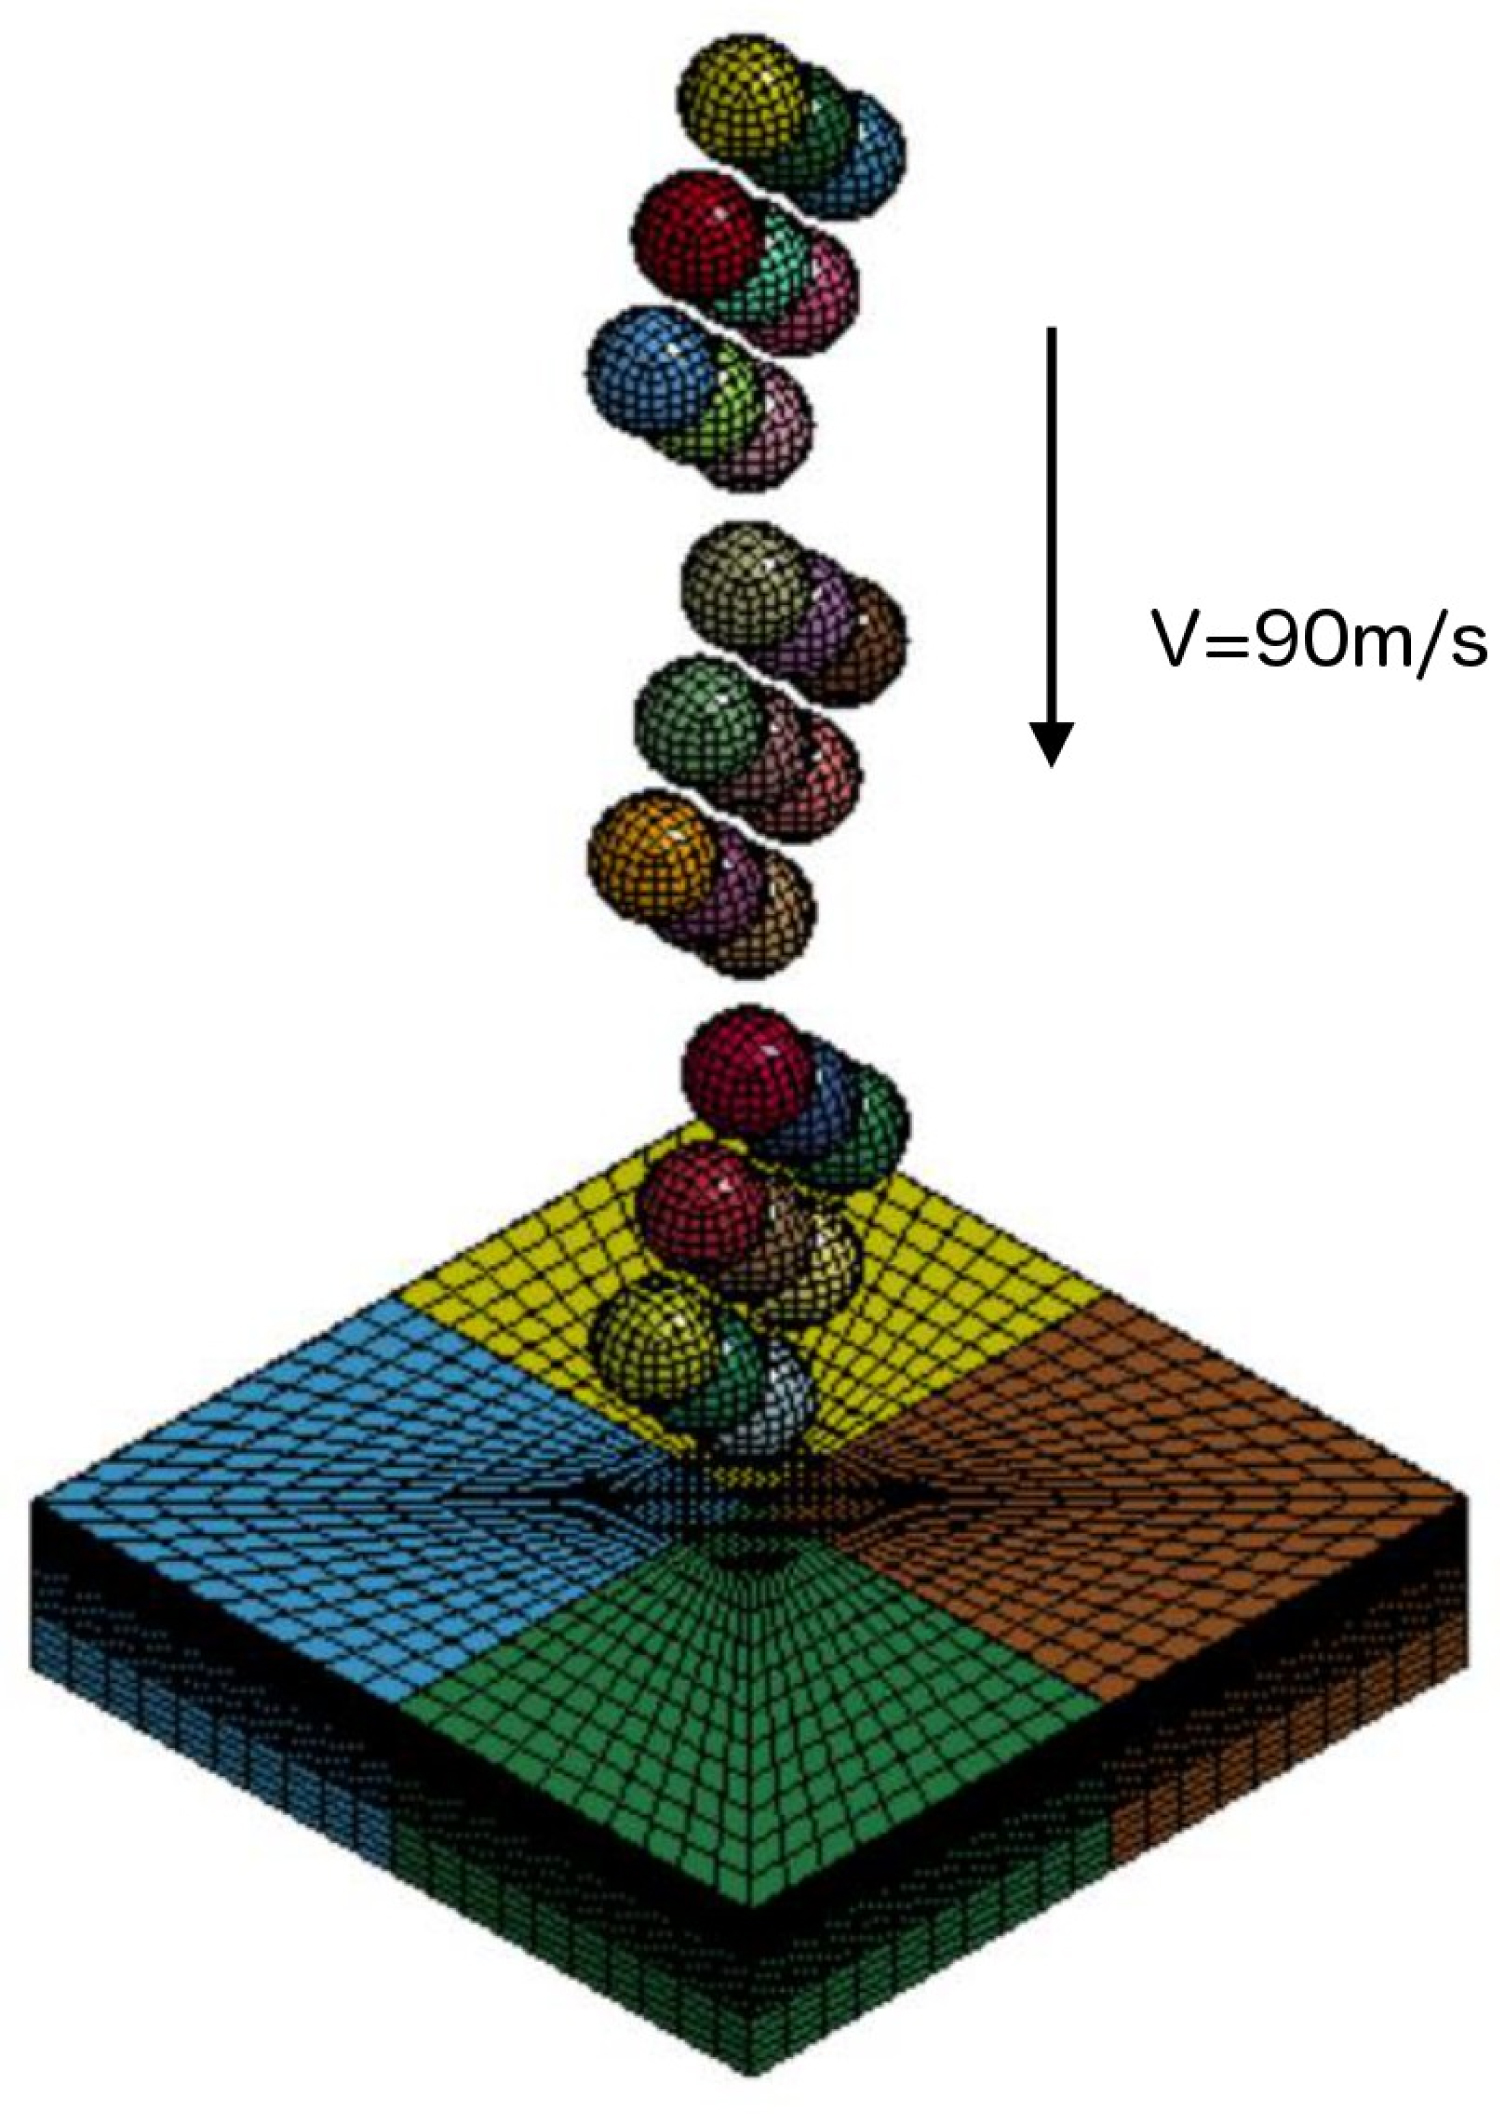
Figure 3: Finite element model of shot peening...
Finite element model of shot peening simulation under several impact sequences.
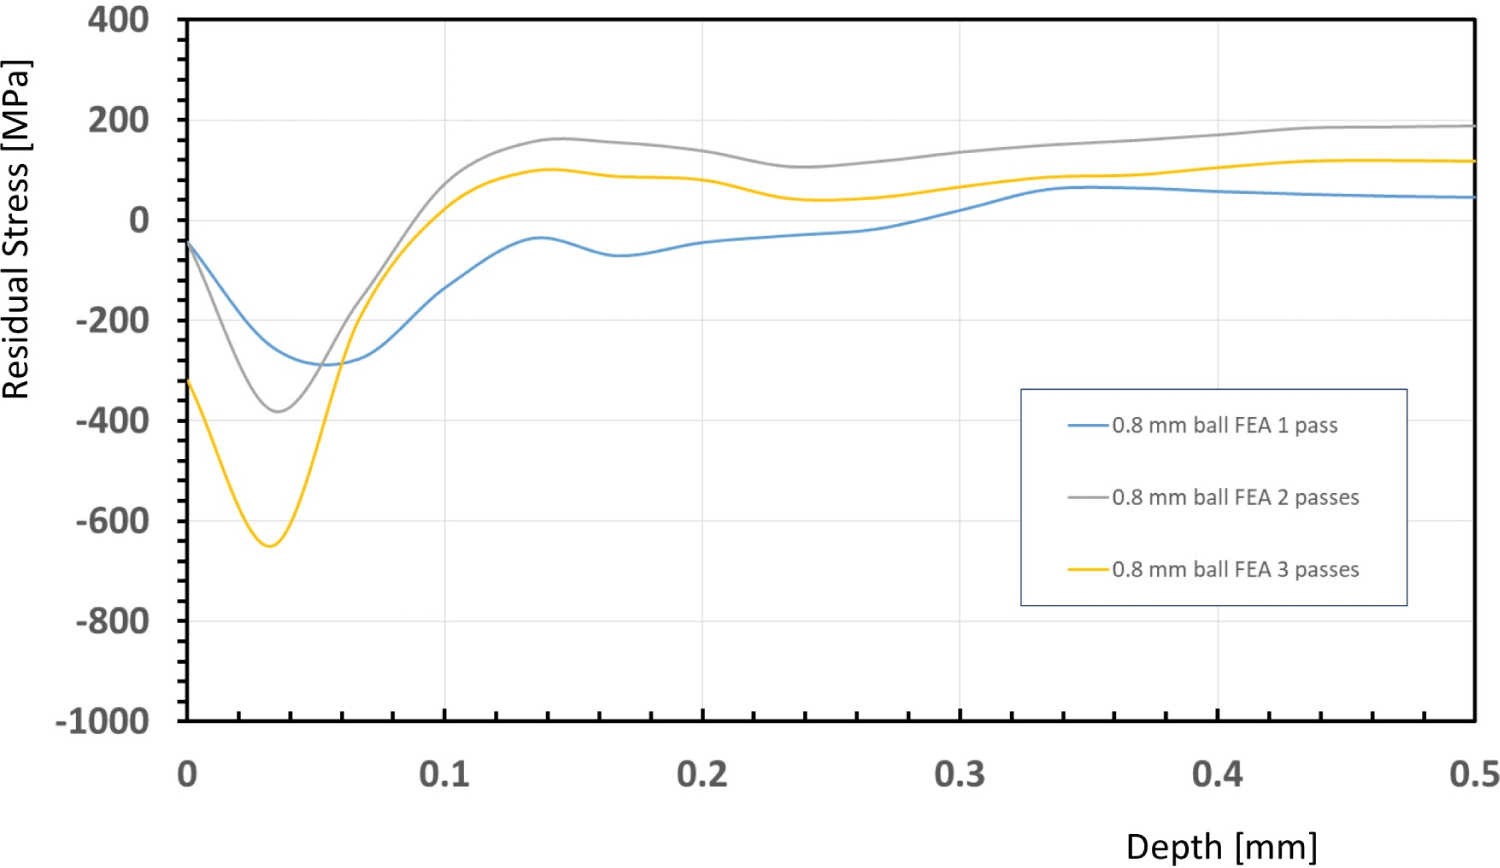
Figure 4: Residual stress computed with finite.....
Residual stress computed with finite element model.
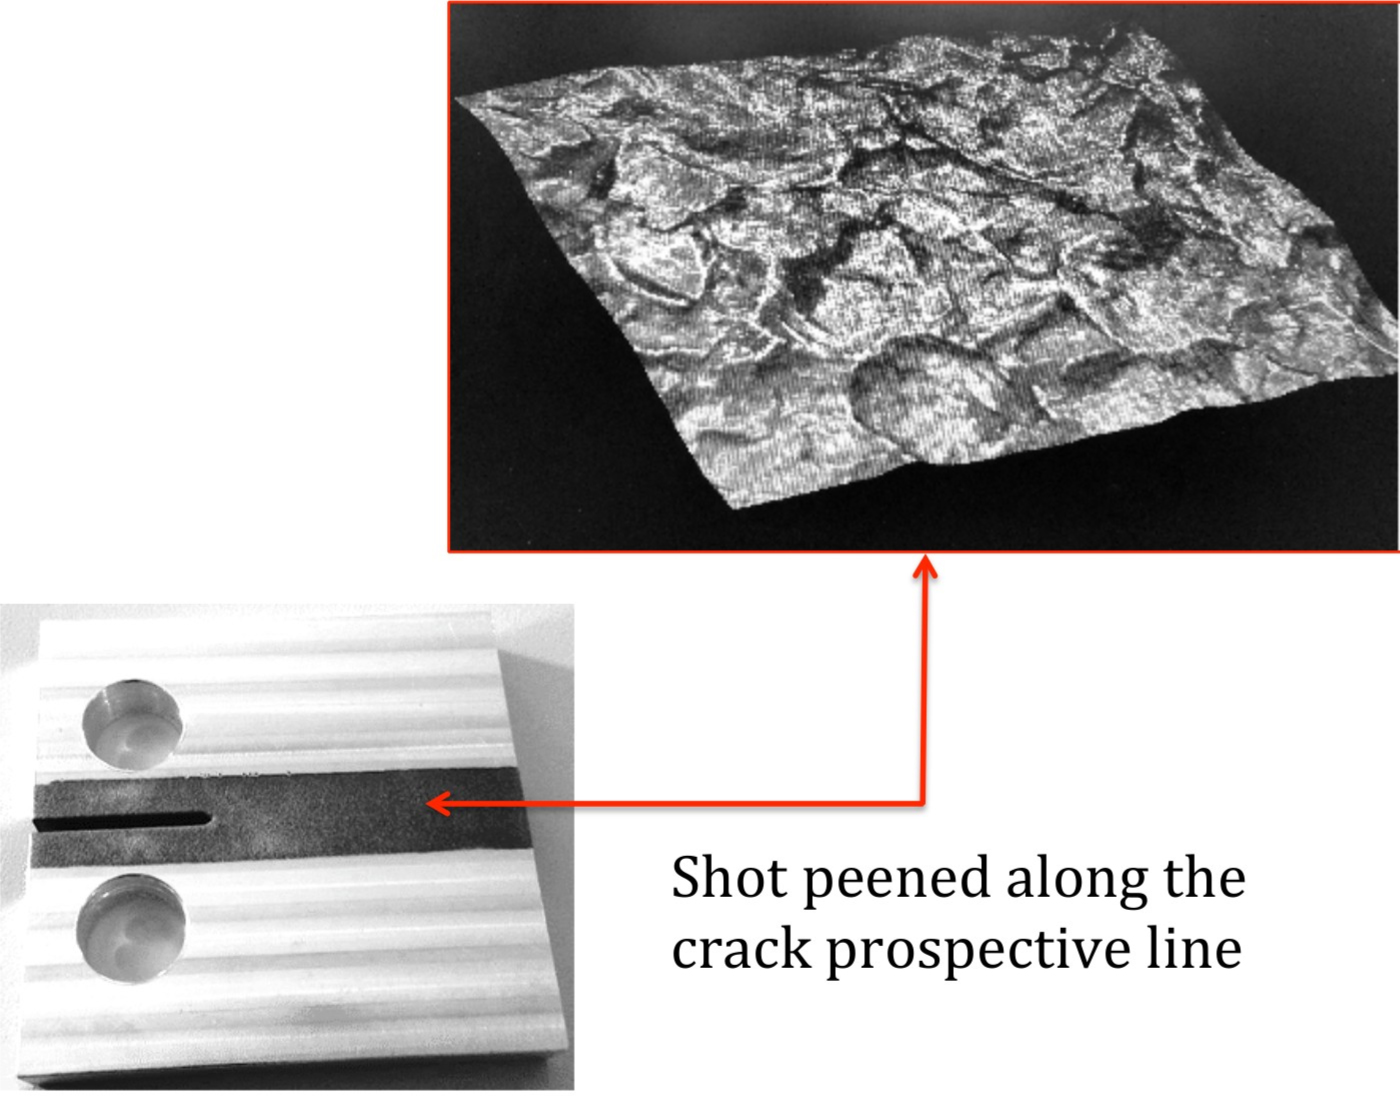
Figure 5: A compact tension sample with shot peening....
A compact tension sample with shot peening along the crack prospective line.
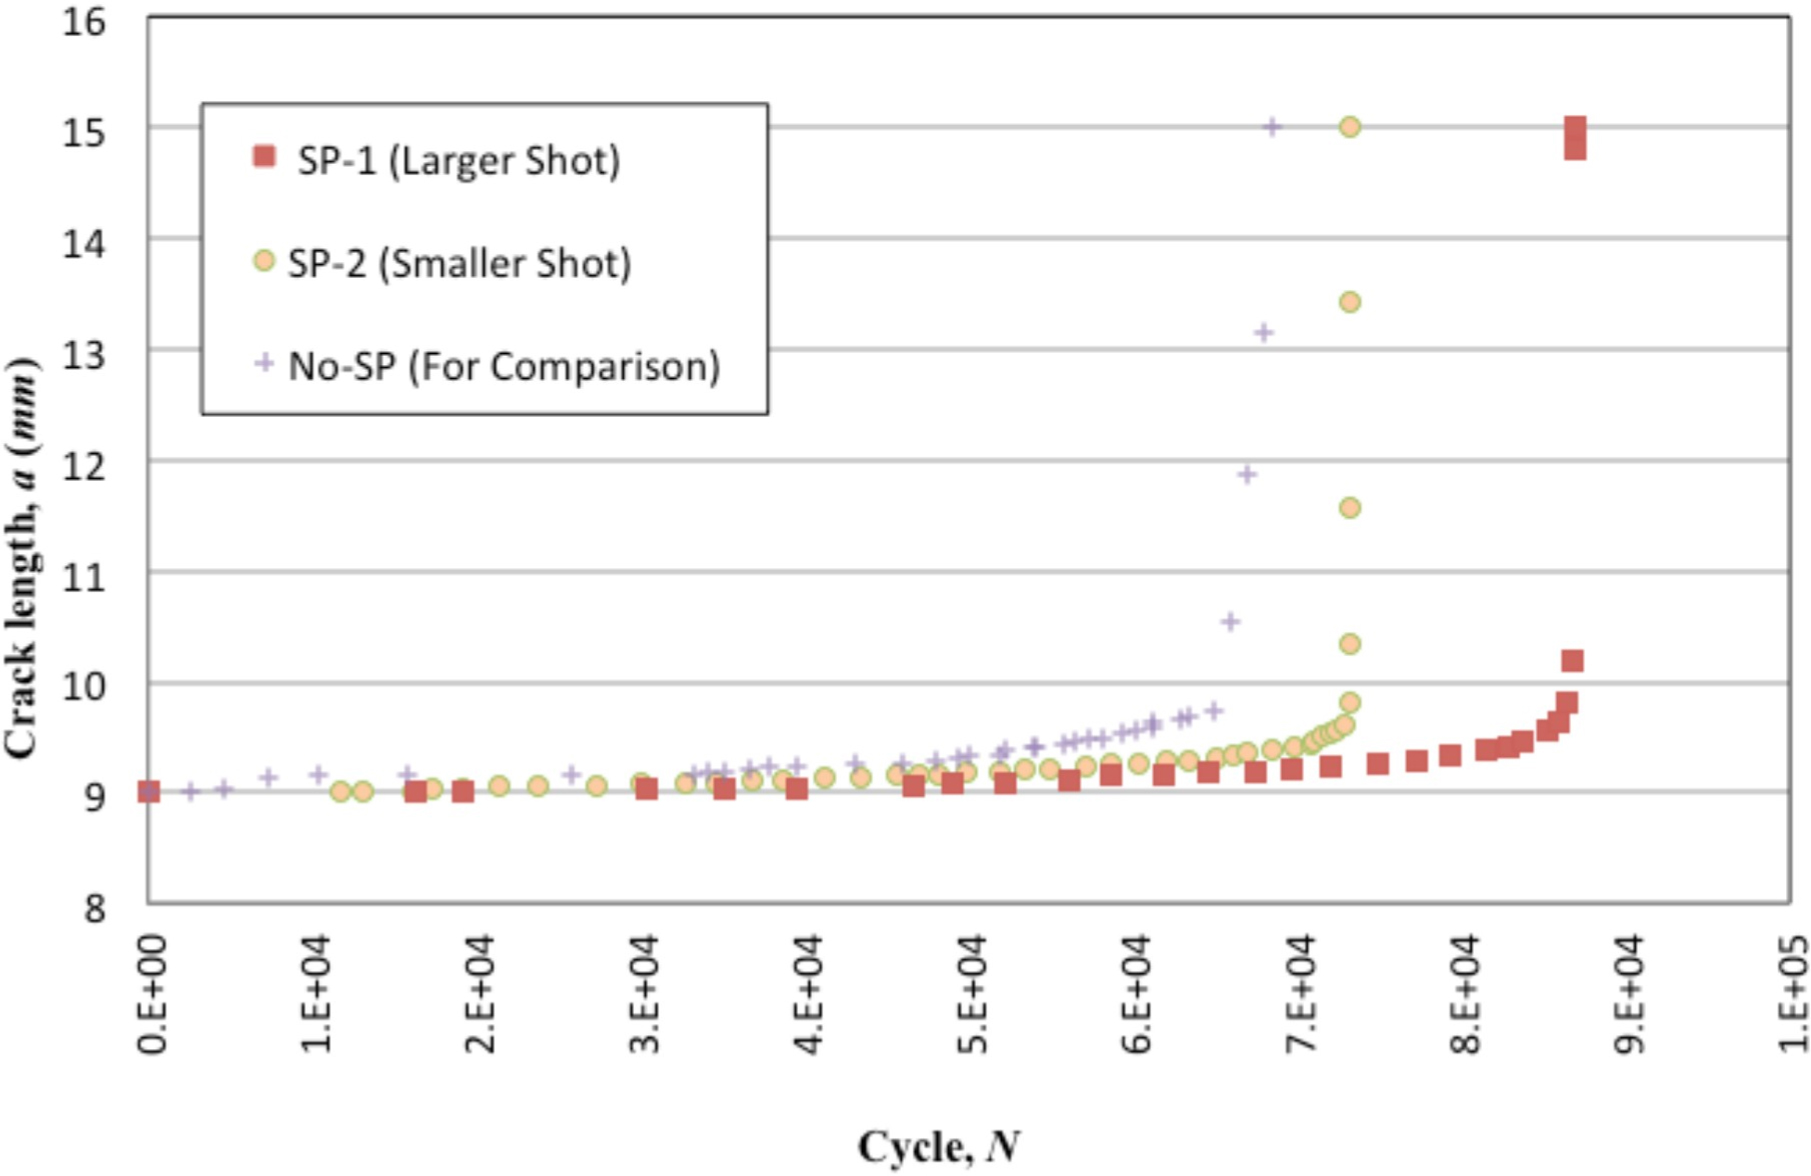
Figure 9: Fatigue crack propagation performed on compact ...
Fatigue crack propagation performed on compact tension sample with shot peening along the crack prospective line at two different shot size.
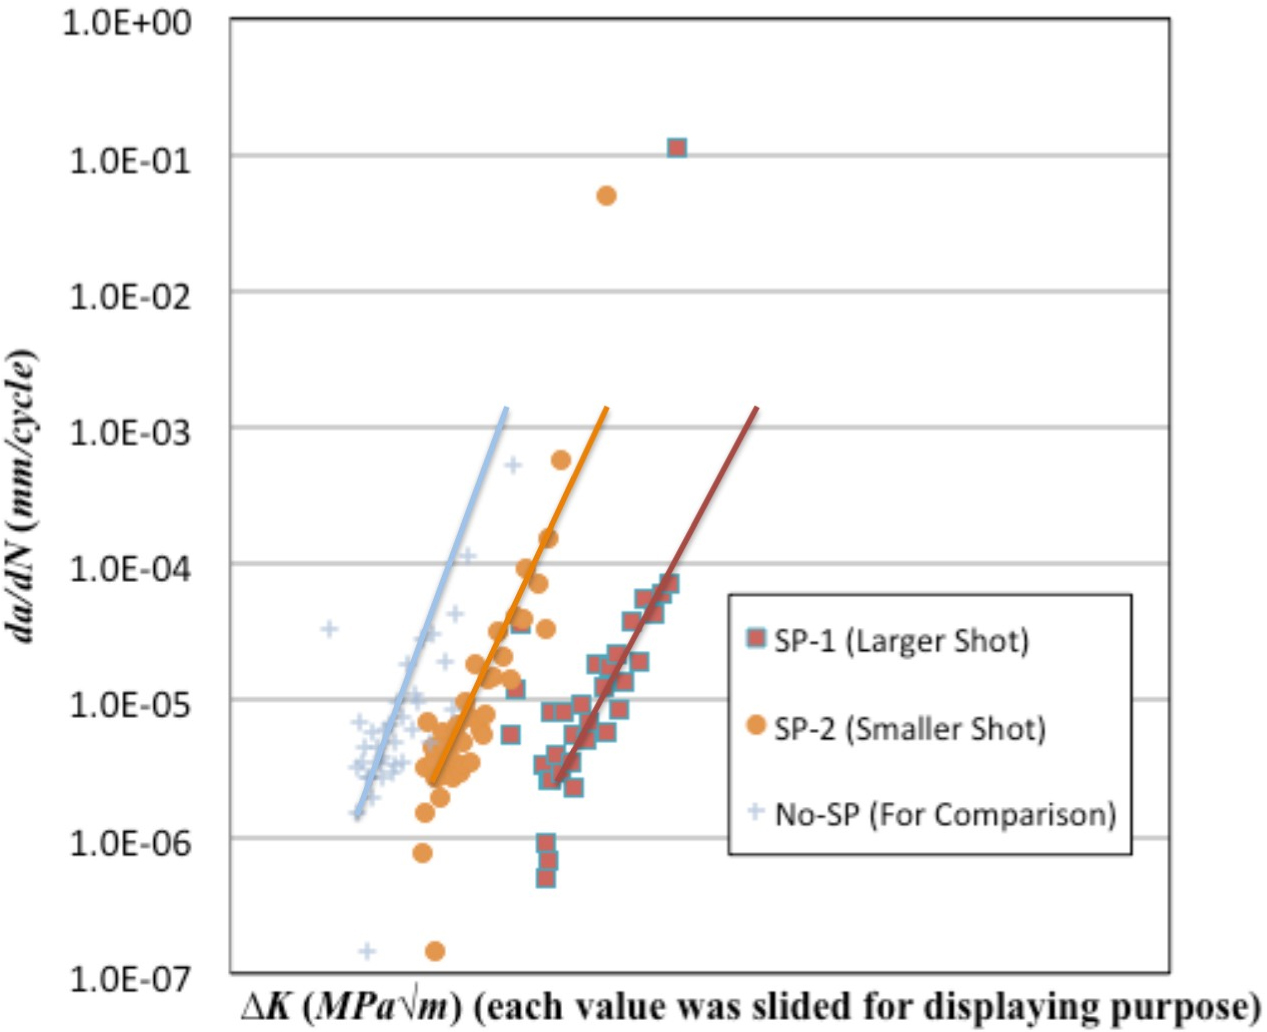
Figure 10: Fatigue crack propagation rate vs. stress...
Fatigue crack propagation rate vs. stress intensity factor.
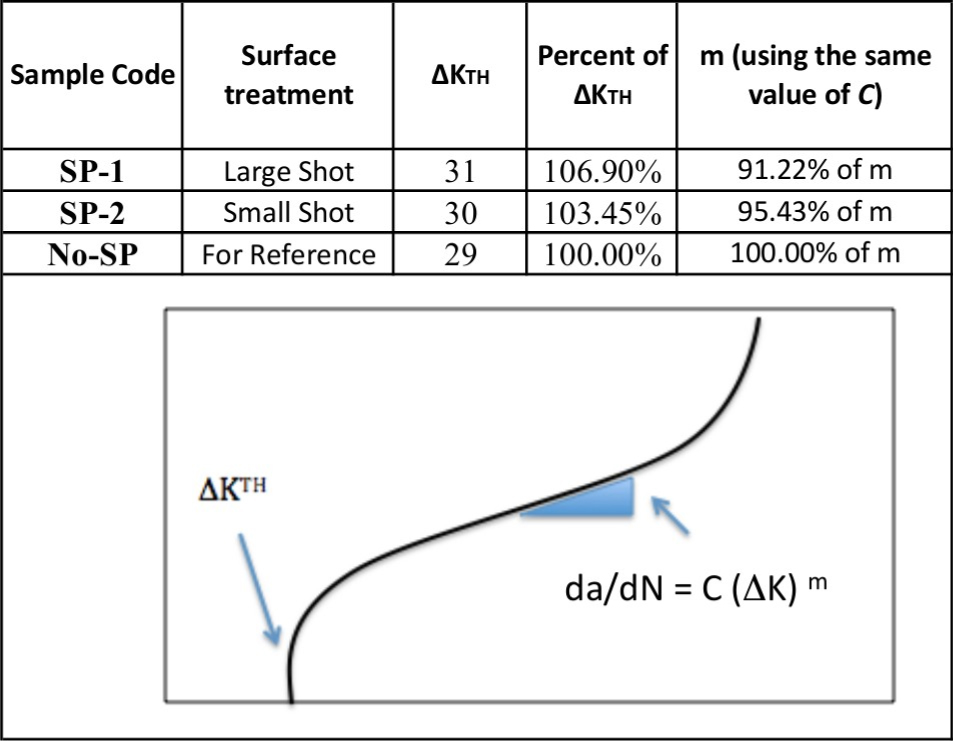
Figure 11: Summary of the Fatigue crack propagation...
Summary of the Fatigue crack propagation evaluation.
References
- S Hashmi (2017) Comprehensive materials finishing. Elsevier.
- S Bagherifard, C Colombo, M Guagliano (2014) Application of different fatigue strength criteria to shot peened notched components. Part 1: Fracture mechanics based approaches. Applied Surface Science 289: 180-187.
- Y Prawoto, P Mazein, A Kosterin, Z Ahmad (2019) Effect of shot size in surface improvement via shot peening; analytical, modeling and experimental approaches. International Journal of Metallurgy and Metal Physics, 4.
- K Takahashi, H Osedo, T Suzuki, S Fukuda (2018) Fatigue strength improvement of an aluminum alloy with a crack-like surface defect using shot peening and cavitation peening. Engineering Fracture Mechanics 193: 151-161.
- Q Yang, W Zhou, Y Zhong, X Zhang, XS Fu, et al. (2017) Effect of shot-peening on the fretting wear and crack initiation behavior of ti-6al-4v dovetail joint specimens. International Journal of Fatigue 107: 83-95.
- N Ferreira, J Ferreira, P Antunes, J Costa, C Capela (2016) Fatigue crack propagation in shot peened al 7475-t7351 alloy specimens. Procedia Engineering 160: 254-261.
- Y Prawoto (2011) Recent trends in fracture mechanics. Nova Science, New York, USA.
- AA Dounde, PR Tanpure, CY Seemikeri (2015) Study of shot peening process and their effect on surface properties: A review. 12: 104-107.
- S Bagherifard, S Slawik (2016) Nanoscale surface modification of AISI 316l stainless steel by severe shot peening. Materials & Design 102: 68-77.
- O Higounenc (2005) Correlation of shot peening parameters to surface characteristic. Icsp9: SHOT PEENING 28-35.
- AA Miftahov, PG Mazein (2006) Modelling of residual stresses at shot peening.
- R Purohit, CS Verma, RS Rana, R Dwivedi, S Dwivedi (2017) Simulation of shot peening process. Materials Today: Proceedings 4: 1244-1251.
- (2014) Standard test method for determining the X-Ray elastic constants for use in the measurement of residual stress using X-Ray diffraction techniques. ASTM E1426, ASTM International, USA.
- (2014) Standard test method for residual stress measurement by X-Ray diffraction for bearing steels. ASTM E2860, ASTM International, USA.
- A Gari'epy, HY Miao, ML'evesque (2017) Simulation of the shot peening process with variable shot diameters and impacting velocities. Advances in Engineering Software 114: 121-133.
- C Bianchetti, D Delbergue, P Bocher, ML'evesque, M Brochu (2019) Analytical fatigue life prediction of shot peened AA 7050-T7451. International Journal of Fatigue 118: 271-281.
- SH Chang, SC Lee, TP Tang (2008) Effect of shot peening treatment on forging die life. Materials Transactions 49: 619-623.
- D Hu, Y Gao, F Meng, J Song, Y Wang, et al. (2017) A unifying approach in simulating the shot peening process using a 3D random representative volume finite element model. Chinese Journal of Aeronautics 30: 1592-1602.
- Y Prawoto (2011) Application of linear elastic fracture mechanics in materials science and engineering. Lulu Enterprise, North Carolina, USA.
- J Rice (1972) Some remarks on elastic crack-tip stress field. International Journal Solids Structure 8: 751-758.
- HF Bueckner (1966) On a class of singular integral equations. Journal of Mathematical Analysis and Applications 14: 392-426.
- HF Bueckner (1987) Weight functions and fundamental fields for the penny- shaped and the half-plane crack in three-space. International Journal of Solids and Structures 23: 57-93.
- HF Bueckner (1989) Observations on weight functions. Engineering Analysis with Boundary Elements 6: 3-18.
Author Details
Yunan Prawoto1*, Zaini Ahmad2 and H Agus Suhartono3
1NHK International Co., 46855 Magellan Drive, Novi MI 48377, USA
2Mechanical Engineering Dept, Universiti Teknologi Malaysia, Malaysia
3Technology Center for Strength of Structures, The Agency for the Assessment and Application of Technology, Indonesia
Corresponding author
Yunan Prawoto, Yunan Prawoto, 1 NHK International Co., 46855 Magellan Drive, Novi MI 48377 USA
Accepted: May 30, 2020 | Published Online: June 01, 2020
Citation: Prawoto Y, Ahmad Z, Suhartono HA (2020) Quantitative Fracture Mechanics Approach to Fatigue Life Improvement by Shot Peening Application. Int J Metall Met Phys 5:054.
Copyright: © 2020 Prawoto Y, et al. This is an open-access article distributed under the terms of the Creative Commons Attribution License, which permits unrestricted use, distribution, and reproduction in any medium, provided the original author and source are credited.
Abstract
Stress intensity factor has been a favorite tool in fracture mechanics due to its simplicity. Here, it is used to study the influence of the shot peening application in fatigue life improvement. Using a CT-specimen, the study of shot peening effect on fatigue life was performed. Here, the compressive residual stress is converted into residual stress intensity factor, Kres.. Together with the applied stress intensity factor, Kapl., the superposition principle can be used. The result of the investigation clarifies quantitatively what has been widely believed that one of the easiest ways to improve fatigue life is by perfecting the surface via shot peening. Compressive stresses are beneficial not only in postponing fatigue crack initiation but also in preventing the crack propagation, which lead to increasing fatigue strength.
Keywords
Shot peening, Stress intensity factor, Residual stress, Fatigue life
Introduction
Shot peening has been believed to be beneficial's for quite some time. It has been used to improve fatigue resistance by introducing compressive stresses onto surface [1]. However, it has been treated too practical in industry without academic and scientific supports. The influence of shot peening to fatigue strength is generally underrated by engineering design codes. The difficulty of defining a general fatigue design approach is the reason, to correctly and quantitatively consider the effect of shot peening, in terms of residual stresses, surface work hardening and surface roughness alteration. The attempt to bring the topics into academics was started by many researchers, e.g., [2-6].
This paper is one of the attempts to layout foundation in the academic field on the issue of shot peening, which within the industrial field is already known for very-very long. Our approach is to use a fracture mechanics concept. It is a mathematical description of the characteristic stress field surrounding any crack in a loaded body. Here, it will be used to accommodate both applied stress and residual stress due to shot peening.
Cracked Body
To explore the characteristics of the stress field surrounding a crack in a loaded body, one can start from the Westergaard function [7]. The Westergaard function is a complex solution to the Airy stress functions. To do this, consider a coordinate system X, Y , Z in a stressed solid. At each point (x, y, z) one can define the stresses σx, σy, σz, τxy, τyz, τzx. Neglecting the body forces, for two dimensional problems, equilibrium equations are:
and
If the displacements in x and y are u and v respectively, the expressions for the strains are:
and the stress-strain relations:
Where E is Young's modulus and v is Poisson's ratio. The above equations are satisfied if:
The function ψ is called the Airy stress function. Substitution of the above equations and differentiating twice leads to the compatibility equation:
or
One can define a complex function by:
For Z to be an analytic function, the derivative dZ/dz must be defined unambiguously. This leads to the Cauchy-Riemann conditions:
In the case of Mode I cracks it is convenient to use a function proposed by Westergaard. The Westergaard function is:
Where and With Cauchy-Riemann equations, it follows that
Which means that Equation (17) automatically satisfies the compatibility equation, which is Equation (12). By using equilibrium equation the stresses can be determined as:
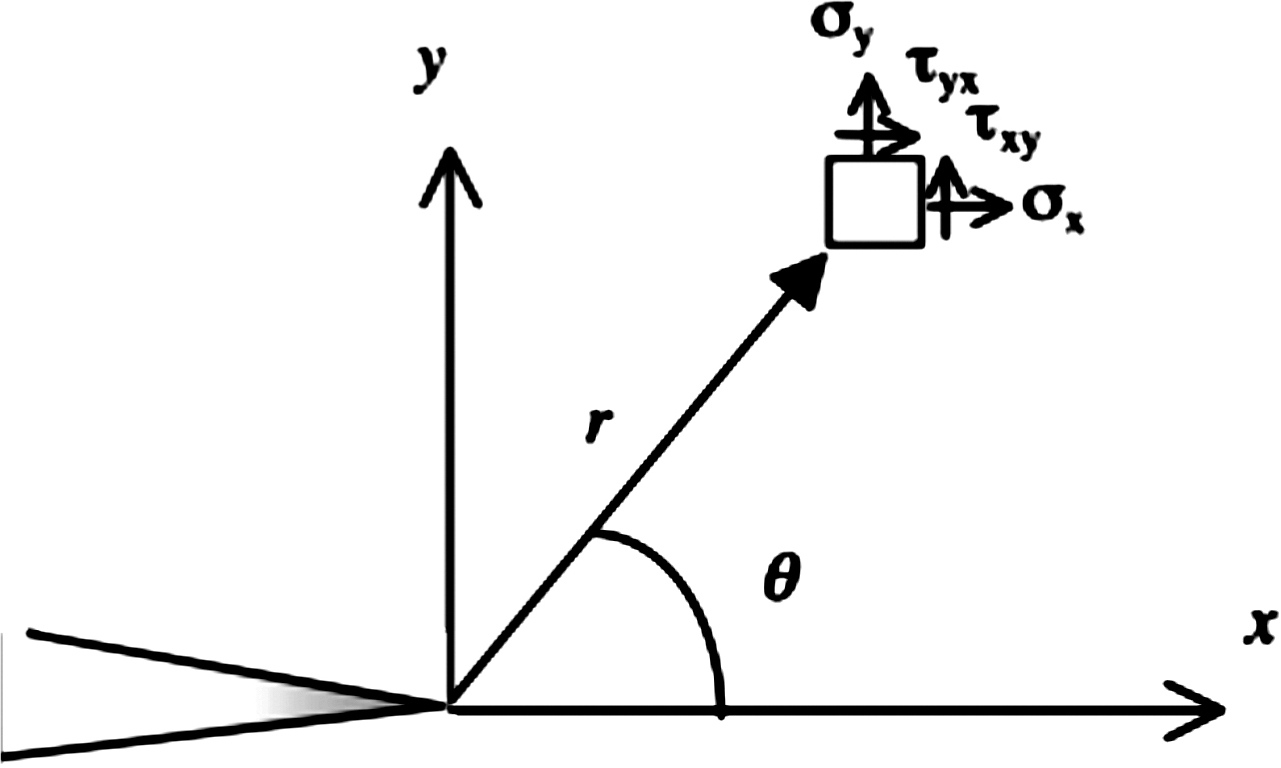
Any analytic function will result in stresses defined by the equations above. For a crack problem of Figure 1, representing an infinite plate under biaxial stress, the stress function is:
Where The function is analytic except for -a ≤ x ≤ a, y = 0. The boundary stresses follow from Equations (19, 20 and 21). At infinity, where the result is σx = σy = σ and τxy = 0, and on the crack surface σy = τxy = 0, which means that the boundary conditions are satisfied.
It is more convenient to convert to a coordinate system with the origin at the crack tip, hence z should be replaced by (z + a). Turning to the general problem, which is shown in Figure 2, that has the form:
According to our boundary conditions, both σy and τxy are zero at the crack surface. The required real and constant value of f (z) at the crack tip is given by the notation KI, hence
Taking polar coordinates from the origin with the stress at the crack tip can be calculated from compatibility equations to be:
The general expression of these is usually also written as:
Where r and θ are the polar coordinates of a point with respect to the crack tip. The parameter KI in these equations is known as the stress intensity factor. The stress intensity factor is then a measure for the stress singularity at the crack tip. Since the stresses are elastic they must be proportional to the external load. For the case of uniaxial tension with σ → ∞, it means that KI must be proportional to σ. In order to give the proper dimension to the stresses in Equation (25), KI must also be proportional to the square root of a length. For an infinite plate the only characteristic length is the crack size, hence KI must take form of:
Comparison of Equation (24) and the above equation shows that
The stress system parallel to the crack is not disturbed by the crack. Therefore, the solution for the uniaxial case must be the same as for the biaxial case.
However, for finite sized plates there are no closed form solutions available. For practical engineering use, the general equation for the stress intensity factor at the crack tip is
Where β is a dimensionless constant, which depends upon geometry as The factor β has been calculated for many geometries and can often be obtained from various fracture mechanics literatures and standards.
Shot Peening
Shot peening has been used for decades as a measure to overcome surface engineering problems in various industries. Its improvements are produced mainly by combinations of compressive residual stress and cold work. Compressive residual stresses are known to be beneficial in increasing resistances to fatigue failures and corrosion fatigue, while the cold work effects of shot peening treatments can increase the surface hardness of many materials [8]. It is believed to be the most economical and effective method of producing and making surface residual compressive stresses to increase the product life of treated metal parts. The increased strength of treated parts allows for lighter-weight parts that exhibit high wear and fatigue resistance. In some cases, shot peening induced grain refinement, martensitic phase transformation and compressive residual stresses and therefore, enhances mechanical properties in terms of hardness and work hardening. The induced compressive residual stresses are expected to play major role in reducing crack propagation rate, while the surface work hardening related to grain refinement and phase transformation can promote a higher resistance towards crack initiation enhancing crack growth threshold [9].
The process can be defined as work hardening to the surface of components by propelling streams of spherical shots to the surface. The surface layer of material yields plastically to generate residual compressive stress. Among the practitioners, it has been known well that many parameters influence the efficiency of shot peening process. These are the peening coverage, saturation, shot material, shot size, speed, and peening time [8,10].
Analytical Solution and FEA Modeling for Shot Peening Application
While the whole complete report on this topics is already published previously by our research group [3,11], here the main result is represented. We developed a model by solving the problem for a single impact of a ball on a half-space. The FEA modeling was conducted using the nonlinear finite element (FE) code LS-DYNA 971. A model of the workpiece surfaces was developed using a constant stress solid element formulation which suitably models the impacted surface response of the workpiece. In a way it is similar to that of Purohit's [3,12] with multiple shot balls.
The finite element discretization of the shot peening simulation is depicted in Figure 3. Shot peening loading was simulated by defining an impact velocity of 90 m/s to the impacting balls over a three repeated impact loading. Figure 4 shows the result of the FE models. One can see that as the number of the pass increases, the maximum compressive residual stress also increases.
Experiment
The shot peening application was conducted by shot peening on two different CT-specimens, namely sample SP-1, which has larger shot and sample SP-2, which has smaller shot size. Figure 5 shows the sample. The shot peening was only given at crack prospective line.
For the residual stress measurement, an X-ray diffraction (XRD) was used. The macroscopic residual stress and information related to the degree of cold working can be obtained simultaneously by XRD methods. XRD is applicable to most polycrystalline materials, metallic or ceramic, and is non-destructive at the sample surface. XRD methods are well established, having been developed and standardized, E.g. [13,14].
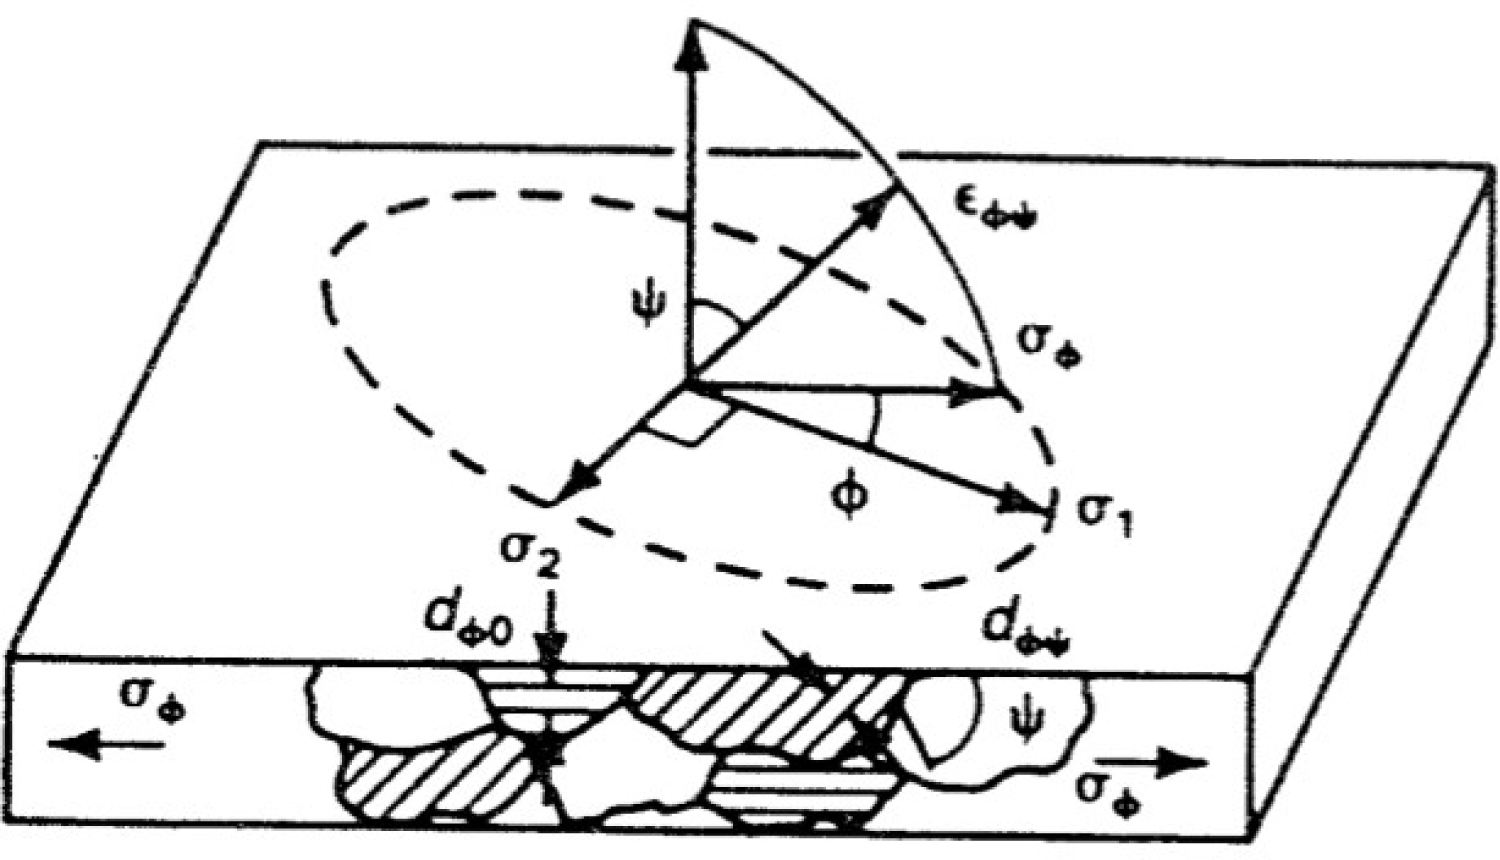
Because the depth of penetration of the X-ray beam is extremely shallow, the diffracting volume can be considered to represent a free surface under plane stress. As shown in Figure 6, the biaxial surface stress field is defined by the principal stresses, σ1 and σ2, with stress normal to the surface = 0. The stress to be determined is the stress, σφ, lying in the plane of the surface at an angle, φ, to the maximum principal stress, σ1. The direction of measurement is determined by the plane of diffraction. The stress in any direction (for any angle, φ) can be determined by rotating the specimen in the X-ray beam. If the stress is measured in at least three different directions, the principal stresses and their orientation can be calculated.
Consider the strain vector, εφψ, lying in the plane defined by the surface normal and the stress, σφ, to be determined. εφψ is at an angle ψ, to the surface normal, and can be expressed in terms of the stress of interest and the sum of the principal strains as,
The only crystals which diffract X-rays are those which are properly oriented relative to the incident and diffracted X-ray beam to satisfy Bragg's Law,
Where λ is the X-ray wavelength, n is an integer (typically 1), θ is the diffraction angle, and d is the lattice spacing. Subsequently, the measured strain is
Where d0 is the stress-free lattice spacing.
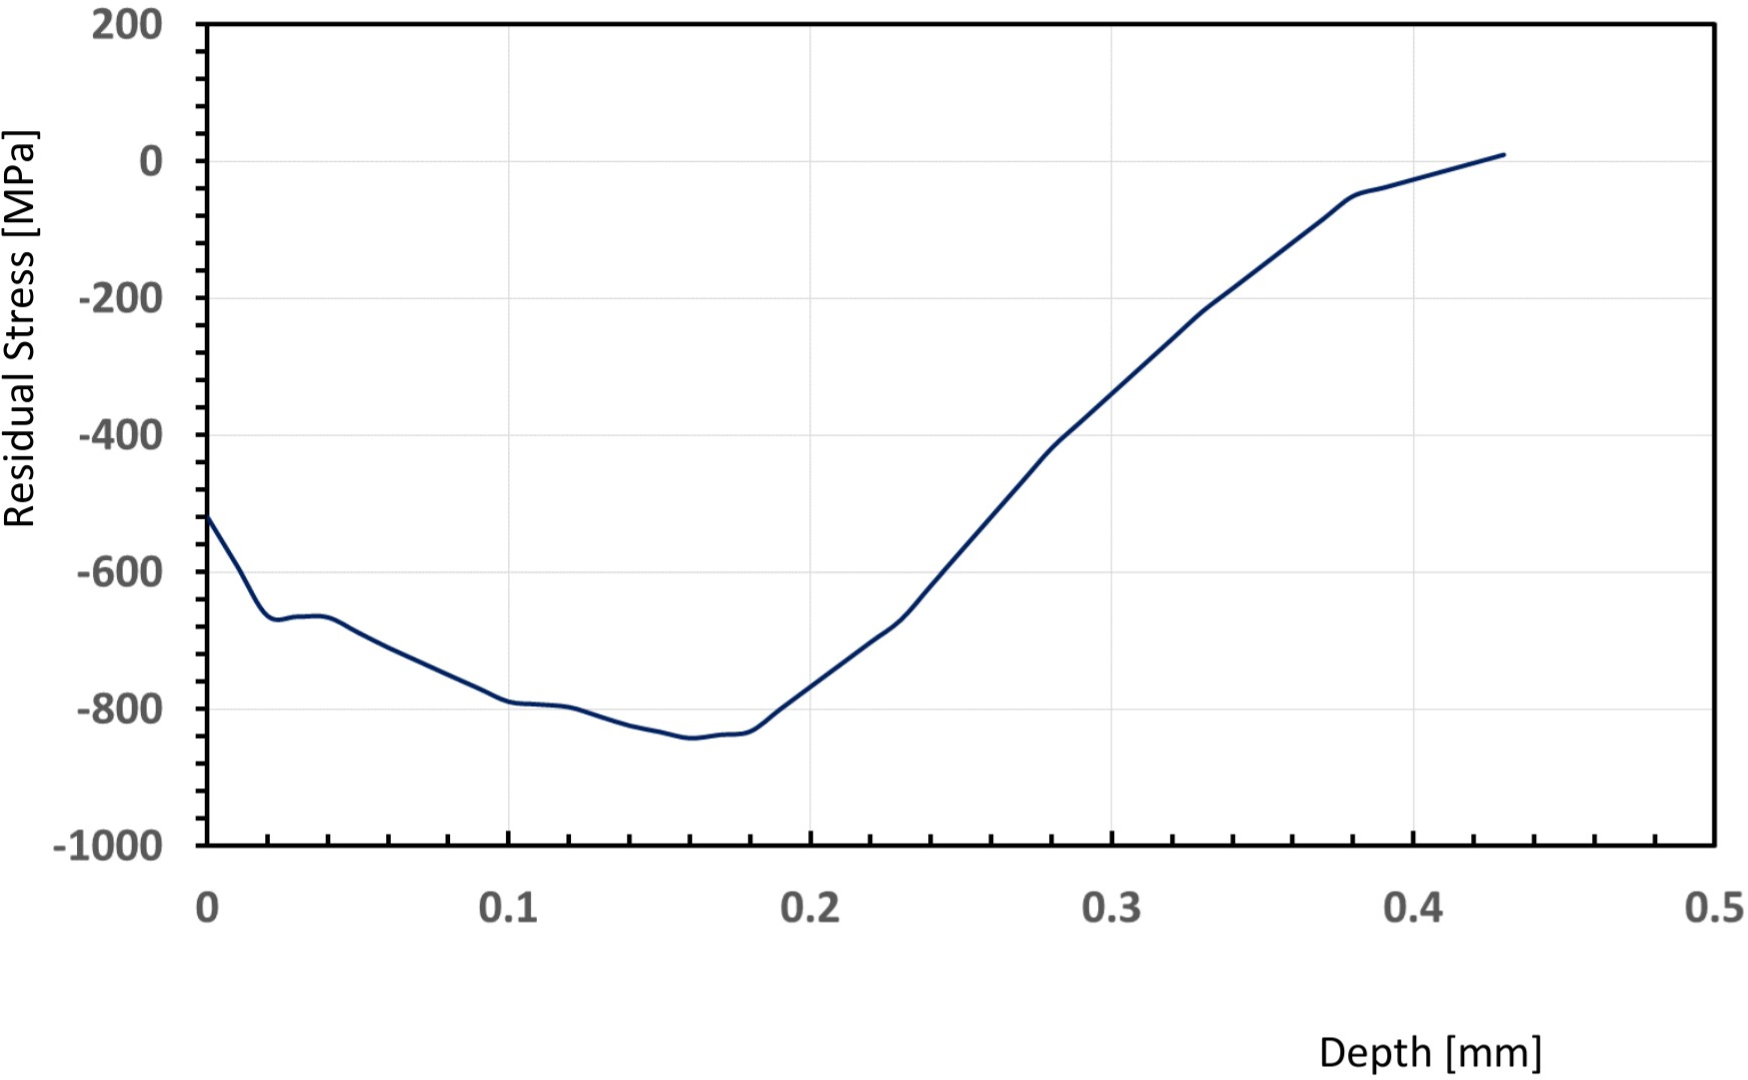
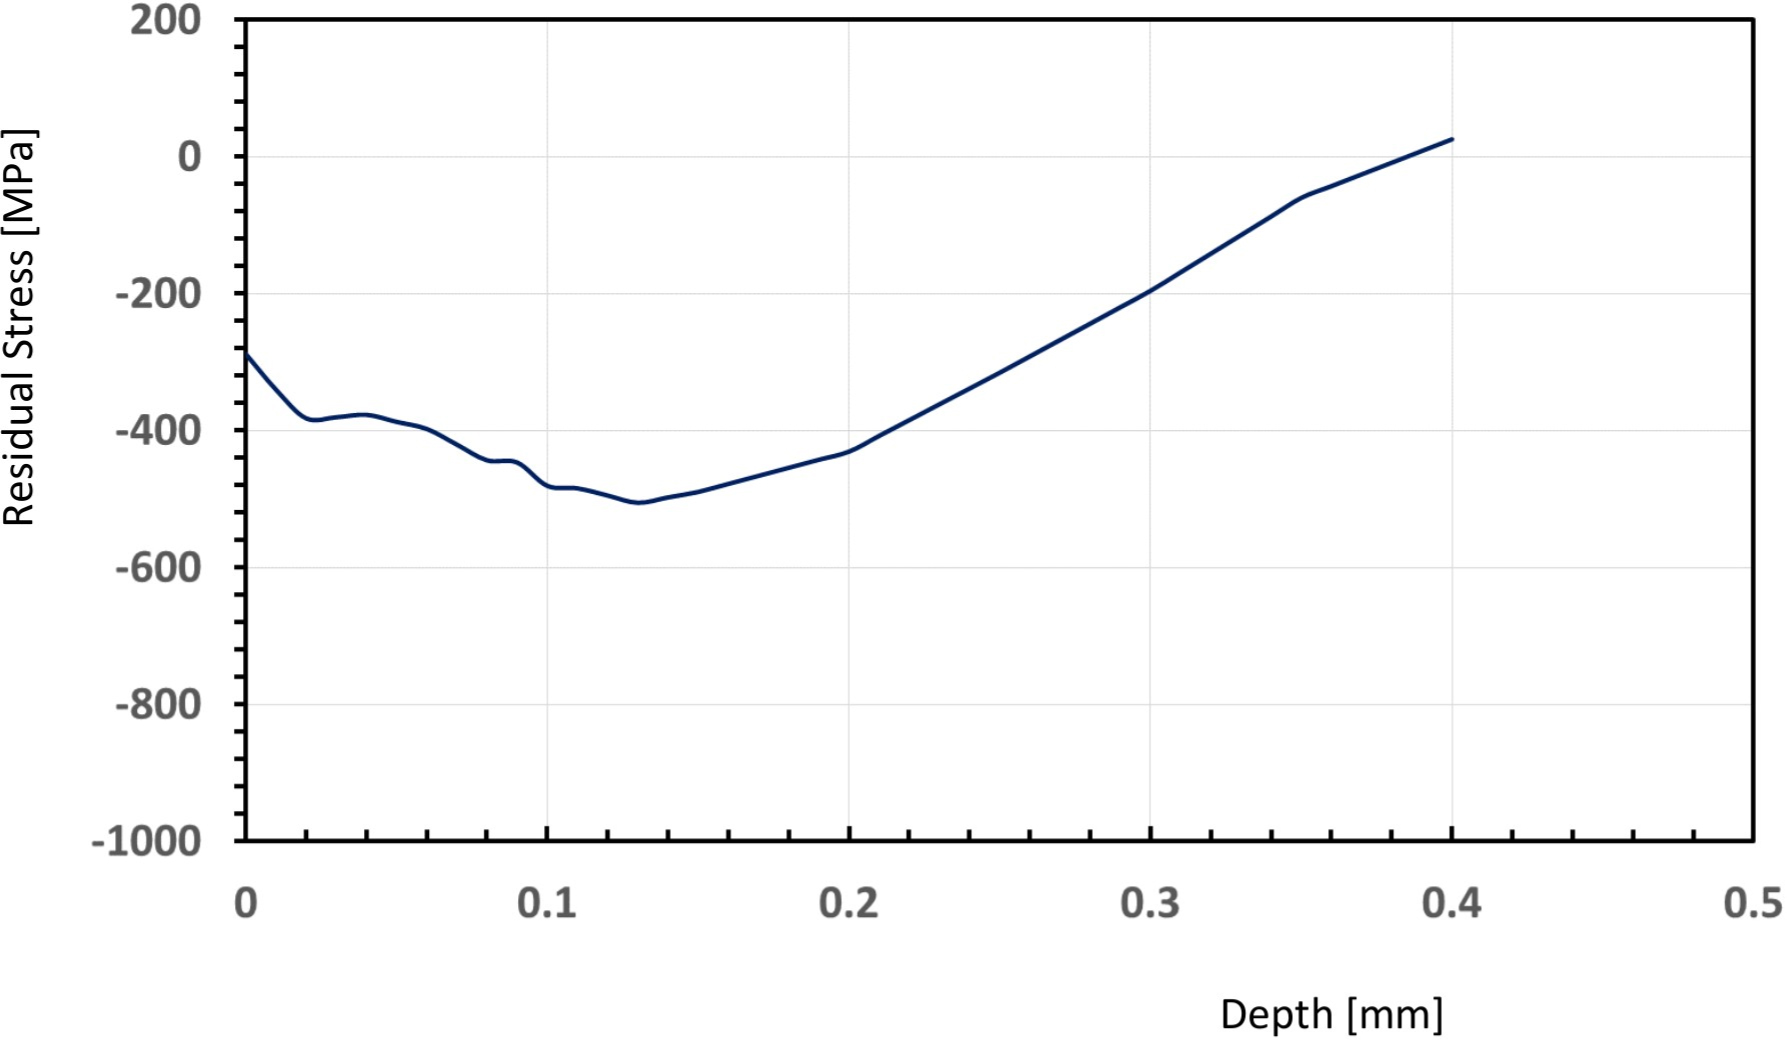
Using the concept highlighted above, the samples were then profiled with an X-ray diffraction device. Figure 7 and Figure 8 show the results. This trend is similar with both the analytical and finite element results as well as the finding of other researchers [15].
The CT-specimen were tested with the frequency of 40 Hz and the lengths were recorded electronically with occasional scope verification. Figure 9 shows the result. It is clear that both SP-1 and SP-2 have much longer time to break. The same data was than processed to construct Figure 10. In this figure, it is more obvious that SP-1 and SP-2 also have lower crack propagation rate.
Discussions
The attempts to bring the mostly industrial concept of the shot peening to academic world is not unique [10,12,16-18]. Our approach is unique due to the work that we did was from very fundamental solid mechanics approach [3], continued to fracture mechanics.
On the residual stress creation
Figure 7 and Figure 8 show the results of actual residual stresses after shot peening with different shot sizes. It is easy to understand that the larger shot size produces deeper and larger compressive residual stress as we discussed in our previous publication [3]. Analytically, we proved that residual stress on the material is
Where - load stresses and - discharged stresses, obtained from the elastic solution. The first term of load stresses is indeed caused by the shot impact, which is needless to say influenced by the shot size.
On the crack initiation
Figure 9 shows the result of the fatigue crack initiation and fatigue crack propagation test. In the figure, the time when the crack start to deviate from the base line is an indication of the crack initiation. The figure shows that the sample with no shot peening already cracked in less than 10,000 cycles, while the sample shot peened with small shot size developed crack in approximately 15,000 cycle. This means that the shot peening delays the crack initiation significantly. The sample that was shot peened with larger shot size in this experiment was found to even postpone the crack initiation until 20,000 cycle. This is also reflected as increasing the threshold stress intensity factor as summarized Figure 11.
The shot peening has a very localized effect near the surface, which results in the introduction of compressive residual stresses, the propagation of cracks will be affected only in these areas. The shot peening increases the retardation of the surface crack propagation observed for small crack length that can be caused by residual stresses profile. This effect seems to increase near the threshold condition has also been verified by other researcher [6].
On the crack propagation
Fatigue crack propagation is typically the closest to be evaluated with stage II in the Paris curve. Figure 10 show the result of the fatigue crack propagation test. It is also summarized in Figure 11. Fundamental Paris law consists of C and m constants. Clearly the slope of the Paris law for shot peened samples are lower than that of non-shot peened sample, assuming the same value of m. Likewise, the value of the m reduces as the constant C is assumed constant. Since Paris law is purely derived based on empirical model, it does not have any significant metallurgical meaning in here besides the fact that it lower the slope. In here, since mathematically, since the constant C in Paris law is simpler to be maintained, based on the following reason, the data is presented in term of m reduction.
or
Where m is directly related to the slope.
On quantitative fracture mechanics
For this, the concept of the weight function is used. The method is simple and can be applied to any shape of sample with any type of stress. In here, the application of the weight function in fracture mechanics is briefly described. Further discussion is available elsewhere [19]. Bueckner and Rice [19-23] introduced the concept of the weight function (WF), which enable one to calculate the stress intensity factor (SIF) for certain loading system by using a reference SIF for different loading system. A WF exists for any crack problem specified by the geometry of the component and a crack type. If this function is known, the SIF can be obtained by simply multiplying this function by the stress distribution and integrating it along the crack length. Basic Relations: A crack of length a in a body may be loaded by tractions T acting normal to a curve Γ, see Figure 12.
The tractions are responsible for a stress field at the crack tip, which can be characterized by a SIF KT, where the superscript T refers to the loading system. As Bueckner and Rice [19-23] has suggested one can write
Where m is the vector of the WF, and WF is related to the displacement field u, under an arbitrary reference load by
With H = E for plane stress and E/(1-ν2) for plane strain. Kref is the SIF for the chosen reference loading case. In most practical cases of the mode I, the stresses along the crack prospective line are of interest, see Figure 13.
Therefore, referring to Figure 13, the distribution of the stress perpendicular to the crack area in the uncracked component along the location of the crack, σ(x), the SIF for this stress distribution is given by
Therefore, the WF depends only on the m, which is essentially independent of the stress state and depends only on the geometry. In our situation here, the value of the residual stress is constant. This makes the relation to stress intensity factor simple. Therefore, it is not difficult to imagine that compressive residual stress in this case indeed work directly like compressive applied stress. Consequently, the superposition principle also applies.
Where the subscripts use here are self-explanatory.
Conclusions
Fracture mechanics was used to quantitatively analyze the effect of shot peening on fatigue life. The finding is that shot peening extend the fatigue life by both increase the stress intensity factor threshold and also lower the slope on stage II. Increasing the threshold means delaying the crack initiation while lowering the slope on stage II means lowering fatigue crack propagation until the crack becomes unstable. Within the limit of our evaluation, we also concluded that larger shot size is more effective than that of smaller shot size.
Acknowledgment
All authors contributed equally to this work. All authors discussed the results and implications and commented on the manuscript at all stages. Part of the work was performed during the first author's stay as a professor at the South Ural State University, Russia.


