International Journal of Metallurgy and Metal Physics
(ISSN: 2631-5076)
Volume 6, Issue 1
Research Article
DOI: 10.35840/2631-5076/9268
Exhaustion Life Influence in Laser-Shock-Peened and Gustoes on Fastener Hole of AHSS-DP350/600
BAIDOO Philip1,2*, WANG Yun1, Nyaaba Nsoh Stanislaus2, Nworu Chibudo Kenneth2, KWABENA Offeh Gyimah2 and JAMES Kwesi Quaisie1
Table of Content
Figures
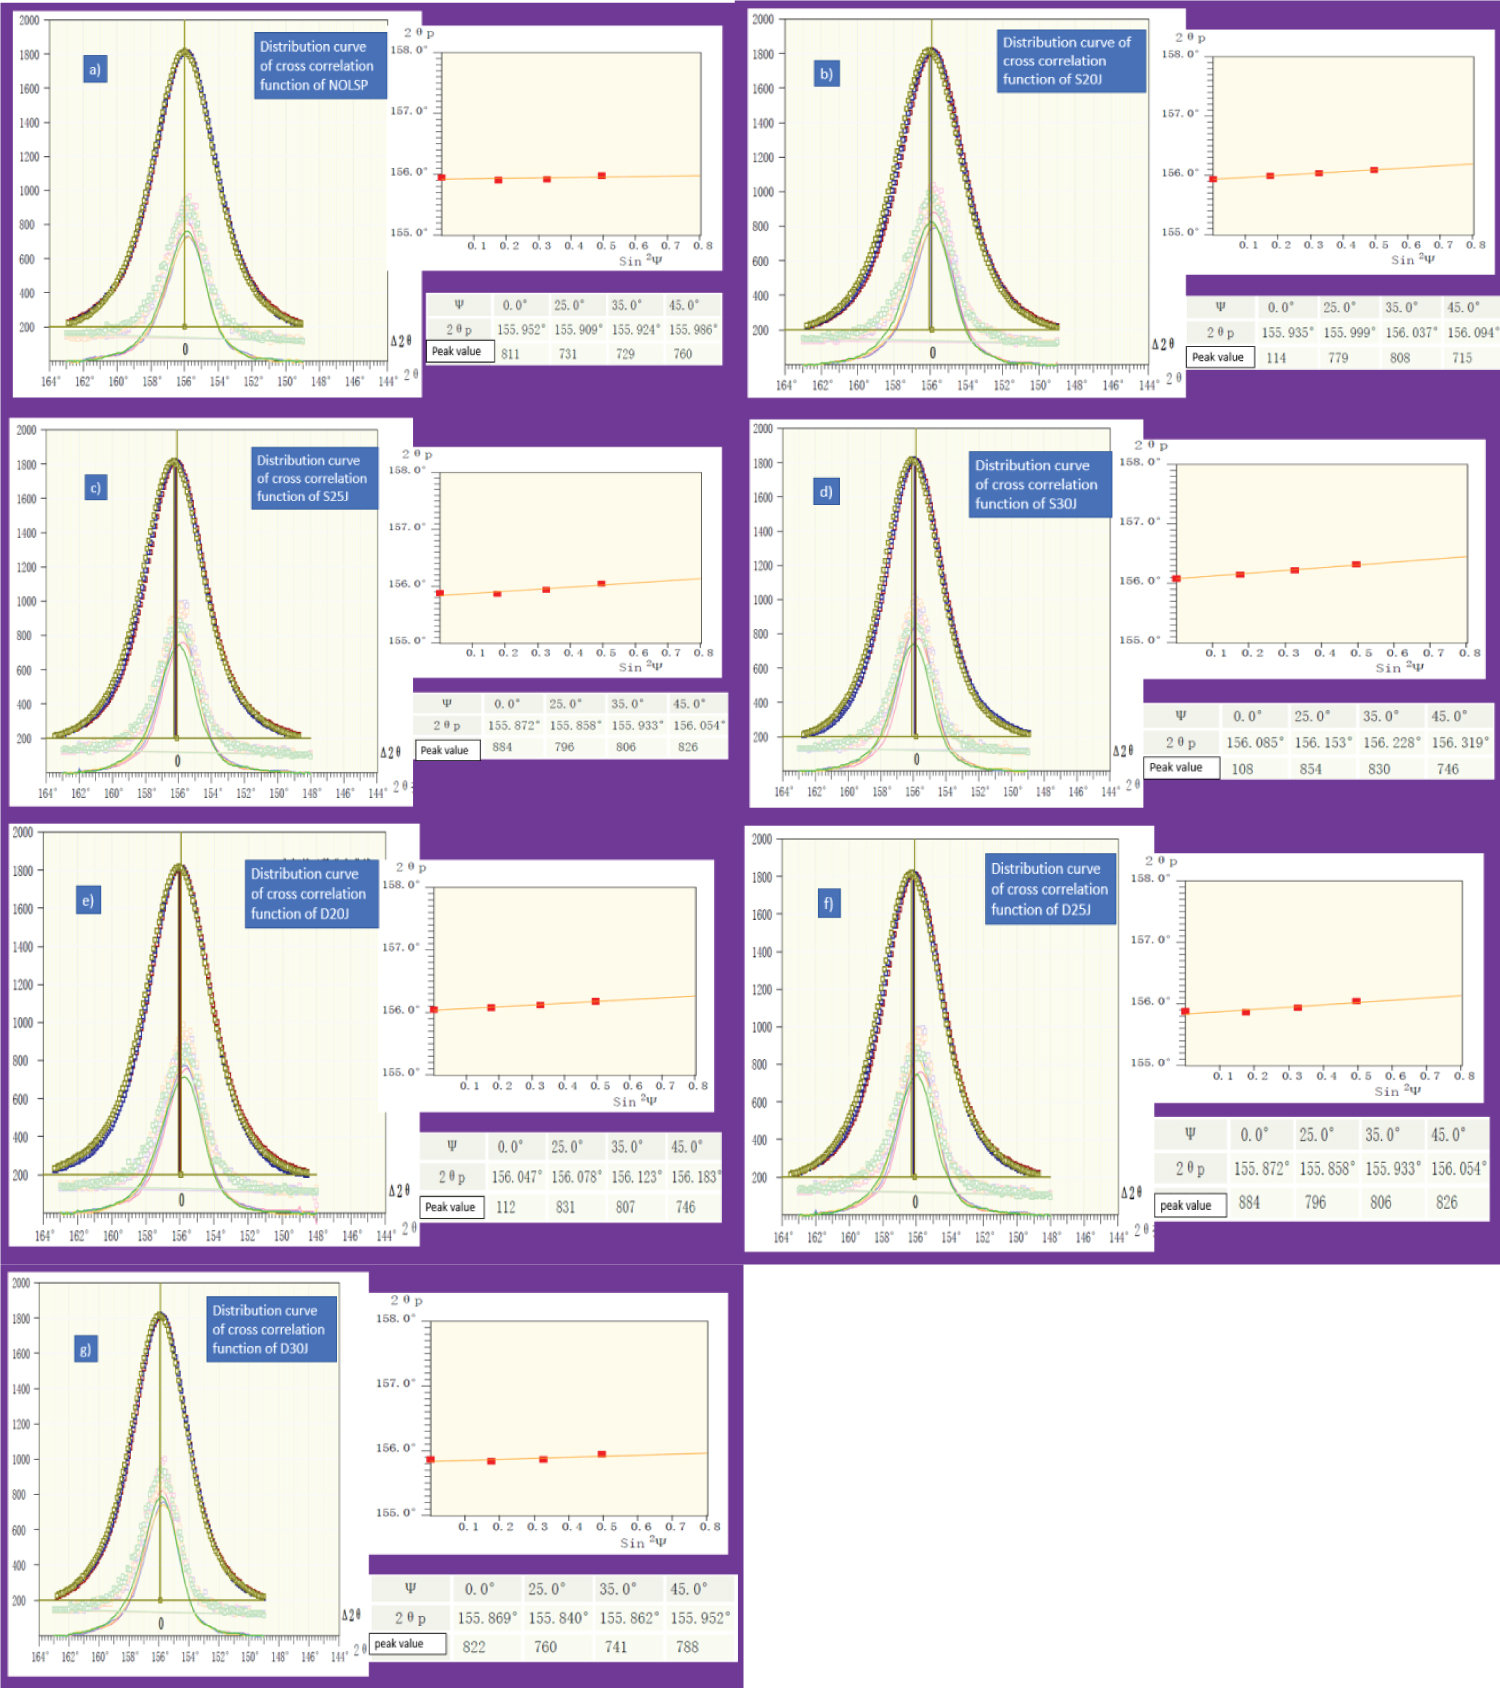
Figure 3: X-Ray diffraction analyzer distribution....
X-Ray diffraction analyzer distribution curve cross-correlation function and peak paths: a) NOLSP; b) S20J; c) S25J; d) S30J; e) D20J; f) D25J and g) D30J.
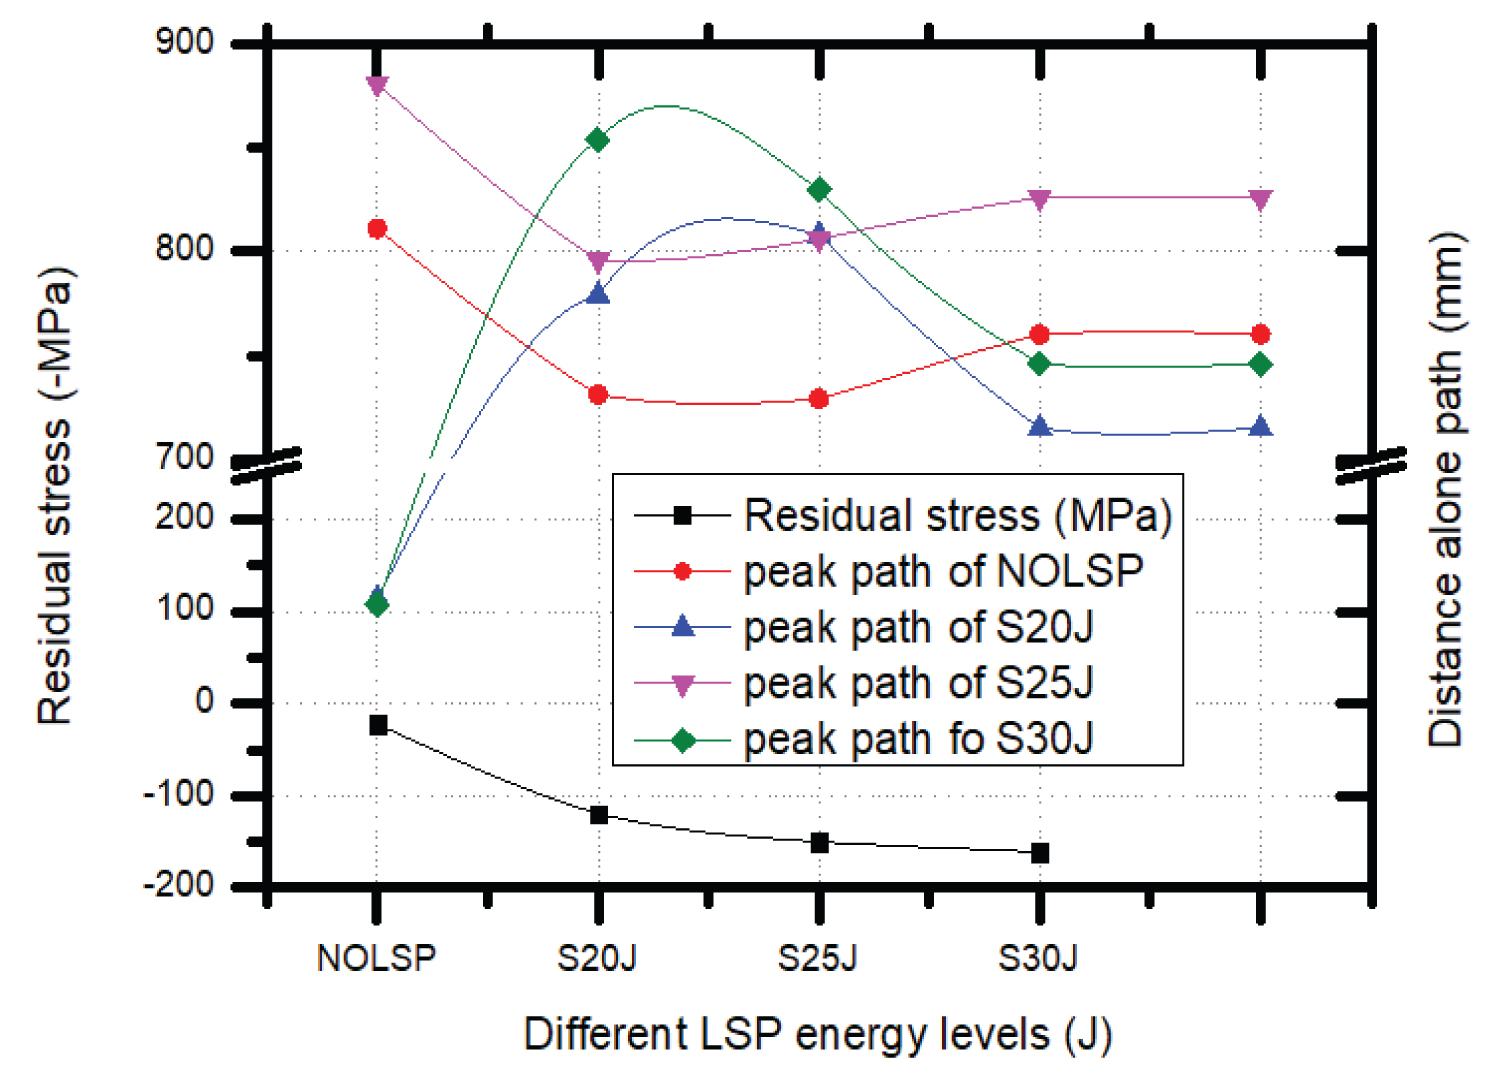
Figure 4: Residual stress and different LSP....
Residual stress and different LSP energy levels on one-sided samples.

Figure 5: Residual stress and different LSP....
Residual stress and different LSP energy levels on double-sided samples.

Figure 6: Hardness test of with and without....
Hardness test of with and without LSP against different energy levels.
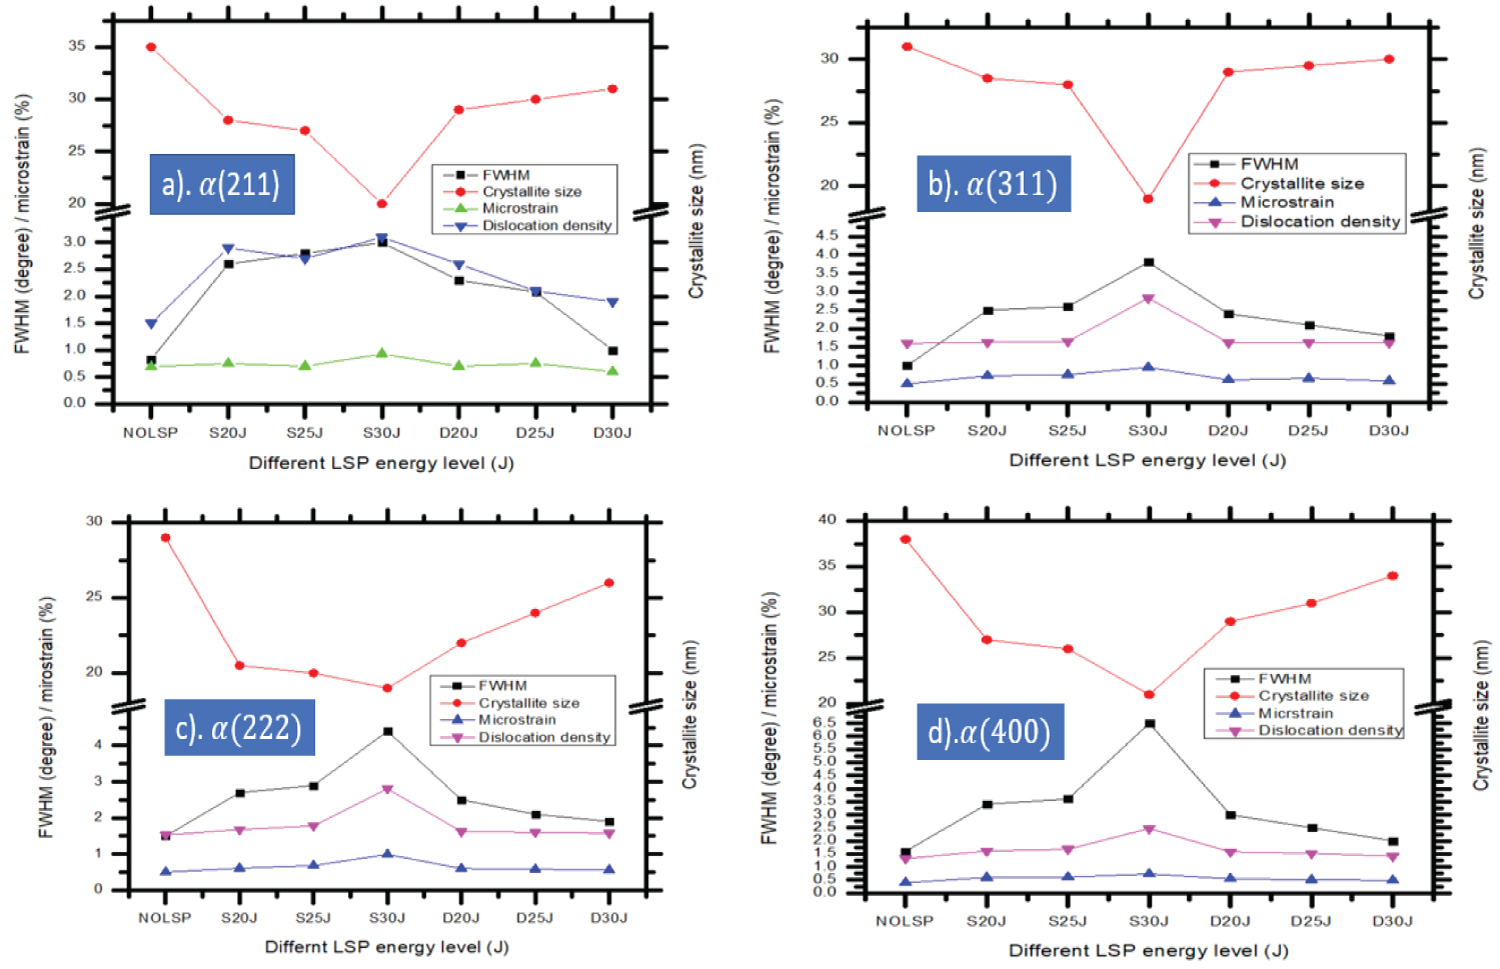
Figure 7: FWHM, microstrain, crystallite size...
FWHM, microstrain, crystallite size, the dislocation density of AHSS-DP 350/600.
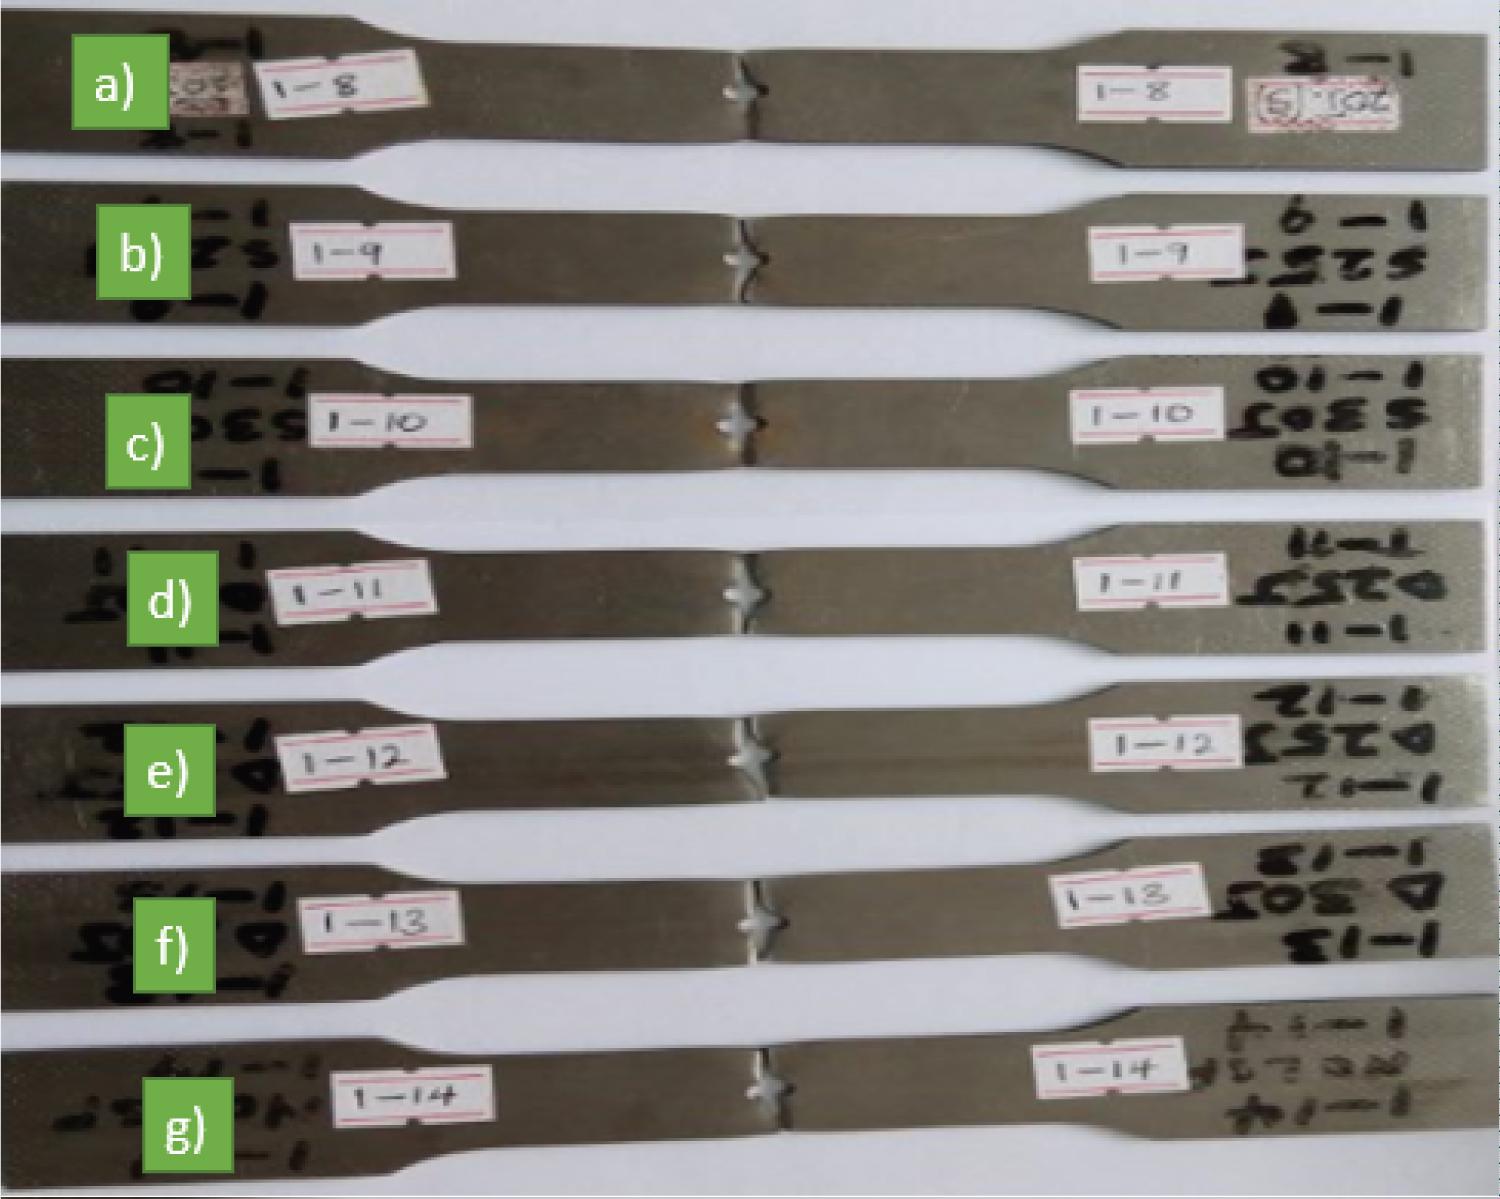
Figure 8: Images of material with and without...
Images of material with and without LSP after fracture: a) NOLSP; b) S20J; c) S25J; d) S30J; e) D20J; f) D25J; and g) D30J.
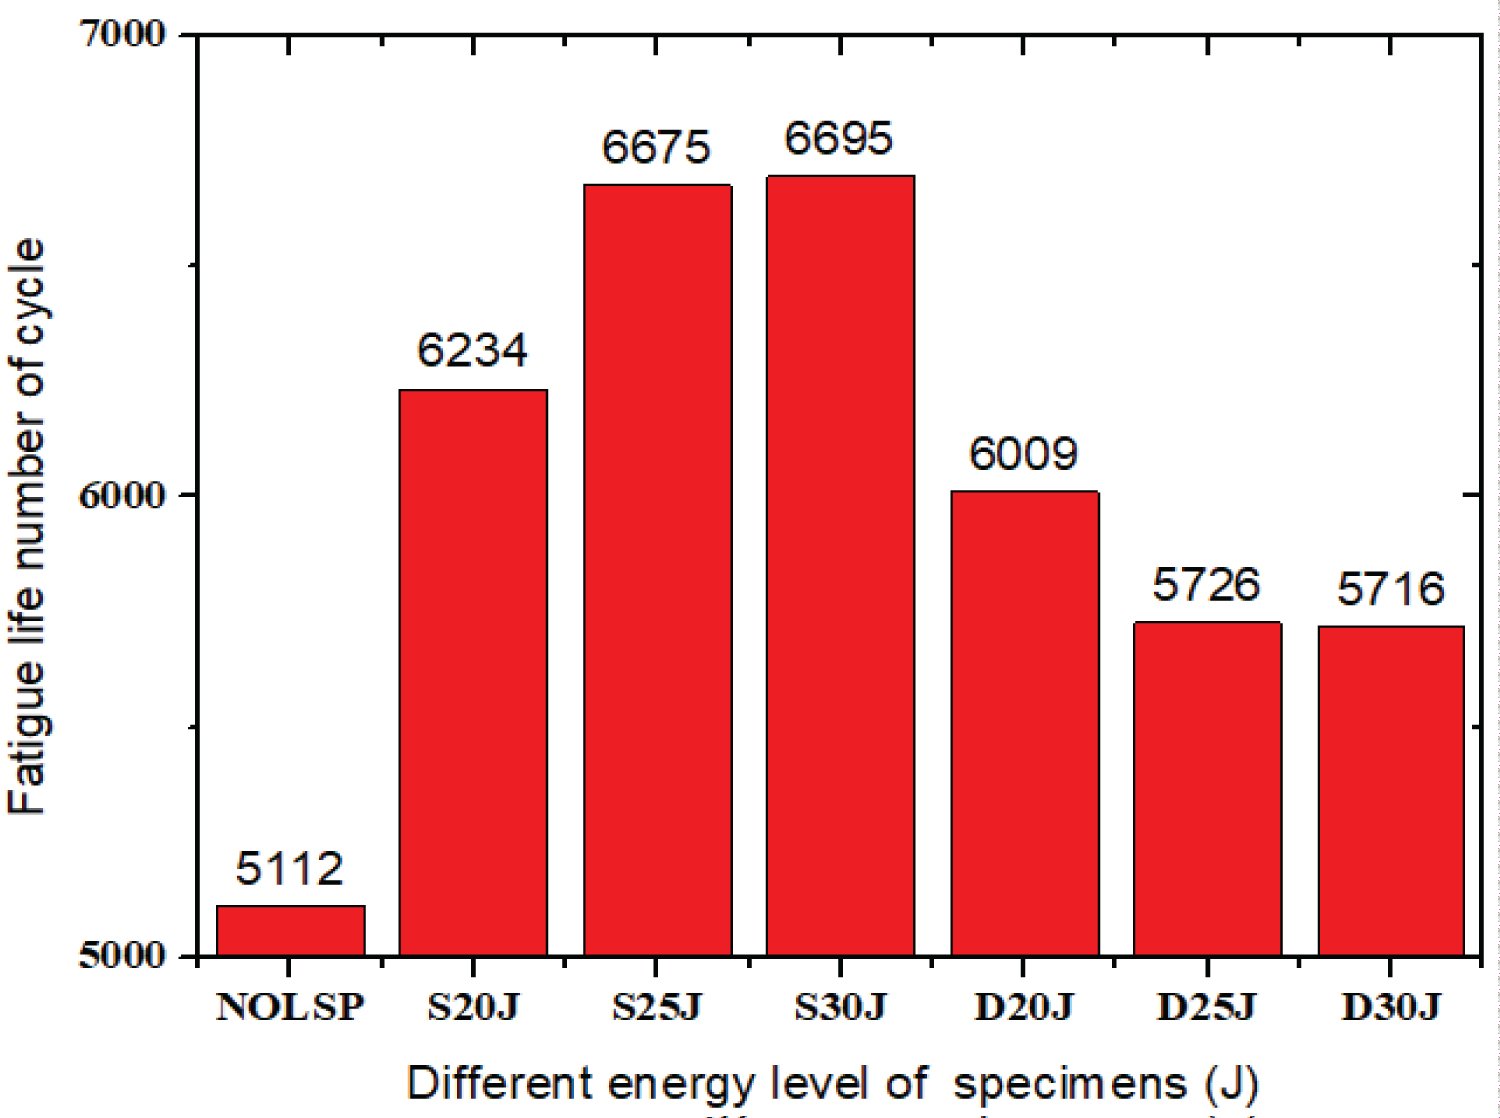
Figure 9: Fatigue life of specimens subjected ...
Fatigue life of specimens subjected to different LSP processes.
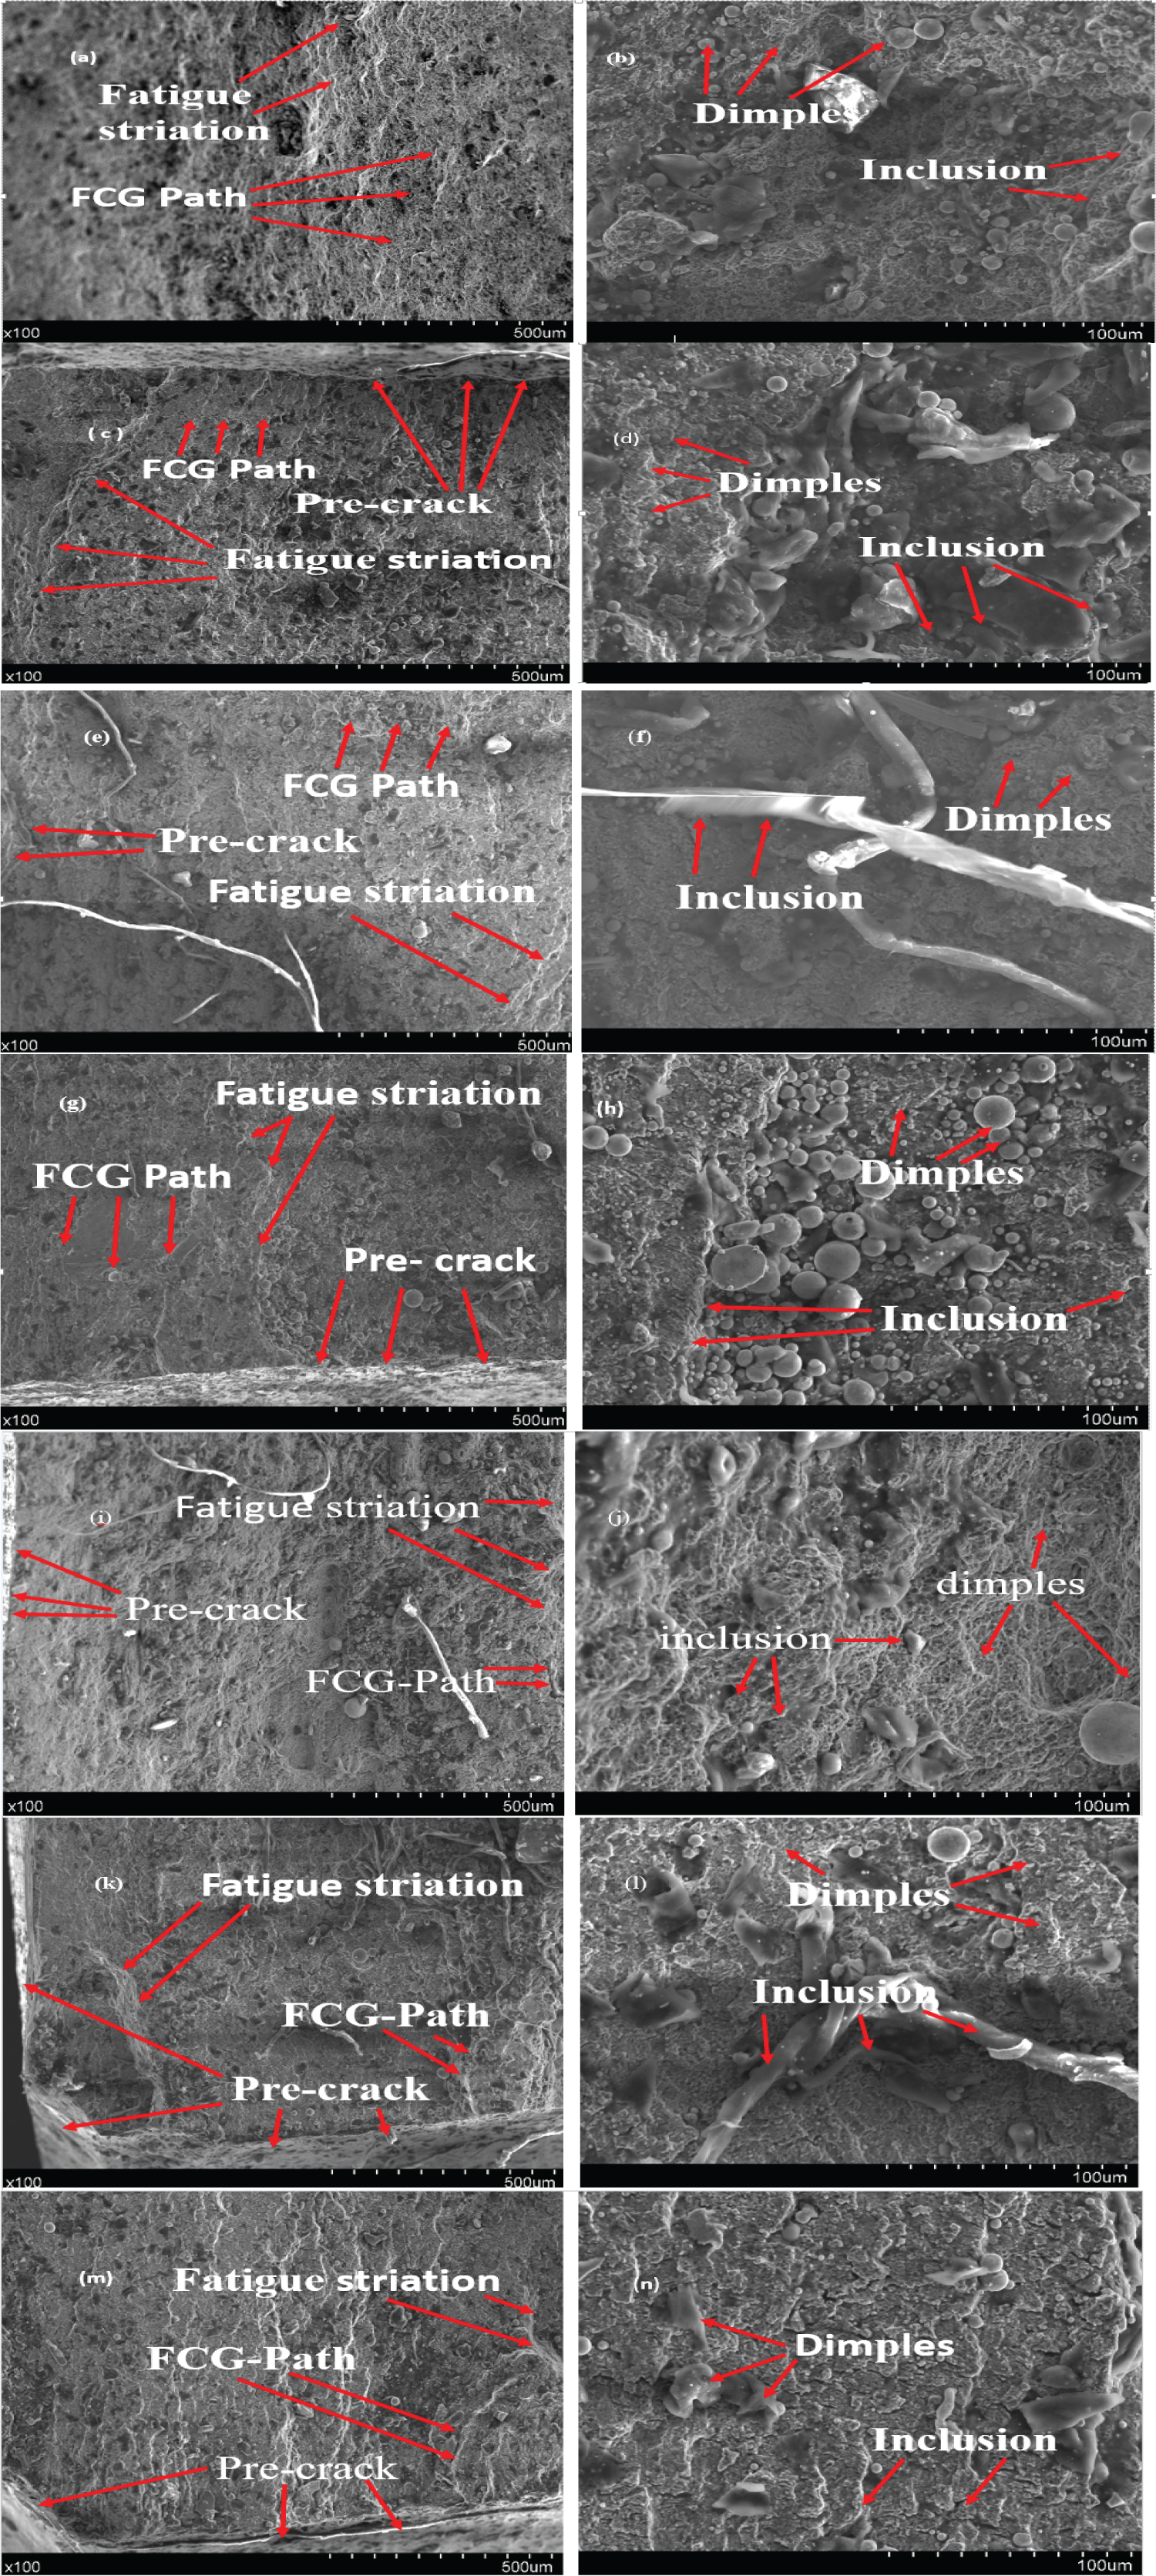
Figure 11: Morphologies of FCG region on AHSS-DP...
Morphologies of FCG region on AHSS-DP 350/600 specimens: (a) Without LSP magnified image of (b), (c) S20J magnified of (d), (e) S25J magnified of (f), (g) S30J magnified of (h), (i) D20J magnified of (j), (k) D25J magnified of (l), and (m) D30J magnified of (n).
Tables
Table 1: Mechanical properties of AHSS-DP350/600.
Table 2: Chemical properties of AHSS-DP350/600.
Table 3: LSP parameters of AHSS-DP350/600.
References
- Forget P, Strudel JL, Jeandin M, Lu J, Castex L (1990) Laser shock surface treatment of Ni-based super alloys. Material and Manufacturing Processes 5: 501-528.
- Montross CS, Tao W, Lin Y, Graham C, Mai YW (2002) Laser shock processing and its effects on microstructure and properties of metal alloys: A review. International Journal of Fatigue 24: 1021-1036.
- Gao YK, Wu XR (2011) Experimental investigation and fatigue life prediction for 7475-T7351 aluminum alloy with and wityout shot peeing-induced residual stresses. Acta Materialia 59: 3737-3747.
- Chakherlou TN, Vogwell J (2003) The effect of cold expansion on improving the fatigue life of fastener holes. Engineering Failure Analysis 10: 13-24.
- Huang Y (1991) A user-material subroutine incorporating single crystal plasticity in the ABAQUS finite element program. Division of Applied Science, Harvard University, USA, 178.
- Kysar JW (1997) Addendum to 'A user-material subroutine incorporating single crystal plasticity in the ABAQUS finite element program. Mech Report, Division of Engineering and Applied science, Harvard University, USA, 178.
- Kysar JW (2001) Continuum simulation of directional dependence of crack growth along a copper/sapphire bicrystal interface. Part I: Experiments and crystal plasticity background. J Mech Phys Solids 49: 1099-1128.
- Kysar JW, Gan YX, Mendez-Arzuza G (2005) Cylindrical void in a rigid-Ideally plastic single crystal. Part I: Anisotropic slip line theory solution for face-centered cubic crystals. Int J Plast 21: 1481-1520.
- Sathyanesan S, Kalainathan S, Sathya S (2012) Laser peening without coating on aluminum alloy Al-6061-T6 using low energy Nd:YAG laser. Optics & Laser Technology 45: 389-394.
- Montross CS, Brandt M, Swain MV (2001) Self-limiting hardness changes in laser peened 6061-T6 aluminum. Surf Eng 17: 477-482.
- Zhou JZ, Huang S, Sheng J, Lu JZ, Wang CD, et al. (2012) Effect of repeated impacts on mechanical properties and fatigue fracture morphologies of 6061-T6 aluminum subject to laser peening. Material Science and Engineering: A 539: 360-368.
- Lu JZ, Luo KY, Zhang YK, Sun GF, Gu YY, et al. (2010) Grain refinement mechanism of multiple laser shock processing impacts on ANSI 304 stainless steel. Acta Metall 58: 5354-5362.
- Roland T, Retraint D, Lu K, Lu J (2007) Enhanced mechanical behavior of a nanocrystallised stainless steel and its thermal stability. Material Science and Engineering: A 445: 281-288.
- Williamson GK, Hall WH (1953) X-ray line broadening from filed aluminum and wolfram. Acta metallurgrica 1: 22-31.
- Lu JZ, Luo KY, Zhang YK, Cui CY, Sun GF, et al. (2010) Grain refinement of LY2 aluminum alloy induced by ultra-high plastic strain during multiple laser shock processing impacts. Acta materialia 58: 3984-3994.
- Peyre P, Fabbro R, Merrien P, Lieurade HP (1996) Laser shock processing of aluminium alloys. Application to high cycle fatigue behaviour. Material Science and Engineering A 210: 102-113.
- Webster GA, Ezeilo NA (2001) Residual stress distribution and their influence on fatigue lifetimes. International Journal of Fatigue 23: S375-S383.
- Bussu G, Irving PE (1999) Fatigue performance of friction stir welded 2024-T351 aluminium joints. 1'st International Symposium on FSW, USA.
- Song PS, Wen CC (1999) Crack closure and crack growth behaviour in shot peened fatigued specimen. Engineering Fracture Mechanics 63: 295-304.
- Omar H, Jed L, Royce F (2007) Laser and shot peening effects on fatigue crack growth in friction stir welded 7075-T7351 aluminum alloy joints. Int J Fatigue 29: 421-434.
- Sadananda K, Vasudenvan AK (2005) Fatigue crack growth behavior of titanium alloys. Int J Fatigue 27: 1255-1266.
Author Details
BAIDOO Philip1,2*, WANG Yun1, Nyaaba Nsoh Stanislaus2, Nworu Chibudo Kenneth2, KWABENA Offeh Gyimah2 and JAMES Kwesi Quaisie1
1School of Mechanical Engineering, Jiangsu University, China
2Faculty of Technology Education, Akenten Appiah-Menka University of Skills Training & Entrepreneurial Development, Ghana
Corresponding author
BAIDOO Philip, School of Mechanical Engineering, Jiangsu University, Zhenjiang, 212013, China; Faculty of Technology Education, Akenten Appiah-Menka University of Skills Training & Entrepreneurial Development, Kumasi, Ghana, Tel: +233-0-244162783.
Accepted: May 01, 2021 | Published Online: May 03, 2021
Citation: Philip B, Yun W, Stanislaus NN, Kenneth NC, Gyimah KO, et al. (2021) Exhaustion Life Influence in Laser-Shock-Peened and Gustoes on Fastener Hole of AHSS-DP350/600. Int J Metall Met Phys 6:068.
Copyright: © 2021 Philip B, et al. This is an open-access article distributed under the terms of the Creative Commons Attribution License, which permits unrestricted use, distribution, and reproduction in any medium, provided the original author and source are credited.
Abstract
Fatigue crack test was performed to evaluate fatigue behaviour in the metallic plates of AHSS-DP350/600. Since, this material is used in the automobile industry and enhancing its fatigue resistance is a challenge in material engineering. The stimulus of LSP of varied energies-vitalities on AHSS-DP350/600 was inspected and its improvement of material properties was the decisive objective of this paper. Measurement comparison of fatigue cycle behaviour, residual stress, observation of morphologies, impact hardness of fracture surfaces and XRD dimensions of different shocking energies level were performed on specimens with and without LSP. Moreover, the results indicated that the residual compressive stress can be inducted into the surface of the specimen with LSP energy pulse of 20J, 25J and 30J were 3.5, 3.1, and 2.5 times than that of the untreated LSP specimens. Again, LSP sample with pulse energy of S30J significantly revealed higher influence among other specimens and LSP was 12.5% higher than without LSP respectively.
Keywords
Fatigue crack growth, XRD, AHSS-DP350/600, Compressive residual stress, Fastener-hole
Introduction
The exhaustive properties of metals are of gigantic practical attentiveness as done 90% of automotive industrial structures eventually nose-dive due to exhaustion. However, the LSP is an influence of both inner and outward body layer treatment technique. To add up to the fatigue, properties of approximately metals and composites as investigated, [1,2]. LSP can pick up mechanical properties of the material, prolonging fatigue cycle life, rigidity and yield stress as compared with the local methods [3,4]. LSP brings enormity and deeper compressive residual stress (CRS) in the material outer body layer. Therefore, the restraint of resistance to stress and corrosion of the treated material fatigue was extended. Furthermore, micro-structures evolution induced by LSP, like grain sophistication and reposition density, increase. In studying the previous researches conducted, observation was made [5,6] that the classical mechanical properties behaviour of LSP specimens was improved [7,8]. This attributed to its contributions in prolonging fatigue life condition, expansion of hardness, fatigue cycle life and reduction of damage on outward body layer structure. After LSP has been intensively investigated on advance higher strengthen steel dual phase (AHSS-DP) 350/600 it confirmed that LSP-induced grain refinement increases the microhardness of the treated coating on aluminum Al-6061-T6 [9,10]. The treatment consideration of AHSS-DP350/600 plates with diverse pulse energies levels of both shocked on single one sided and double two-sided LSP of energy 20, 25 and 30. Single one-sided shocked represent S20J; S25J; S30J and single double-sided shocked are D20J; D25J; D30J respectively. The spot size was 4 × 4 mm2 with spot spacing of 3.4 mm, the pulse width of 15 ns, and fascinating layer of aluminum foil and water confining layer were used and laser densities of 12.5 gw/cm2 for 30J, 10.4 gw/cm2 for 25J and 6.25 gw/cm2 for 20J were used and studied.
However, the characters of fracture microscopic performances of this material when studying microstructure development under different in-depth, fatigue properties were revealed. It is crucial to obtained knowledge, that fatigue crack initiation (FCI) and FCG mechanism of LSP specimens are based on observation of fracture behavior of morphologies. Therefore, the authors examined the effect on LSP treatment on mechanical properties and fatigue life cycle, residual stress, fracture morphologies, and in-depth of hardness of fastener hole on AHSS - DP350/600 steel plates. This was subjected to LSP with different coverage energy levels and impacts revealed.
Experimental Procedures
Material and sample preparation
The automobile transportation industry, nowadays, highly uses AHSS-DP 350/600 plates of a good low-temperature impact, homogeneous microstructure, good cool forming performance, low ductile-brittle transition and finally good resistor to corrosion. The AHSS-DP 350/600 is used under a harsh environment of automotive industries and transportation platforms with its chemical composition and mechanical properties as shown in Table 1 and Table 2 are our priority of improvement.
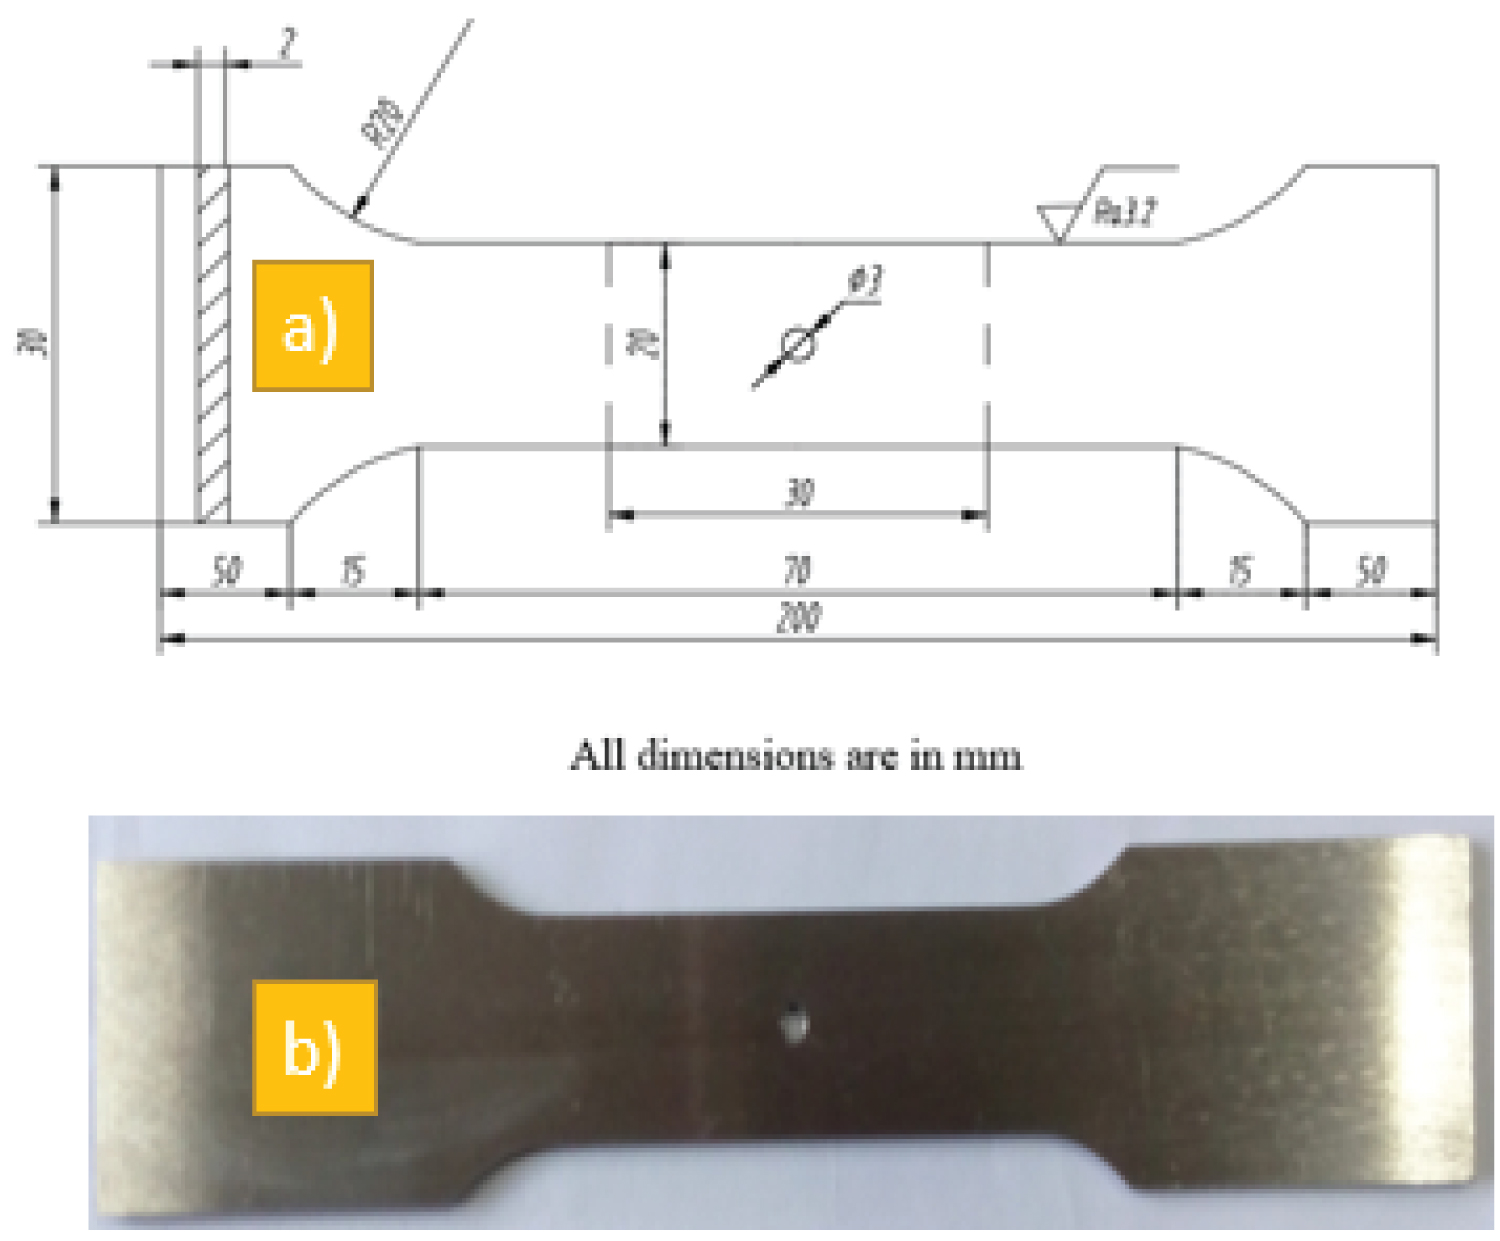
Enlightening fatigue possessions of AHSS-DP 350/600 theatres a vital role in lengthening material service life. The LSP is a novel and anti-fatigue technology for a betterment expansion of metal life and cycles Table 3. According to GB/T6398-2000 standard and experimental revelled conditions on the fastener hole specimens, which were prepared with the dimensions shown in Figure 1. However, to do a lookout on the upshot of LSP on the FCG rate on AHSS-DP 350/600, the situations of the LSP zone on AHSS-DP 350/600 were cautiously patent by marking pen input to extricate it from different zones handling. The fastener hole samples/specimens prepared procedures are shown as follow:
1. Cutting specimens at stated dimensions by electro-discharge machined (EDM);
2. Boring a-holes centre with a diameter of Φ 3 mm;
3. Grinding and polishing samples with SiC paper at different grades of roughness;
4. Cleaning samples in deionized water and saving in drying box;
5. Eliminating machined surface residual stress of fastener hole specimens by naturally ageing treatment for a particular interval of time.
Principle of LSP and experimental parameters
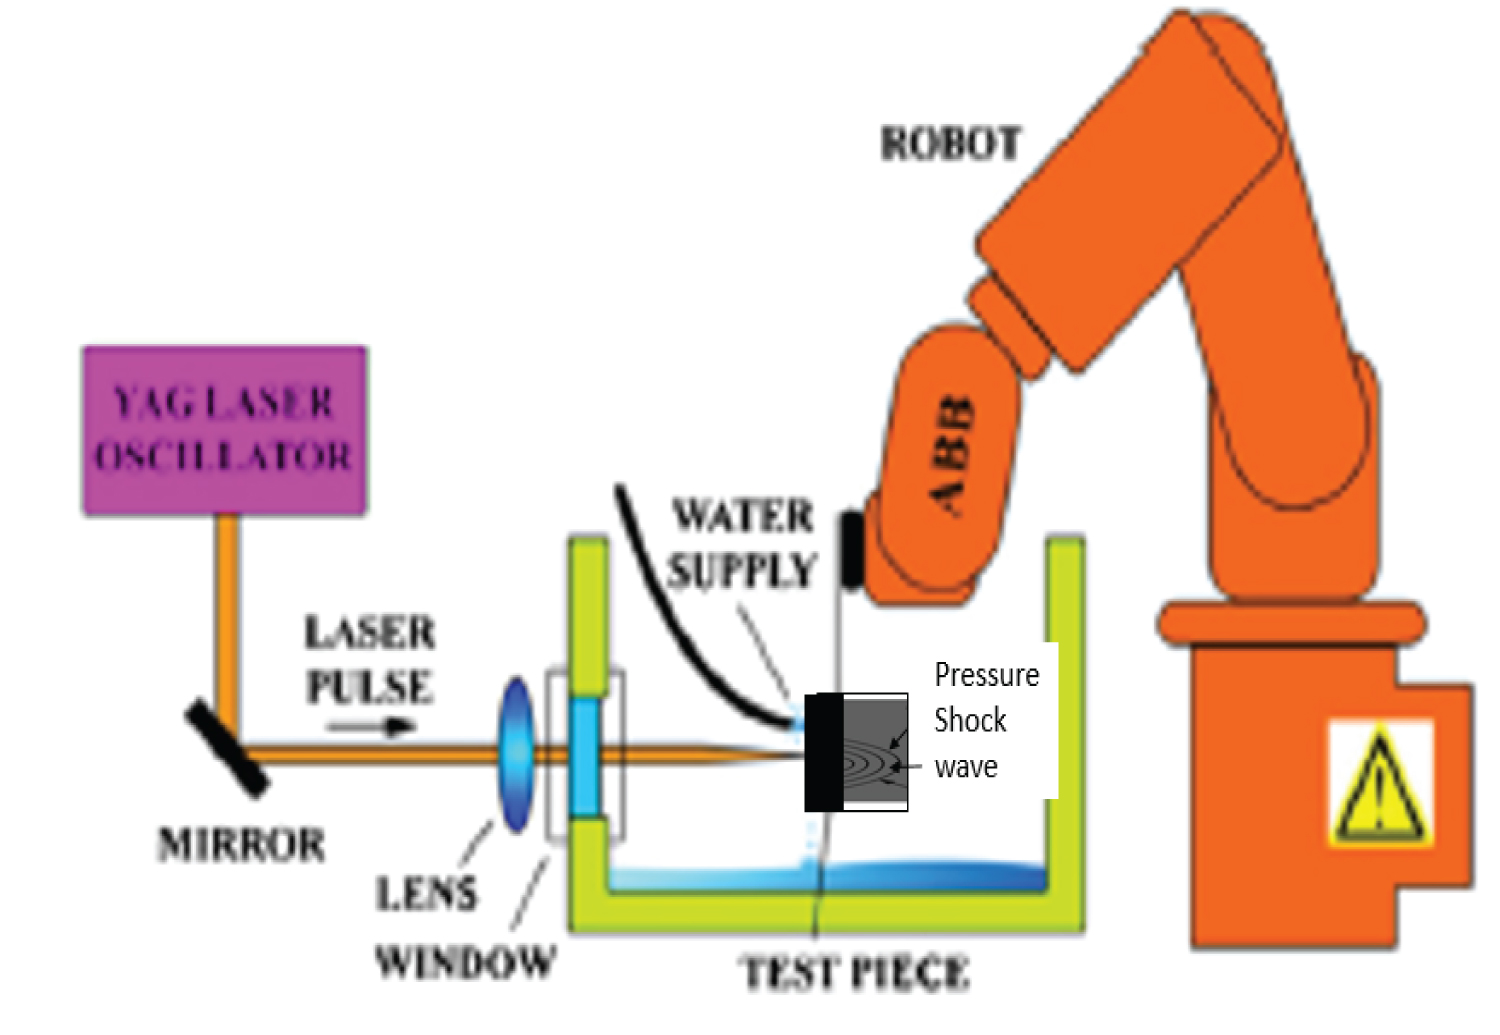
The LSP exploited a hefty energy pulses to hit the outer-body-layer of material and then formed plasma. The restrained plasma created a high surface pressure propagating into the material as a shock-wave. When the pressure shock-wave exceeded the go-ahead yield strength of the material, it produced a modification of plastic-state in the near-outward body layer and an adopted LSP principle shown in Figure 2. The gigantic LSP impacts in the treated zone of the fastener hole of AHSS-DP 350/600 were carried out using a Q-switched Nd: YAG (Neodymium doped Yttrium Aluminum Garnet) laser system and a numerical control workbench unit. And Shock was done on specimens as illustrated in Figure 1. All samples were sunk into a water bath processed by LSP. A water layer thickness of about 1 mm was used as the transparent confining and the professional aluminum foil, a thickness of 0.1 mm, to protect the sample surface from thermal effect.
Measurements of residual stress
To measure the CRS of the specimen's manual, cleaning was done with ethanol to remove the sticky aluminum foil produced during LSP. All CRS measurements were determined by X-ray diffraction (XRD) with the sin2Ψ method. An X-ray tube with a chrome anode operated at 22.0 kV was used. The X-ray beam diameter and source were about 2 mm and Cr Ka ray. The feed angle of the ladder scanning was 0.5 s. The scanning starting angle and terminating angle were 163.00° and 148.00°, respectively. Measurement points were selected in an equal distance on LSP parallel to swept direction over the central hole. Each test point was detected three times on both sides.
Rockwell hardness test
This methodological test is among the effective and efficient indentation hardness tests used today. It measures the fracture that occurred on the material under test penetrated by an indenter. The force applied to the indenter at a rate on specific dwell time and material hardness measured was based on deeper of indenter at two periodic times. Hardness number in a formula yield value in a defined range of numbers of Rockwell hardness scale was given. The indenter was contacted with the material and an initial load of force was applied to the indenter. Force held constant to a period called dwell time and the depth of indentation was measured. After the measurement is done, more force is applied at a rate of a period to increase the applied force to maximize the increment as the major load. The force is held fixed for a particular interval of time, after that the additional force is taken out, which returns to the previous force level. In this paper hardness measurement of a force of 150 gf was applied for 10 s.
XRD test
The XRD pattern was recorded with Cu-Kα radiation at a frequency of λ = 1.5406 Å within a range of 2Ɵ from 5° to 30° at a speed of 5°/min. It resulted that, the high-pressure shockwave caused the plastic deformation and refinement of grains. In this study the consequence of LSP on the AHSS-DP 350/600, the XRD method used to worked various diffraction patterns by the untreated and treated LSP energies; NOLSP, S20J, S25J, S30J D20J, D25J and D30J specimens.
Fatigue test equipment
Fatigue tests were conducted on different settings of energy both single one-sided impact and single double-sided impact shocked specimens as against non-shocked on an electro-hydraulic servo control test machine in the same environmental condition, respectively. This experiment was performed under constant load amplitude of 18.2 KN, frequency of 3 HZ and a ratio of 0.1 in a normal room temperature, respectively.
Fracture morphologies observation
The fractured end of the bracken specimen's surface was cleaned with deionized water after the fatigue cycle test and kept for the normal dried system after being carefully studied. However, the fracture surfaces were observed by scanning electron microscopy (SEM, JSM-6490LV).
Results and Discussion
Residual stress
The LSP route induces high density, effective-distribution and fixed dislocations, which may cause lattice distortion and generate high amplitude CRS. Zhou [11] Morphologies of 6061-T6 aluminum of LSP Compared to non-LSP samples seem to 1-3 LSP impacts amplified by 18.1-59.1% and 7.3-99.4%. The CRS position on superficial outer-layer of the samples after LSP, and the value step-up with the increase of the impact numbers. The LSP in accordance with FCI transferring from the top outer layer to sub-outer layer and the distance from FCI to the top outer layer increased with a governed impact number. Luo [12] ANSI 304 stainless steel in conformity to multiple governed LSP impacts was investigated. The plastic strain-induced grain refinement technique of face-centred cubic (FCC) materials with lesser stacking fault energy was identified. However, this related to work on CRS distribution before and after LSP on the surface over the central-hole, which was performed and measured along the width direction of the specimens during the experiment. The results and distribution curve of the cross-correlation function with and without LSP were presented in Figure 3. Tensile residual stress generated during the fabrication process on the specimen surface before LSP course converted to CRS after LSP.
From Figure 3, Figure 4 and Figure 5, the CRS magnitude increased with the increase of LSP coverage area. From Figure 4, the higher CRS of one-sided LSP on S30J was 161 MPa and followed by S25J of 150 MPa, S20J of 119 MPa and NOLSP of 22 MPa. From Figure 5 double-sided LSP on D20J gave as 100 MPa, followed by D25J of 88 MPa and D30J of 52 MPa. From Figure 3d CRS on one-sided shocked S30J of 161 MPa of a peak paths value from 1-4 of 108, increased to 854, and decreased to 830 and 746, while Figure 3c S25J gave CRS of 150 MPa as second higher and its peak paths value was 881 went down to 796 and went up again to 806 and 826. Figure 3b S20J gave CRS of 119 MPa and peak path value of 114 went up to 779 and 808, dropped to 715. Figure 3a NOLSP CRS of 22 MPa gave peak path value of 811 decreased to 731, 729 and 760.
Double-sided shocked from Figure 3e D20J of the CRS of 100 MPa peak path value 1-4 was 112, increased to 831 and dropped to 807 and 746. From Figure 3f D25J of the CRS of 88 MPa peak value, 1-4 was 881 decreased to 796 and increased again to 806 and 826. From Figure 3g D30J gave lower CRS 52 MPa after NOLSP, its peak path value started from 822 and reduced to 760, 741 and increased to 788. However, the growth of the outer layer of CRS tended to drench as the LSP paths which are relaxing. Although, there are differences in Figure 4 and Figure 5, the doubled shocked reacted its compressive stress that is why D30J values were greater than that of D25J and D20J respectively.
Hardness test
The fatigue life of fracture morphology of AHSS-DP350/600 relies near-by on the outward body layer manufacturing quality and resistance of metal/material to plastic deformation, usually by indentation. However, it may be temper or confrontation to scratching abrasion. It is the property of a metal that ability to relax and being undeviatingly deformed when the foreign load is applied. Therefore, the long span of the automotive industrial metal plate of AHSS-DP 350/600 for the comfortability, long life span and less cost-intensive is our optimal expectation.
An experimental test with and without LSP treatments was performed on sampled specimens of different energy levels comparatively. Figure 6 shows single one-sided and single double-sided pulse performances of microstructure under different depths result of hardness structure on the specimens with LSP and without LSP. It was indicated that specimen without LSP gave 69 HRB, and single one-sided of S20J gave 72.10 HRB, S25J gave 71.5 HRB and S30J gave 71.0 HRB. Also, for the single double-sided pulse of D20J gave 72.50 HRB, D25J gave 72.0 HRB and D30J gave 71.50 HRB, respectively.
However, it was revealed that D20J gave a higher result of 72.50 HRB and followed by D25J of 72.0 HRB, D30J of 71.50 HRB and without LSP specimen of 69 HRB, respectively. Again, for the single one-sided pulse, specimens revealed that S20J gave a higher hardness result of 72.10 HRB, followed by S25J of 71.50 HRB, S30J of 70.0 HRB and specimen without LSP repeated 69 HRB respectively. Moreover, LSP of D20J gave a higher in-depth hardness result of 72.50 HRB compared to single one-sided pulse of 72.10 HRB and without LSP of 69 HRB. This implied that the LSP pulse with the higher pressure plasma striation and its propagation regulation of a particular set of energy levels, had an influence on AHSS-DP 350/600 material properties which had contributed a lot to the unique arrangement of the bainitic-ferrite and martensite atoms-grain boundaries and strengthens improvement.
However, the supplementary particle borders the smaller the individual crystal grains, the harder the metal becomes because metals tend to fracture at grain edge-point. Increasing the number of grain boundaries not only expands the hardness but also makes bainite-ferrite more enclosed and well arrangement in a regular way of propagation and striations. Besides, a piece of metal is made up of a large number of "crystal grains", which are regions of regularities.
XRD diffraction and phase analysis
XRD patterns of the samples revealed that no new peaks were formed after a series of shocks on the specimens. It was again observed that there was a non-phase transformation of the surface layer on AHSS-DP 350/600 by LSP. However, from Figure 7, it could be observed that the diffraction peaks of the treated specimens were broader than that of the untreated. The refined grains dislocation occurs as a results of high plastic strain deformation and micro-strain among adjacent peaks. An increment in micro-strain in the surface layer of the specimen increased in the crystal lattice distortion [13] as a result of the dislocation and multiplication after LSP. The atomic distance's' was altered as a result of the high strain plastic deformation by extremely shocked during the process. However, the brittleness influence level saw S30J eating among other LSP. The average grain size was determined from the full width at half maximum (TWHM) of Bragg diffraction peaks via standard Scherrer-Wilson and equation and Miller indices; [14] equation six (Eq. 6).
FWHM × cosθ = K × λ / D + 4 × ε × sinθ (Eq. 6)
Where,
D is the crystallite size, K is the shape factor of the lattice constant (K = 0.94), λ is the wavelength of the X-ray (λ = 1.5418 Å), ε is the microstrain; and θ is the Bragg angle.
The treated and untreated LSP samples have the same crystalline structure but the FWHM, Crystallite size, microstrain and dislocation density differed. As the energy increases from S20J, S25J to S30J average grain size decreases, but the micro-strain increased by the shocked, meanwhile, the D20J, D25J and D30J are a bit wayward. Throughout plastic deformation of austenitic stainless steels at room-temperature, the martensitic transformation occurs from the austenite phase. The structure observed in the diffraction-peaks consists of a mixture of chemical composite passes of AHSS-DP 350/600 which corresponds to and characterised by martensitic and austenite phases, respectively. However, the XRD patterns of AHSS-DP 350/600 samples in different states present a remarkable difference in intensity. The peaks of the treated sample are sharp, while the peaks of the untreated pattern exhibit a significant shortening that indicates a crystal size refinement. The grain refinement attributed high-strains during plastic deformation induced by LSP to the generation of dislocation lines [15]. The Figure 7 also showed that FWHM of (211) (311) (222) and (400) peak increased more after the treatment as against non-treated.
Fatigue test
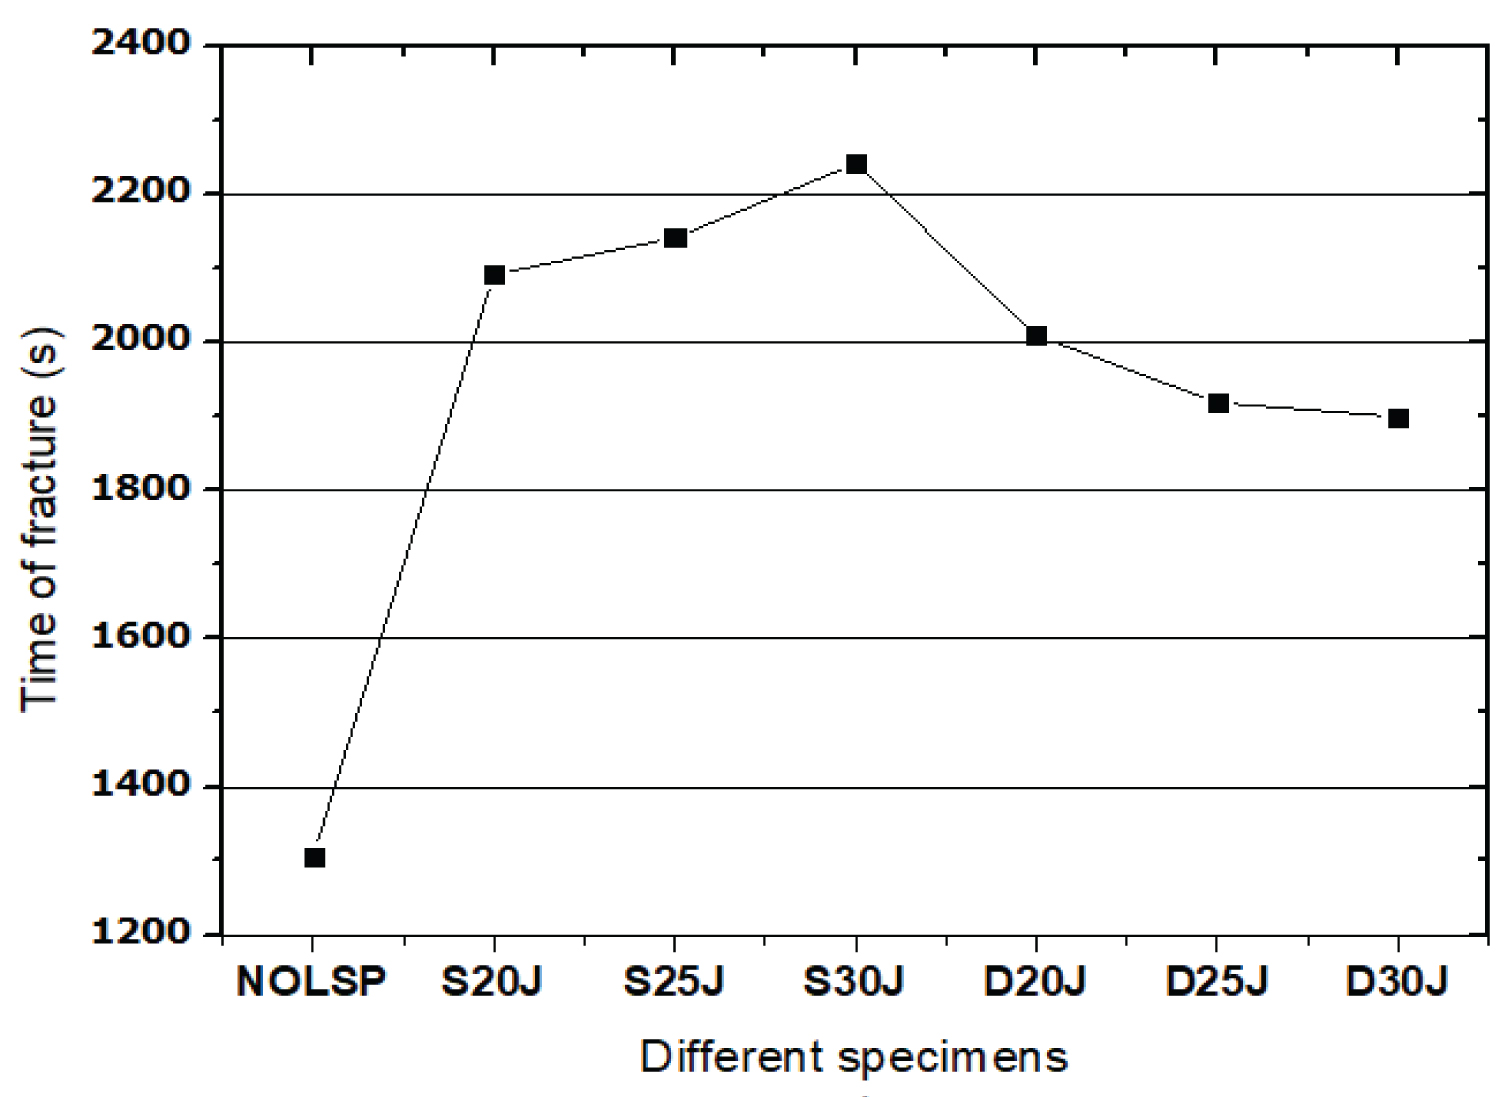
The specimens with and without LSP irradiating were tested under the cycle loading and finally broke into two pieces, as shown in Figure 8. The specimens had no phenomenon of drawing and necking down, which differed from tensile failure. However, fatigue life changes as a result of with and without LSP of different energies in Figure 9. The results were also compared to fatigue life cycle and time of failure/fracture of different specimens as indicated in Figure 10, respectively. However, from Figure 9 it is indicated that the specimen without LSP had a fatigue cycle to failure of 5112 as against those with LSP with diverse energies level and impact times of S20J, S25J, S 30J, D20J, D25J and D30J of 6234, 6675, 6695, 6009, 5726 and 5716 before, fractured respectively. The specimens processed with LSP indicated a higher increase in fatigue life span in terms of fracture when compared to without LSP sample. Previous research [2,16] has shown that the CRS resulting from LSP can be significantly higher comparatively. Therefore, the deeper the CRS, the longer the compressive stress will interact with the crack, resulting in a slower CGR rate and longer span fatigue life.
From Figure 10, it emphasized on cycle failure that specimen without LSP used 1305 seconds for fracture whiles that of S20J, S25J, S30J, D20J, D25J, and D30J indicated 2092, 2142, 2242, 2010, 1919, and 1900 second, respectively. In addition, Peyre [16] showed that very small surface gradients are found after LSP, while Webster [17] indicated that significant near surface stress gradients are produced by the LSP process. However, from both Figure 8 and Figure 9, it was clearly revealed that the higher the energy level regulated on fastener hole significantly higher fatigue cycle was S30J and followed by S25J, S20J, D20J D25J, D30J and without LSP. Therefore specimen with the LSP indicates about 12.5% increment of the fatigue life cycle as compared to without LSP, respectively.
Again LSP treatment appears to be a novel and an effective approach to increase the fatigue life of fastener hole edge 5 mm adjacent points were selected and regulation of the required energy used for processes and parameters selected is in vain and diverse ways. From Figure 3, it was indicated that for single double-sided specimens with LSP of higher roughness level was D30J (3.70 μm) and lower was D20J (3.10 μm), from Figure 4 despite D20J (72.50 HRB), D25J (72.0 HRB) and D30J (71.50 HRB) were among the higher in-depth level hardness of fastener hole, S30J was 70.0 HRB indentation. However, Figure 9 and Figure 10 indicated that fatigue cycle failure of D30J and S30J were significantly diverse.
It was noted that LSP specimens of D30J, D25J, and D20J (single double-sided shock peened) had cracks initiation at the edges, even though the edges of the specimen were rounded. Therefore location corresponds to a minimum hardness level as evident on the microharness and fatigue tests in Figure 4, Figure 9 and Figure 10. These data seem to confirm the results obtained by Bussu [18] on FSW 2024-T351. Peyre [16] indicated that cumulative LSP impacts on 7075 resulted in increased CRS levels in the superficial layers. The numerous LSP impacts contribute to local cyclic hardening. There is some extrusion of material differences at the edge volume after LSP treatment on the surface texture of specimen that contributes to the faster creak expansion that saw the speeding fracture of specimens of D30J, D25J and D20J due to its higher roughness values respectively. A study by Song [19] helped explain whether the improvement in fatigue was due to the crack closure caused by the CRS from the LSP. The results from [19] study revealed that strain hardening introduced by LSP of energy or energies was not the main reason for suppressing crack propagation in peened fatigued specimens of which the researchers are of a different view that is vice versa. It was postulated that crack closure was not the only cause for the CGR retardation. The specimens with different LSP energies process can influence microstructure which can contribute to earlier cycle failure indicated in both Figure 9 and Figure 10, therefore, LSP limitation is an effective surface treatment technique.
Morphologies test
From Figure 11 the fatigue life of specimens relies closely on the surface manufacturing quality. Under the cycle loading, the FCI always originates from the weak point of the specimens. LSP waves have a very higher intensity pulse width of 15 ns dozen of nanoseconds which generally cause the solid particles to generate some ultra-high strain rates under the action of the LSP waves. The AHSS-DP 350/600 have some special mechanical and physical characteristics of martensitic and bainitic ferrite which increase the hardness and strength of the structures [20,21].
The observation of the FCG paths, crack initiation always originates from a weak point, where the stress/strain concentrates and micro-forms progressively expand. The fatigue striation distance enlarged as the crack length increases and the FCI from these cracks grew until failure. The fatigue cracks narrow in the LSP specimens and the fatigue striation was very large in LSP specimens which indicated that the crack distance was small and that the LSP had inhibition effect on the material FCI and expansion. However, from the above the martensitic depend on both the stress intensity factor and the metallurgical factors such as the higher stiffness/rigid and anti-intrusion. Therefore, this shows that the overdue of stiffness by the energy level saw the ductility decreases with strength typically martensitic higher stiffness of a contributed factor of an earlier nano/micro port cracks at the edges of the hole. During fatigue cycle test due to the level of influence of LSP energy, its spot size and type as well as the thickness of the specimens contributed to the above results respectively.
Conclusions
The impact of double and single LSP of diverse energies of 20J, 25J and 30J were used on AHSS-DP 350/600 specimens to characterized and investigated. The fatigue cycles, residual stress, morphologies and microhardness tests were done on the specimens LSP treated and untreated. These tests were discussed and analyzed.
1) The CRS can be relaxed on the material surface which was subjected to LSP and valued in the spot center edge was sharp, tiny-declined and attributed to surface wave action.
2) The fatigue and XRD tests on LSP specimens revealed that its striation in specimens of diverse energies with and without LSP was higher but its limitation was an effective surface treatment technique.
3) The quality of surface treatment by LSP was improved. There was collectively changed of FCI surface and the fatigue striation spacing with LSP was little as compared to the totality of the fatigue striation garbs of the un-treated LSP which resulted in 12.5% improvement as compared to the untreated one significantly.
Acknowledgements
The financial support provided by NSFC (51575245) and the Key Project of Jiangsu Province (BE2015134) is, especially, acknowledged and also grateful to Priority Academic Program Development of Jiangsu Higher Education Institutions.


